iPhone gets minor design changes and feature improvements year on year which makes every new iPhone a little better than the last one. The iPhone 12 series has incorporated a lot of advanced features in the camera department that brings the image and video quality closer to the professional DSLRs. Even though the interface looks simple, you can change a lot of settings and use the iPhone 12 Camera app like a pro. We’re going to take a look at every camera setting, what it does, and how can we use it to capture better quality images and videos. Let’s begin.
iPhone 12 Camera Specifications
The iPhone 12 series has two different camera systems: a dual-camera system on the iPhone 12 and 12 Mini, and a triple camera system on iPhone 12 Pro and 12 Pro Max. I’m going to focus on iPhone 12 and 12 Mini in this article as I use the iPhone 12 Mini. The only features missing on this camera system are the ability to record 4K video at 60FPS and support for Apple ProRAW for pictures.
- Primary Camera Sensor: 12 MP, f/1.6, with OIS
- Ultrawide Camera Sensor: 12 MP, f/2.4, 120˚
- Flash: Dual-LED, Dual-Tone
- Front Camera Sensor: 12 MP, f/2.2
Use iPhone 12 Camera Like a Pro
1. Precisely Control the Zoom
The Camera app on the iPhone has intuitive controls and you can seamlessly switch between the primary sensor and the ultra-wide sensor by tapping the zoom button. However, if you wish to precisely control the zoom, you can press and hold the zoom button to bring up the dial that would let you effortlessly zoom in and out. This also works while recording videos.

2. Instantly Record Videos
You can’t always have your iPhone recording videos all the time but you can reduce the time it takes to start recording. Usually, you open the Camera app, turn to the video mode, hit the record button, hit it again to stop and save the video. A better way to do this is by simply opening the Camera app and press and hold the shutter button or the volume down button to start recording and as soon as you let go, the iPhone stops recording and saves the video. It’s a much quicker and efficient way of capturing moments.

3. Capture Burst Photo
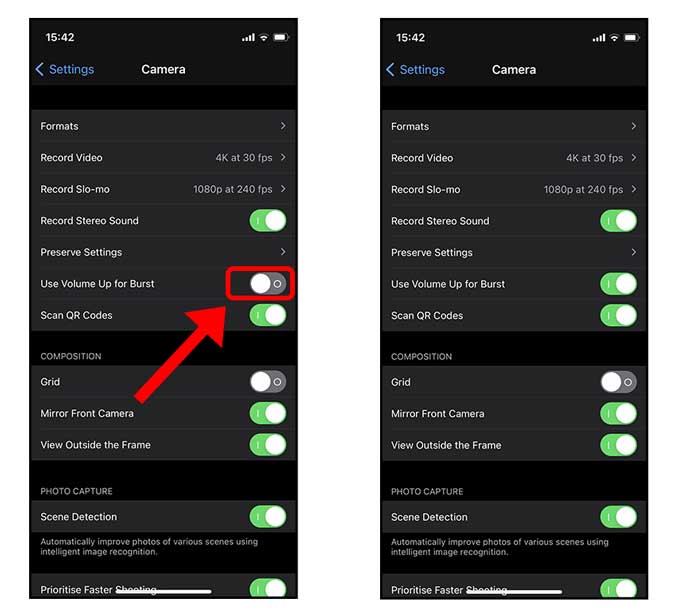
When capturing a fast-moving subject, professionals use a technique called burst to capture multiple images in one go that allows you to choose the best frame afterward. You can click a burst on iPhone 12 as well. You just need to enable it in Settings then use the feature in the Camera app. To capture a burst, open the Camera, press the volume up button to start the burst, and let go of the button to stop capturing.
To enable the burst option in Settings, open the Settings > Camera > toggle the Switch “Use Volume Up for Burst” on.
4. Adjust the Aspect Ratio of your Photos
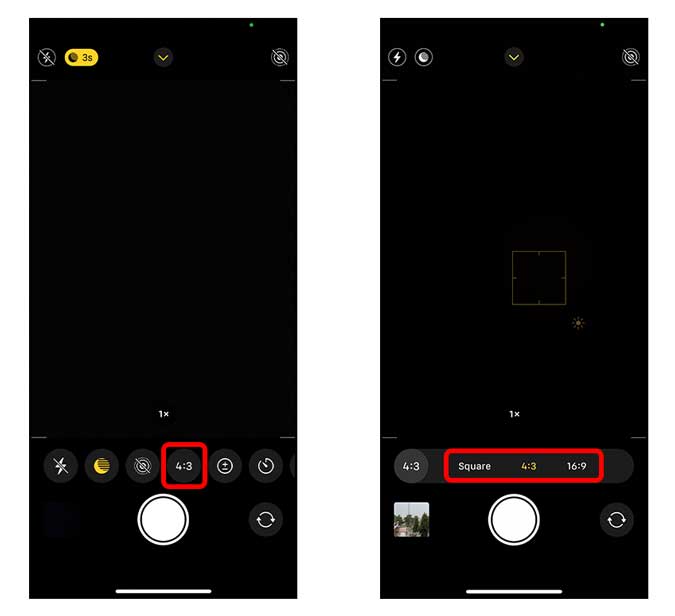
The default iPhone pictures are shot in a 4:3 aspect ratio but if you want you can change it to shoot in 16:9 or 1:1 which can save you some time in post-processing. Shooting images directly in those aspect ratios are easy. Simply tap the arrow button on the top to bring up the additional controls. Tap the Aspect Ratio button on the bottom row and select either of the available aspect ratios.
5. Adjust the Blur in Portrait Mode
Even though the Telephoto Sensor is missing on the iPhone 12, you can still capture portraits with varying degrees of blur in the background. Thanks to its computational prowess, the iPhone can simulate a blur in real-time. You can adjust the blur by sliding the Depth of Field slider that goes from f 1.4 to f 16. Simply put, the lower the f value, the greater the blur.
You can find the DOF button on the top right corner in the Portrait Mode. Tapping the button brings the slider to the bottom where you can slide around to adjust the blur in real-time.

6. Preserve Camera Settings
When you capture a photo or record a video and close the app, the Camera app opens on the default mode: Photo. This can be annoying because your creative controls are reset and you would have to adjust the aspect ratio, light, depth settings again. iPhone, however, offers an option to enable or disable saving these features in the settings. Open the Settings app, go to the Camera app, and tap Preserve Settings.
On this page, you would find four different toggles that you can enable to preserve settings. Enabling Camera Mode would open the Camera app in the last used mode. For example, if you used the Slow-mo mode last time, the Camera app would open in the Slow-mo next time. Enabling Creative controls would preserve aspect ratio, light, depth, and last filter.
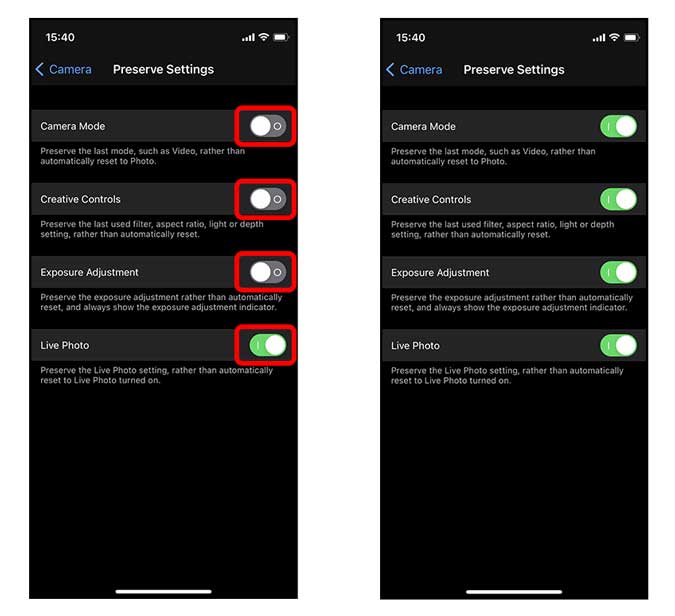
If you enable Exposure Adjustment, the iPhone would set the exposure to the last set value. Lastly, turning on Live Photo would allow you to preserve the setting which means if you turn Live Photo OFF in the Camera app, it would stay off until you turn it on again.
7. Adjust Video Resolution and Frame Rate
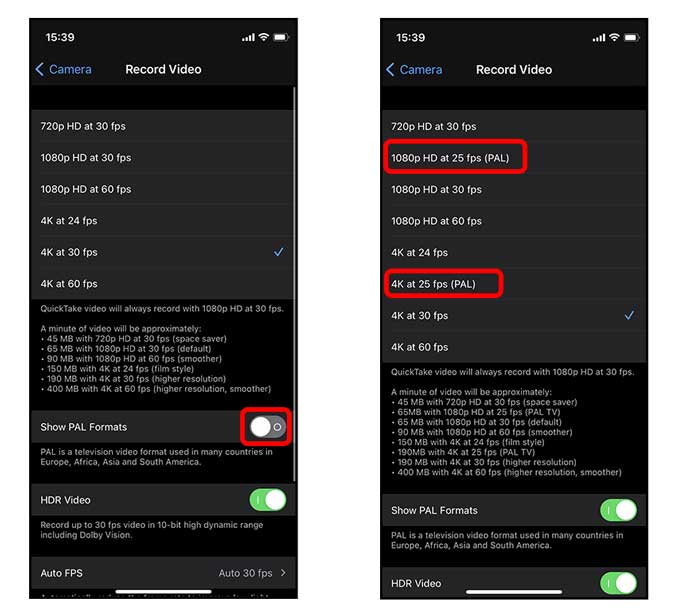
While the option to change the resolution and frame rate for videos exists right in the Camera app, there are more advanced controls in the Settings that allow you to record in different frame rates. To change the frame rate and resolution in the Camera app, open the Video mode in the Camera, and tap the button on the top right. Tap the left button to adjust resolution and the right button to adjust the frame rate.

iPhone has recently added the option to shoot in PAL format that is widely used in Europe, Africa, South America, and Asia. It allows you to record videos in 25 fps in 1080p and 4K. To turn it on, open the Settings app, go to Camera, tap Record Video, and toggle “Show PAL Formats” on.
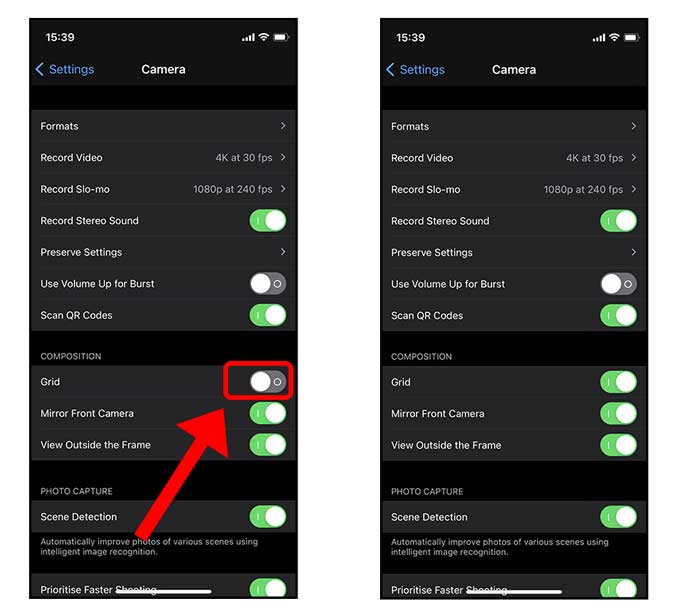
8. Shoot with Grids
Grids are super useful when capturing a photo or a video as it can help you align the horizon, shoot in thirds, shoot diagonally, etc. To enable Grids, open the Settings app, go to Camera, and enable Grids under composition.
9. Mirror Front Camera
Selfies are always finicky as it usually looks really different from the preview. It’s because we see a mirror view in the preview and when the iPhone captures a photo, it flips it again so that the image looks natural to others. You can choose to enable this feature in the Settings. In the Camera Settings, enable the toggle “Mirror Front Camera”.

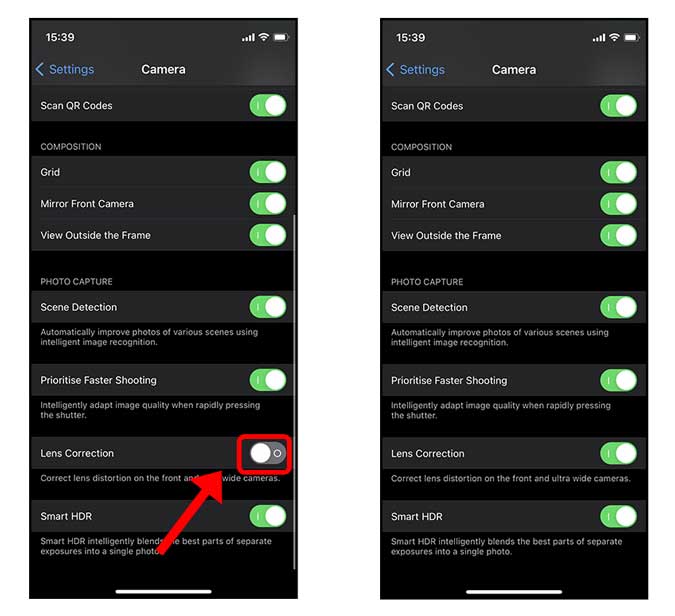
10. Disable Ultra-Wide Lens Correction
The ultra-wide sensor and the front camera offer a wider field-of-view that can sometimes make things look weird and distorted. To compensate, the iPhone 12 corrects it with the software but can sometimes make it worse. If you find ultra-wide images distorted like that, try disabling this option in the Settings. Open the Settings app, go to Camera, and disable Lens Correction.
How Do You Use the iPhone 12 Camera
These were all the iPhone Camera features and settings that you should know about. Along with the most obvious settings, I have also listed some of the lesser-known ones. You should also know that these can come in handy when you’re looking to up your mobile photography game. What do you think? Did I miss anything? Shoot me a tweet and let me know.