Microsoft has made several changes to its apps with Windows 11. One of these is the combination of the Snipping tool and Snip & Sketch. While the new tool combines features from both of them, it is still referred to as the Snipping tool. If you are curious about how to use the Snipping tool in Windows 11, we are here to help. Let’s get started.
Table of Contents
How to Take Screenshots Using Snipping Tool
The Snipping Tool allows you to capture screenshots in multiple ways on Windows 11.
1. Using App
You will find the Snipping tool under the list of apps on your Windows PC. Here are the steps to use it:
1. Open Search and type Snip. The Snipping tool app will appear. Click to open it. You can pin it to the Taskbar for quicker access.
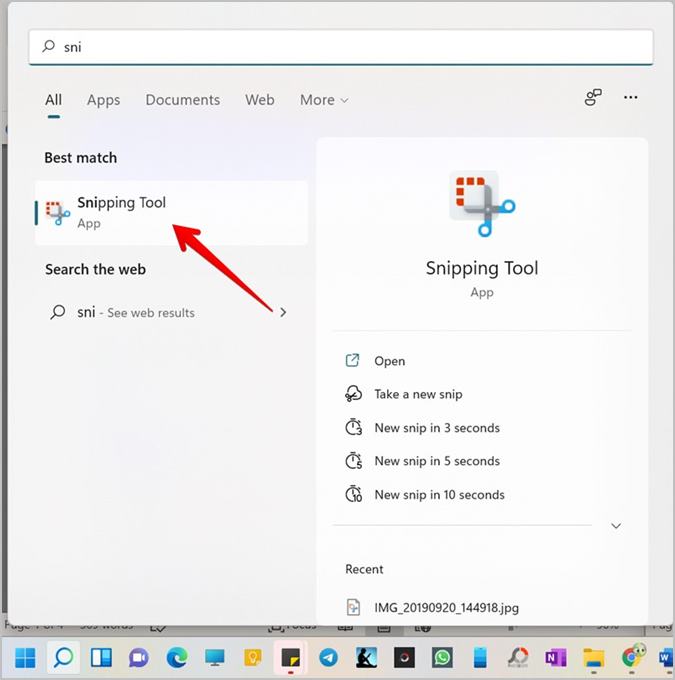
In case you can’t find the Snipping tool in Windows 11, install it from the Microsoft Store.
2. The Snipping tool window will appear on the screen. Open the app or the window that you want to capture. Click on the New button in the Snipping Tool.
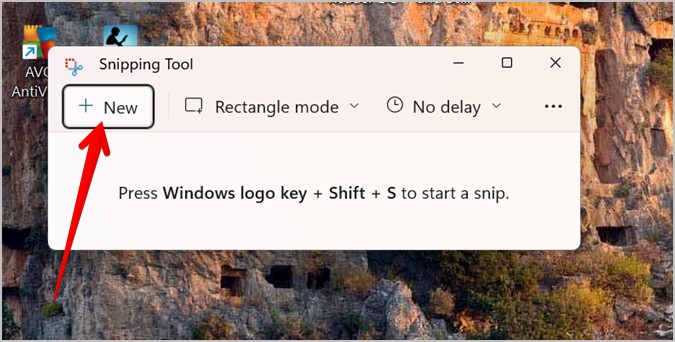
3. The screen will darken, and the snipping screen will open with four screenshot modes at the top. These let you define the area that you want to capture.

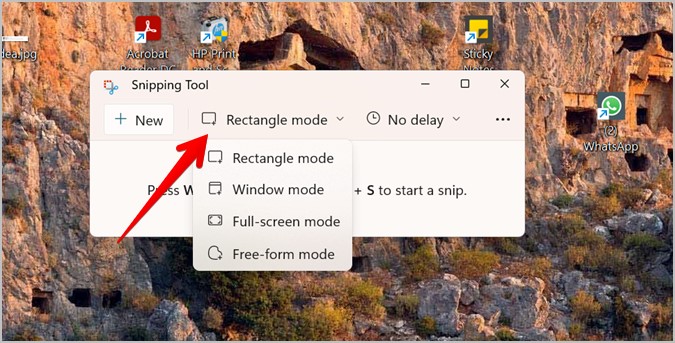
Rectangle mode: This is the first one and is selected by default. It lets you manually define the area to be captured in a rectangular form. Click on the screen and then drag the mouse to capture the required area.
Freeform Snip: This mode lets you define the area in a free-form manner. It doesn’t put any restrictions on the selection as the selected area can be of any or no shape.
Window: This mode lets you take a screenshot of any window on the screen. All you need to do is click on the window once and it will capture the screenshot with just the window in it.
Full-screen mode: Click anywhere on the screen to capture a full-screen screenshot using this mode.
Tips: Use the Tab key to navigate between these modes and press Enter to select a mode. Press the ESC key or click on the X icon next to the modes to get out of the snipping screen.
4. Once you capture a screenshot, it will automatically open in the Snipping Tool editing mode. We have covered how to edit and save screenshots in the Snipping tool below.

Change Default Screenshot Mode
In case you want to change the default screenshot mode for future screenshots, click on the Rectangle mode in the app and select the required mode from the list. When you click on the New button the next time, it will automatically open the new default mode.
Add Delay
By default, the screenshots are taken immediately after you select the required area. You can add a delay of up to 10 seconds before a screenshot is captured. This helps in opening the required app/screen or doing some task before taking a screenshot. To do so, click on the No delay button in the app and select the delay time.

2. Using Keyboard Shortcut
The Snipping Tool can also be activated via the keyboard shortcut. Press Windows logo key+Shift+S to open the screenshot tool. Please keep in mind that when you use the shortcut, the Snipping app will not open; instead, the screen will darken and you will be taken directly to the snipping screen. Select the required mode to capture a screenshot.
3. Using Print Screen
The above two methods might seem slow for capturing screenshots regularly. The best practice is to assign the Snipping Tool to the Print Screen key on the keyboard. Go to Windows Settings > Accessibility > Keyboard. Enable the toggle next to Use the Print screen button to open screen snipping.
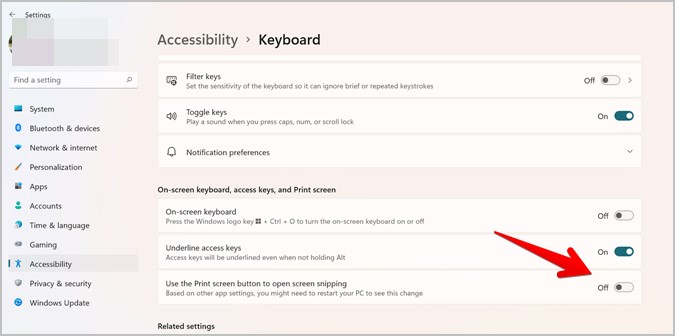
As a result, when you press the Print Screen key, it will immediately open the snipping screen where you can select between different modes to capture a screenshot.
Note: If you want to add a delay, use method 1 to capture screenshots.
Where Does Snipping Tool Save Screenshots
The screenshot is not automatically saved to your computer when using the last two methods. Instead, a notification will appear on your computer when you capture a screenshot. Click on it to open it in the editing mode of the Snipping Tool. If you don’t see the notification or you missed it, go to Action Center and look for the Snipping tool notification.
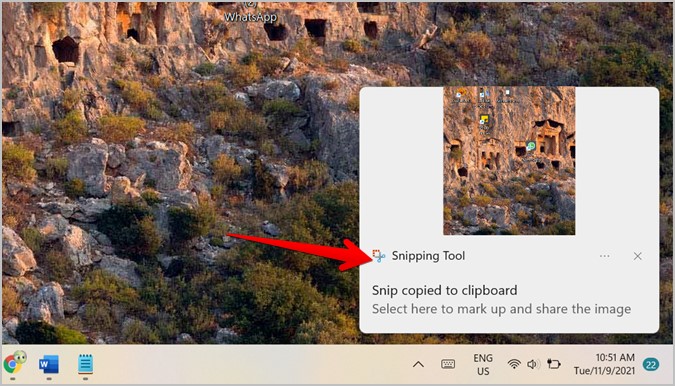
Furthermore, the screenshot is copied to the clipboard. You can paste it directly into any app of your choice, such as Paint, Word, Google Docs, and so on, without having to open it in the Snipping Tool first.
Tip: Check out more ways to take screenshots on Windows.
How to Edit Screenshots in Snipping Tool
You will find a number of editing tools in the top bar of the Snipping Tool. Let’s check how to use them to edit screenshots.
Draw on Screenshots
The Snipping app provides a ballpoint pen and highlighter tool to annotate on images. When the image opens in the Snipping Tool’s editing mode, click on the Ballpoint or Highlighter tool to activate one of them. Then start drawing/writing on the screenshot. Double click on the tools to adjust the pen size and color options.

Erase Annotations
To remove any drawings from the image, click on the Eraser tool and use the mouse/finger to remove annotations. To erase all the annotations, double-click on the Eraser tool and select Erase all ink.

Use Ruler and Protractor
The Snipping Tool doesn’t offer a native way to draw straight lines or circles. You can use the ruler and protractor tools for the same purpose. However, only one tool can be used at a time.
To enable the ruler, click on the Ruler icon in the menu bar. The ruler will show up on the image. To use a protractor, double-click on the Ruler icon and select Protractor from the menu.
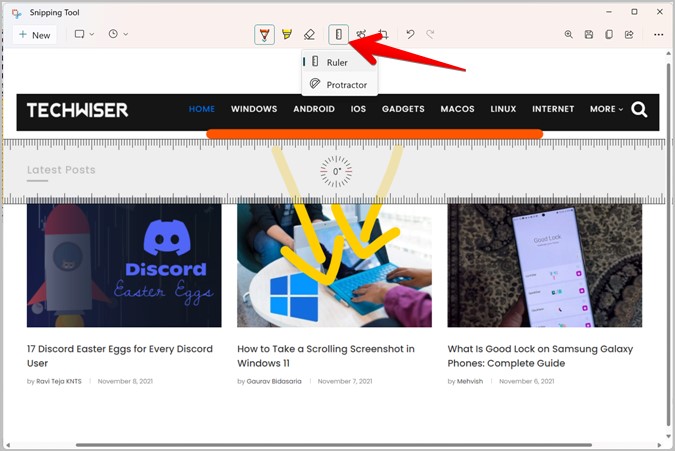
Drag the ruler or protractor to change its position. To change their angle, hover the mouse pointer over the tool and use the mouse scroll bar to change its angle. Use the pen or highlighter tool and draw along the ruler or protractor edges to get a straight line.
To hide ruler or protractor, double-click on the Ruler icon followed by clicking on the active tool. That will hide it.
Enable Touch Writing
If you have a touch-enabled device, click on the Touch-writing (hand) icon to activate touch writing mode. Now you can write on the image with your fingers.
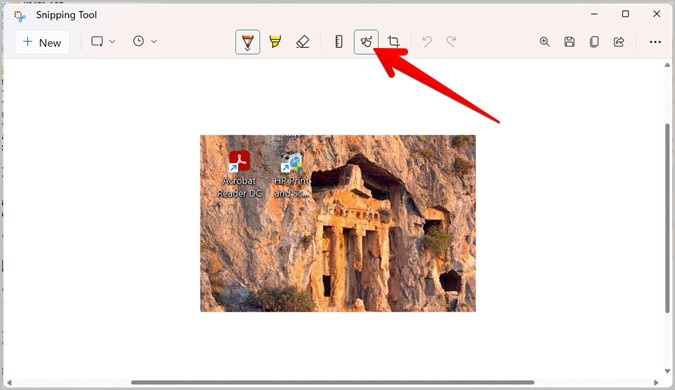
Crop Screenshot
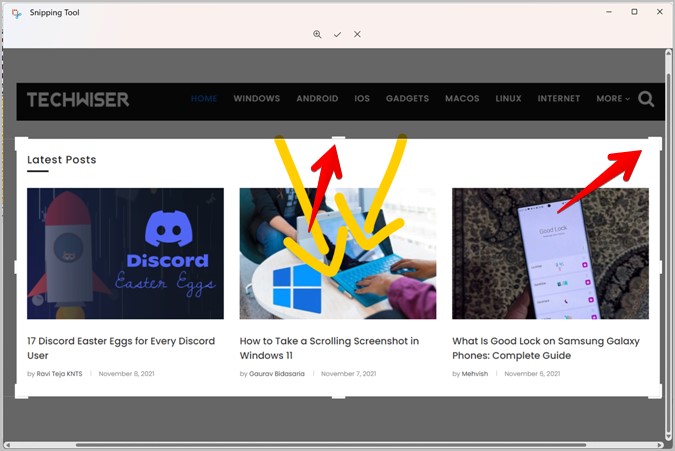
If you have captured an extra area in your screenshot, use the Crop tool to remove it. Click on the Crop icon to enter the cropping mode.

Select the required area by dragging the edges using white bars. Click on the checkmark icon or press the Enter key to confirm the selection.
Save Screenshot
Once you are done editing the screenshot, click on the Save button or use the Ctrl+S keyboard shortcut. The Save as window will open. Give a name to the screenshot and save it at your preferred destination.

Bonus Tips to Use Windows 11 Snipping Tool
1. Edit Old Screenshots
If you like the editing options provided by the Snipping Tool, it lets you import old screenshots or other images in the editing tool. Launch the Snipping tool app and click on the three-dot icon. Choose Open File and select the image that you want to edit.

2. Open Screenshot in Another App
You can directly open the screenshot from the editing mode in a different photo-editor app. For that, click on the three-dot icon in the Snipping tool and select Open with. Choose the desired app.

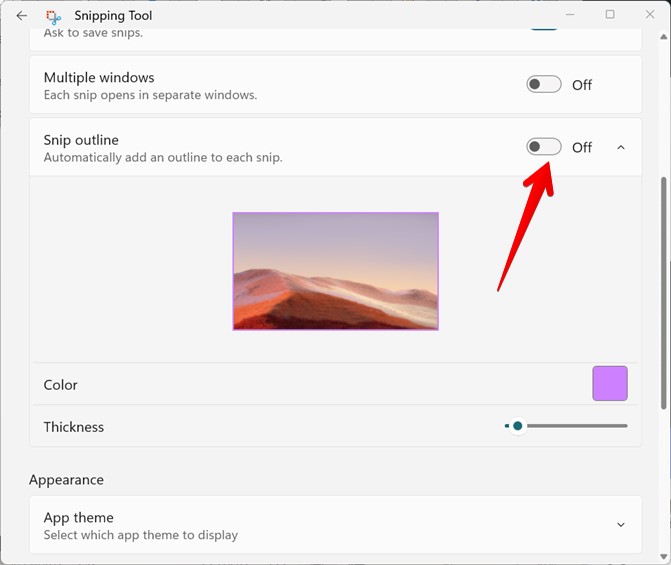
3. Add Outline to Screenshots
If your screenshots require a border, you can add them automatically using the Snipping Tool. Go to the Snipping Tool Settings from the three-dot icon and enable the toggle next to Snip outline. Also, click on the arrow next to the toggle to change the outline color and thickness.
4. Enable Multiple Windows
If you want each screenshot to open in a new window instead of replacing the existing screenshot in the tool, enable Multiple windows to toggle in the Snipping Tool Settings.

Do More With Screenshots
The Snipping Tool in Windows 11 is an amazing utility to capture and edit screenshots without any third-party apps. Sadly, it doesn’t let you capture scrolling screenshots. Find out alternate ways to take scrolling screenshots in Windows 11. Also, learn how to take a screenshot by including a mouse pointer and capturing a screenshot of the login screen.