In case you are planning to start vlogging or already have a vlog channel, a video editor is an important tool. Vlogging is an exhaustive task and unlike other editing work, you need a run-and-gun editor that can quickly do the job. So, what may be the best editor for other work might not be good for vlogging. So, with that out of the way, here are the best free video editor for vlogs on Android without watermark.
Best Video Editor For Vlogs
1. Magisto
Ideal For: Instagram Posts, Instagram stories, TikTok, etc.
If you have zero knowledge about video editing, Magisto is for you. It’s an AI-based video editor which allows you to choose a few clips, pick an editing style (love, holiday vacation, adventure, etc), and the app will generate a video for you.
Magisto is free but the free version is fairly limited. You get a bunch of free templates, up to 10 videos per edit, and maximum video size up to 1:15 secs. Moreover, you can only share your video on Facebook, YouTube, and Instagram. Although you can then download your video from YouTube, it’s an additional step. In order to remove these restrictions, you would have to upgrade to premium starting at $4.99/month.

Pros:
- Automatic AI-based editing
Cons:
- Video length cannot exceed 1:15 mins
- Limited social media sharing
- No export or edit option in the free variant
Download Magisto (Android | iOS)
2. Quik
Ideal For: Small format video editing for IGTV, TikTok, and action cam footage.
Quik is a video editing app developed by GoPro for editing adventure & travel vlogs. Unlike Magisto, Quik is truly free in terms of video duration, export methods, etc. It’s a minimal video editor that works similar to Magisto. You select your video files, pick a soundtrack and Quik will do the editing for you. However, unlike Magisto, Quik provides you the option to refine this automatic edit.
You get basic editing tools like cut, trim, change aspect ratio, filters, etc. You can also speed up or slow down your video clips. Quik also provides a huge library of background music. However, if you are monetizing and uploading your video on YouTube, refrain from using this music. A lot of users have posted about receiving copyright strikes due to the inbuilt music.

Pros:
- Quik automatic editing
- Basic editing tools like cut, trim, speed, filters, etc
- Huge set of music library within the app
3. Vita
Ideal For: TikTok, IGTV, Vlog Intros,
Vita is a new video editing app. The main highlight of Vita is video editing templates. As soon as you open the app, you’ll have a template tab at the bottom-right. It boasts a lot of templates created by users that range from Instagram, TikTok, Action, to YouTube intros. You just have to pick an intro, put in your clips, and get the desired effect. It’s really a cool way to get YouTube trailers, intros, and even short-format vlogs.
Apart from this, similar to Quik you get all the basic editing tools. Moreover, Vita boasts of a huge library of background music, text effects, fonts, etc. It’s more of a library of stock videos, photos, music which can also edit. The only problem with Vita that stops it from being a long-format video editor is the timeline. It can accommodate only clip at a time and that’s a real bummer for YouTube vlogging.
Pros:
- Doesn’t require sign-up
- Huge list of reusable video templates to create intros, vlog videos, etc
- Huge list of stock photos, videos, music, and fonts
Cons:
- Timeline is pretty basic and can have only 1 video layer at a time
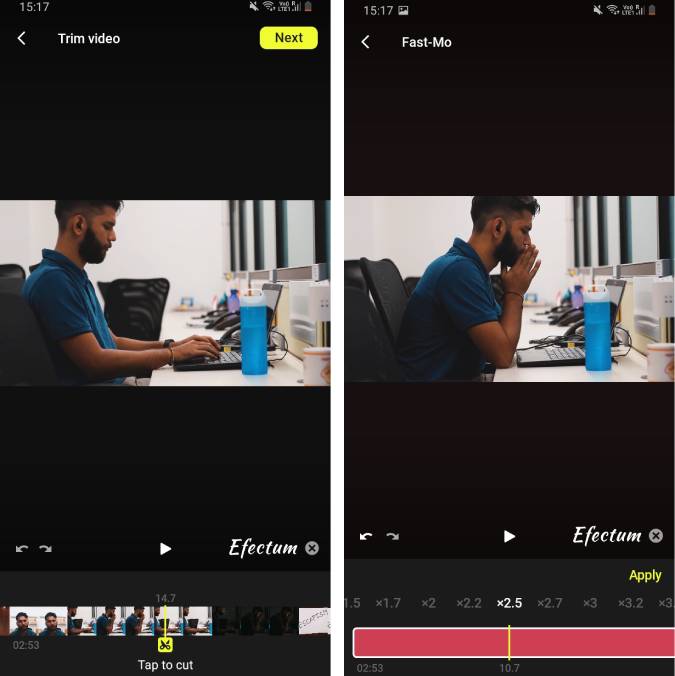
4. Efectum
Ideal For: Timelapse, Hyperlapses, slow-mo videos, etc
Timelapses are a great way to show the passage of time. For instance, a transition from night to the next day can be well shown off well with a sunrise timelapse or moonset timelapse. Now, there are 2 types of Timelapses – Hyperlapse and a normal timelapse. HyperLapse is basically a timelapse but with camera movement.
In case you are new to the world of timelapse, it’s hard to edit them in a normal video editor. Hence, you would need a special one like Efectum. You just have to upload the video, decide the speed (up to 10x) and export the video. My favorite option is the ability to speed-up and slow down footage at the same time. This really comes in handy when you have to speak within a timelapse and then continue it back again. Additionally, it also supports slo-mo, timelapse camera, reverse footage, etc.
Efectum provides a watermark on the footage but it can be easily removed by paying a one-time fee of $0.99.
Pros:
- Upto 10x speed up
- Timelapse camera built-in
- Additional options to slo-mo, reverse, speed ramp, etc
Cons:
- Watermark
- Lots of premium content on the home page
Download Efectum (Android | iOS)
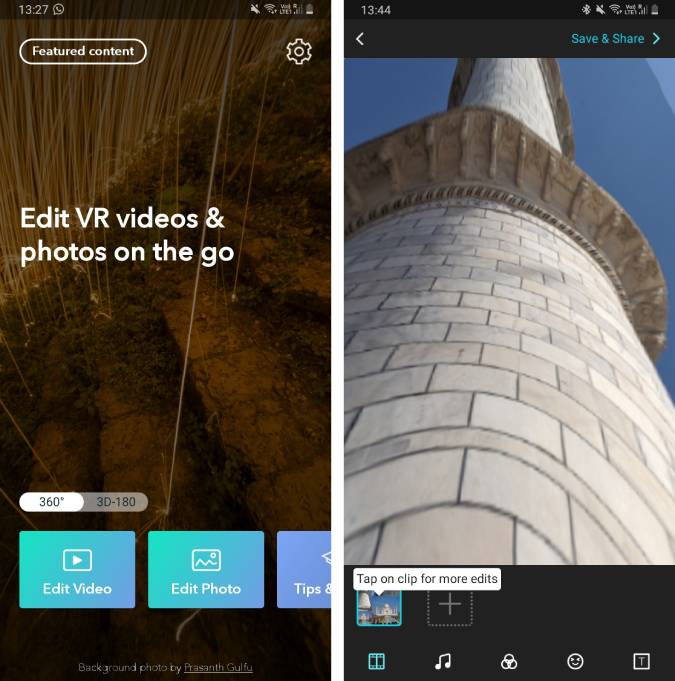
5. VeeR Editor
Ideal For: 360-degree video and photos
360-degree videos are quite a trend in travel and moto vlogs. In case you have a 360-degree camera, normal editors won’t be able to edit the footage for you. Instead, you would have to use a separate video editor like VeeR Editor. It’s a simple 360-degree and 3D 180-degree video and photo editor. You get the options to trim, speed up, and decide the orientation of the footage. Additionally, you can also add filters, stickers, and text to your footage.
VeeR Video Editor requires you to sign-in in order to remove the watermark.
Pros:
- Edit 360-degree or 3D 180-degree video and photo
- Change speed and orientation of the video
- Add filters, music, and text to your footage
Cons:
- None
Download VeeR Editor (Android | iOS)
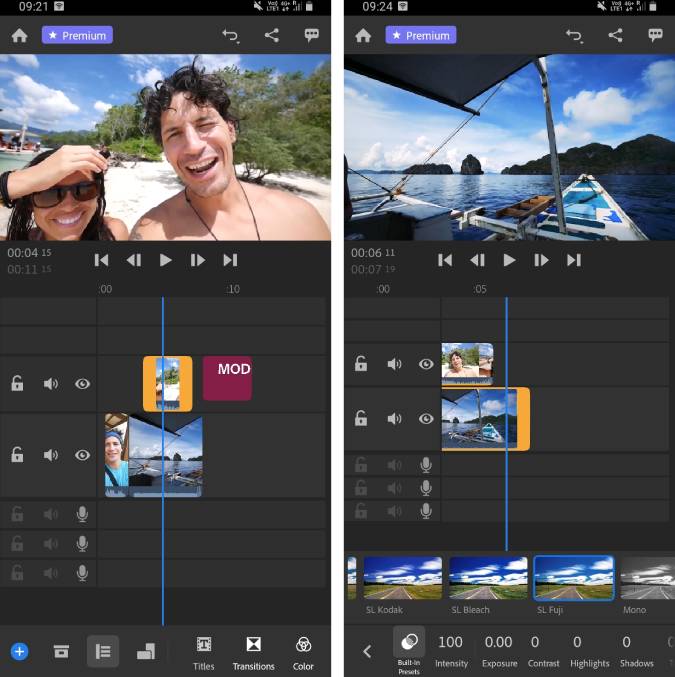
6. Adobe Premiere Rush
Ideal For: YouTube, complex video editing
In editing long-form vlogs or complex storylines, you need an advanced editor. Basically, you need an editor that can handle multiple video & audio layers stacked over each other. For instance, if I want to edit a portion of me climbing the mountain or a riding a bike in hilly areas, I would want wind noises, bird chirps, intense gripping background music along with my narration. So, you obviously need an editor that can handle that amount of clips simultaneously. Adobe Premiere Rush, hands down is the best one to do it.
Apart from the usual editing tools like split, join, crossfade, Rush also offers a few advanced editing tools. My favorite one is “speed ramping”. In case you have to slow down or speed up a long clip, it looks jarring if you just cut it and increase the speed. Speed Ramp smoothes this process by slowly ramping up the speed or slowing it down. The color grading and color correction tools are no match. You can also create your own color preset. This really helps if you often use the same color grade for all your clips.
Adobe Premiere Rush also has a premium variant starting at $5/month which provides 100 GB cloud storage, advanced audio editing tools, 4k export, etc.
Pros:
- Multi-layer video editing
- Color grading tools
- User designed presets to quickly color grade your footage
- Advanced editing features like speed ramping, audio enhancements, etc
- 2 GB of free Adobe cloud storage
Cons:
- Exporting is limited to 1080p
- Resource heavy
Download Adobe Premiere Rush (Android | iOS)
Closing Words
For an easier edit, you can choose anything between Quik, Magisto, and Vita. Adobe Premiere Rush is worth the time to invest if you are serious about video editing. Eventually, for more complex tasks and broader storytelling, you would have to move to desktop video editing apps and more likely you will find Adobe Premiere there as well. Hence, learning Premiere Rush would be better utilized.
For more issues or concerns, let me know in the comments below.
Also Read: 7 Places to Find Background Music for YouTube Videos For Free