Usually, we don’t see the mouse cursor randomly moving on the computer screen. However, when it does happen, it makes the computer harder to use, reduces productivity, and affects the gaming experience. To ensure your cursor problem is resolved as quickly as possible, we have compiled a list of the most effective solutions to prevent the mouse cursor from moving on its own on Windows 10 and 11 PCs.
Table of Contents
Before We Get Started
We would like you to try a few basic solutions before moving forward with advanced troubleshooting methods. Here are some of them:
- Ensure no dust particles are obstructing your mouse pad or sensor.
- Check the mouse for physical damage.
- Test your mouse on another PC or laptop.
- See if the USB port is functioning properly. If not, switch to another port.
- Check the battery health of your wireless or Bluetooth mouse.
- Restart your Windows PC.
- Check if your PC is not being accessed remotely. Search for apps like TeamViewer, Splashtop, or suspicious software on your PC.
1. Turn off the Internet Connection
What if your computer has been hacked, and that’s why your mouse cursor is behaving strangely? If you suspect that’s the case, try turning off the internet on your Windows PC. After that, if your cursor starts acting normally, check for malware, system logs, browser extensions, and network activity.
2. Have You Checked Your Power Source
If you plug your laptop charger into a bad power source like a train outlet, faulty UPS, or a damaged wall outlet, it might make your mouse cursor jitter. So, we recommend using your laptop unplugged. If that’s not possible, try switching to a different wall outlet or use an extension cord for your laptop or PC.
Additionally, you should also ensure that the charging cable is not damaged or that you are using an incompatible charger. This can also result in the mouse cursor moving on its own.
3. Are You Using a Gaming Controller
We have seen on multiple occasions that when a gaming controller is connected to a PC, it sometimes acts as a mouse and keyboard. If the same thing happens to you, try disconnecting your controller from your computer.
Furthermore, if you’ve installed a Steam app on your PC, it might cause your cursor to move on its own in Windows 11 or 10. You can follow the below steps to fix the issue:
1. Open the Steam app, click the Steam menu in the top left corner, and select Settings from the list.
2. Then, choose the Controller option from the left pane and hit the GENERAL CONTROLLER SETTINGS button.
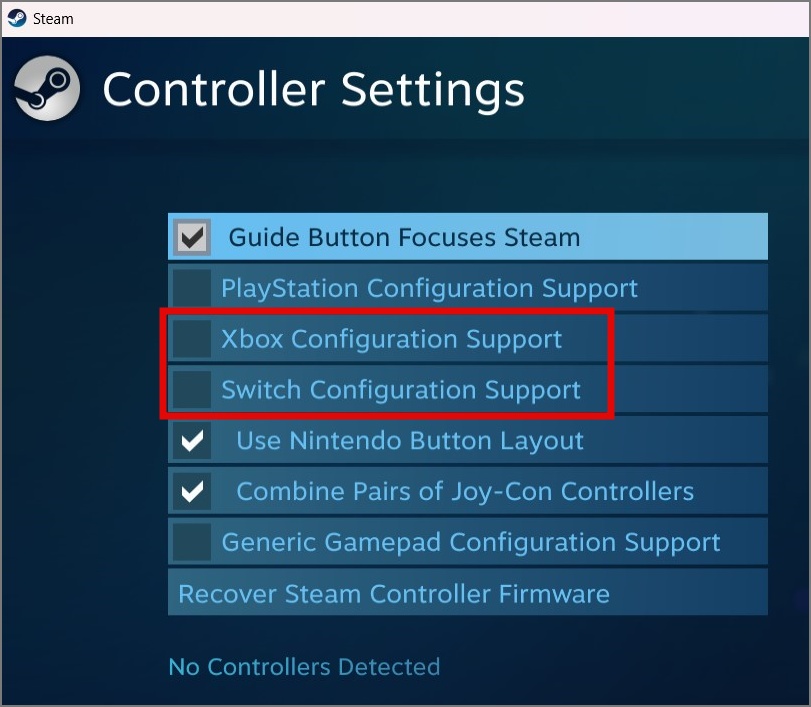
3. A new window will open and now uncheck the two settings – PlayStation Configuration Support and Xbox Configuration Support.
4. Disable Touchpad
While using the laptop, you may unconsciously touch the touchpad while using the keyboard, which could be the reason for the random cursor movement on the screen. To address this issue, disable the touchpad and use an external mouse. Here’s how to do it:
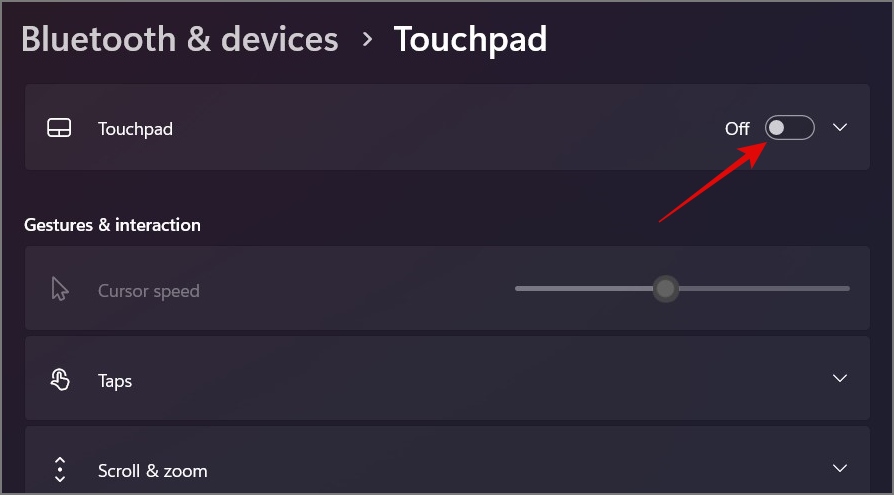
1. Press Windows Key + I to open the Settings app and then move to Bluetooth & devices settings.
2. On the right pane, select the Touchpad option.
3. Now all you need to do is disable Touchpad.
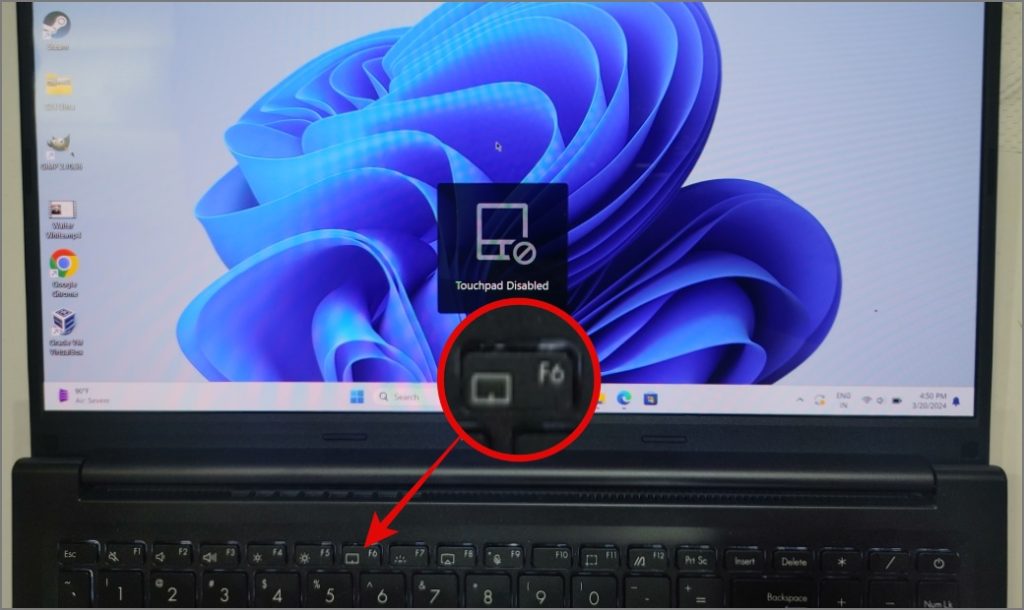
Pro Tip: Some laptops have a dedicated key to disable the touchpad easily.
5. Update or Uninstall the Mouse Driver
If the above methods don’t work out, you can try updating your mouse driver and see if it resolves the issue. Here’s how to do it:
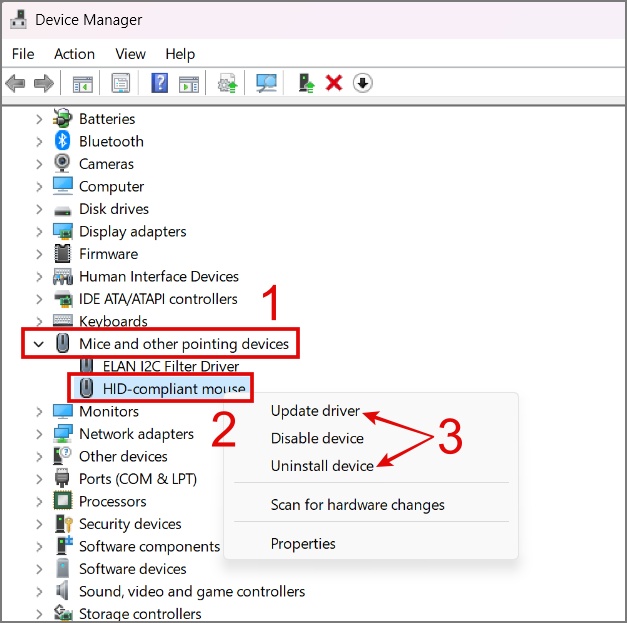
1. Right-click on the Start button and select Device Manager.
2. Expand the Mice and other pointing devices and right-click on the relevant driver.
3. Now, either choose the Update driver or Uninstall device option. If an update is unavailable, proceed with the uninstall device option. After restarting your PC, Windows will perform a fresh installation of the mouse driver, which may likely resolve the cursor issue.
6. Disconnect Other Interfering Peripherals
If you have multiple wireless devices, they can interfere with each other, and your wireless or Bluetooth mouse is no exception. Examples of wireless devices that can cause interference include Bluetooth speakers, Wi-Fi routers, and cordless phones.
For instance, many wireless mice and Wi-Fi routers use the 2.4 GHz frequency, leading to your mouse behaving abnormally. To identify the culprit, try switching off devices one at a time while monitoring your mouse cursor. If the culprit is found, you can take appropriate action. If not, you can try the next troubleshooting method.
Another way a device might interfere with the cursor is when multiple mice are connected to your computer. Many users prefer a wireless mouse while doing productivity work and a gaming mouse when playing games. So if you belong to this group, ensure that only one mouse is in use.
7. Check Your PC for Any Sneaky Malware
Your mouse cursor may also act erratically if your Windows system is infected with malware or has been hacked. To confirm that, disconnect your internet and run a full PC scan from any of your preferred anti-malware software. We recommend Malwarebytes.
You can also try a free Windows built-in malware scanner to eliminate the hidden viruses. Here’s a guide on it:
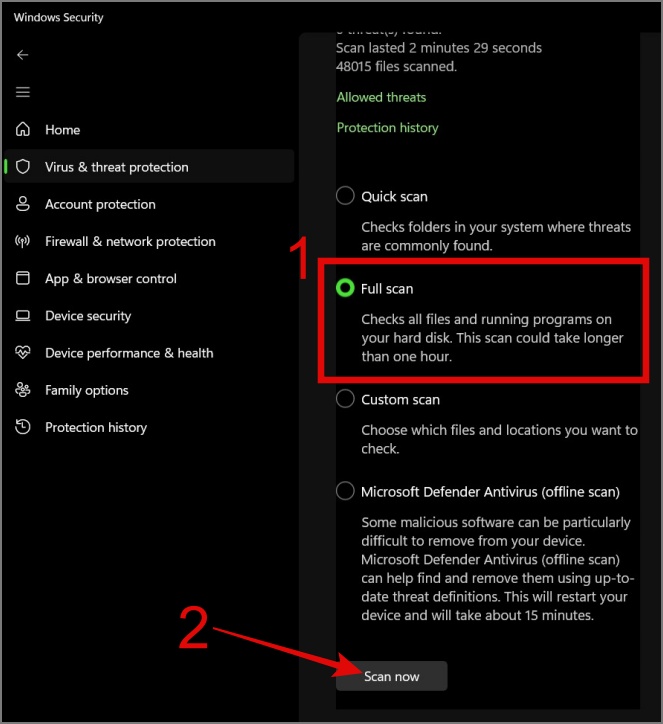
1. Click the Start button and search for the Windows Security app.
2. Open the app, navigate to Virus & threat protection, and click Scan options.
3. Now choose the Full scan option and hit the Scan now button.
If a virus is the main reason your mouse cursor is moving on its own, then reputable anti-malware software should be able to detect and remove any known viruses from your system.
8. Switch Back to Stable Version of Windows
We found numerous reports online of users experiencing issues with their mouse moving on its own. One common cause was using the insider build of Windows 11 or 10. If you’re currently using Windows Insider, it may be worth switching back to the stable version of Windows and see if that resolves the problem.
If that also doesn’t work, your last resort would be to reset your Windows computer.
Is Your Mouse Still Not Working?
Even after reaching this point, if your issue is still not resolved, it can be frustrating. But what if the problem is with your mouse altogether? Most of us opt for the cheaper mouse which often doesn’t have a long shelf life.
You can test your mouse by connecting to another PC. If it is working normally, then the issue is with your computer. If not, it’s high time you purchase a new mouse from a reputable brand like Logitech, Razer, Dell, HP, etc. Also, make sure after buying a new mouse, test it on multiple devices to ensure there is no fault in it and the mouse cursor is working as intended.