So you’ve logged in to your Mac and were about to join an important meeting or a class. And then you realize that the camera on your Mac is not working. Here is what to do when your Mac camera is not working. Let’s roll up our sleeves and get ready.
Table of Contents
1. Check Your Camera
The first obvious thing to check when the camera on your Mac is not working is to check it physically. Check if the camera is blocked or covered by anything. This is also a good time to clean the camera with a fiber cloth.
2. Check the Green Indicator
You can also check the green indicator on your Mac near the camera. Whenever you are using an app that accesses the camera on your Mac, the indicator will light up green. Open an app and see if the camera is working or not and at the same time, check if the indicator is lighting up or not. This will help you conclude if there’s any fault with the camera or just the indicator.
3. Camera Being Used by Another App
MacBook’s camera cannot be used by two apps at the same time. Check if you have any app or website open on Safari or Chrome that might be using the camera. If yes, quit the app or close the tab and then try to access Mac’s camera again.
4. Continuity Camera
Mac also allows you to connect and use your iPhone’s camera as a webcam. Apple calls it Continuity Camera. So if your Mac is connected to your iPhone, you won’t be able to use your Mac camera at all. Here are the steps to disconnect your iPhone’s camera from your Mac.
1. Go to your iPhone and just tap on Disconnect. And now you can use your Mac camera.

5. Restart Your Mac
Sometimes a small restart can fix a lot of small issues on your Mac. Here are the simple steps to restart your Mac if your camera is facing problems.
1. Click on the Apple logo in the menu bar to access the Apple menu.
2. Now click on Restart and follow the prompts to restart your Mac.

6. Allow Using Screen Time
One more way to fix the camera not working on your Mac is to allow it from the Screen Time. Are you or your parent using it to limit screen time? Let’s take a look at the steps to do so.
1. Open the Launchpad on your Mac and navigate to System Preferences and click on it to open it.
2. Click on Screen Time.

3. Click on Content & Privacy.
4. Then click on the Apps tab.
5. Click and allow the Camera from there.

7. Check Camera Permissions
If you mistakenly denied or have not enabled the camera permission for an app, it might also be causing the problem. Then giving that app camera permission can let you use your camera like normal. Here are the steps to follow.
1. Open System Preferences and click on Security & Privacy.

2. Click on the Privacy tab and click on Camera.
3. Enable the toggle next to the app in which you are struggling to access the camera.

8. Check Browser Level Permissions
Browsers like Safari and Chrome also need permission to access your Mac’s camera. Check whether they have proper permissions or not. Let’s take a look at the steps to do so on Chrome and Safari.
Chrome
1. Open the website on which you are trying to use the camera on the Chrome browser.
2. Click on the lock icon in the URL bar.

3. Now enable the camera and microphone from here to access the camera in the Chrome browser.

Safari
1. Open the website in Safari on which you are facing trouble accessing Camera.
2. Right-click on the URL bar and click on Setting for that website.

3. Click on Ask next to Camera.
Tip: You can also allow Microphone permission from here.

4. Click on Allow. And it should work like normal now.

9. Use Activity Monitor to Kill the Camera App
If the camera is not responding to any apps or browsers, you can try to kill it using the Activity Monitor app on your Mac. Here are the simple steps to follow.
Quick Tip: You can also try to quit the app in which the camera is not working and try to launch it again.
1. Open the Activity Monitor app on your Mac.
2. Search for “VDCAssistant” and “AppleCameraAssistant”.
3. Click on it to select it and then click on the quit icon.


4. Now click on Force Quit to quit the Camera.

10. Update Your Mac
One more way to fix your Mac camera not working is to update your Mac to the latest macOS. If there’s a software problem with your Mac’s camera, an update may fix it. Let’s take a look at the steps to update your Mac.
1. Open the System Preferences on your Mac and click on Software Update.

2. Click on Update Now to update your Mac, if there’s an update available.

11. Reset NVRAM (Intel Macs)
If your Mac’s camera is not working properly due to a hardware issue, resetting NVRAM can work in your favor. Resetting the NVRAM restores the default hardware settings and can help you fix your Mac camera not working. Here are the steps to follow.
Note: Resetting the NVRAM works only on Intel Macs.
1. Shut Down your Mac.
2. Turn on your Mac by pressing the power key.
3. Immediately press the Opt + Cmd + P + R key on your keyboard, hold it for 20 seconds, and then release it.

4. Let the Mac turn on, as the NVRAM has been reset.
12. Reset SMC
The SMC or System Management Controller manages power on your Mac. You can reset the SMC as it can help you with the camera issue on your Mac. But do note that resetting the SMC works only for Intel Macs. Let’s take a look at the steps to do so.
Note: If you own a Mac with Apple Silicon, Apple says that closing and opening the lid on your Macbook or restarting it can help. And to restart your Mac, click on the Apple logo > Restart.
MacBook
Let’s take a look at the steps to reset the SMC on a MacBook.
1. Shut Down your MacBook.
2. Press and hold Shift + Opt + Control keys on keyboard simultaneously. Meanwhile, press and hold the power button as well. Keep holding them for 10 seconds and release them.
Note: If you have a MacBook that has an Apple T2 security chip in it, hold the right Shift key on your keyboard. If it doesn’t have either Apple Silicon or T2 chip in that case, hold the left Shift key while resetting the SMC on your MacBook.
Tip: Find out if you have a Mac with the Apple T2 Security Chip.

3. Now turn on your MacBook by pressing the power key on your keyboard as the SMC has been reset.
Mac Mini or iMac
Here are the steps to reset the SMC on a Mac desktop.
1. Shut Down your Mac.
2. Unplug the power cord and wait for approximately 15 seconds and then plug it back in.
3. Once it is plugged back in wait again for 5 seconds, then turn it back on.
13. Run a Diagnostic Test
Whether it’s Mac fans running loud or the camera not working properly, running an Apple Diagnostic Test can get you a more detailed insight into what exactly is wrong with the hardware of your Mac. Once the test ends it will show you a reference code on the screen, you can look for more in the Apple Diagnostic reference codes to understand more about what that code means.
Tip: If Apple Diagnostic Test comes up with a problem that requires professional assistance, you should visit Apple Care to get it checked properly.
Tip: Find out if you have a Mac with Apple Silicon or Intel processor.
Run Apple Diagnostic Test on Mac With Apple Silicon
Here are the simple steps to run an Apple Diagnostic Test on a Mac with Apple Silicon.
1. Shut Down your Mac and ensure it is on a flat surface with good ventilation.
2. Turn on your Mac and continue to hold the power button and let your Mac startup.

3. Once you see the start-up options on the screen, release the power key.
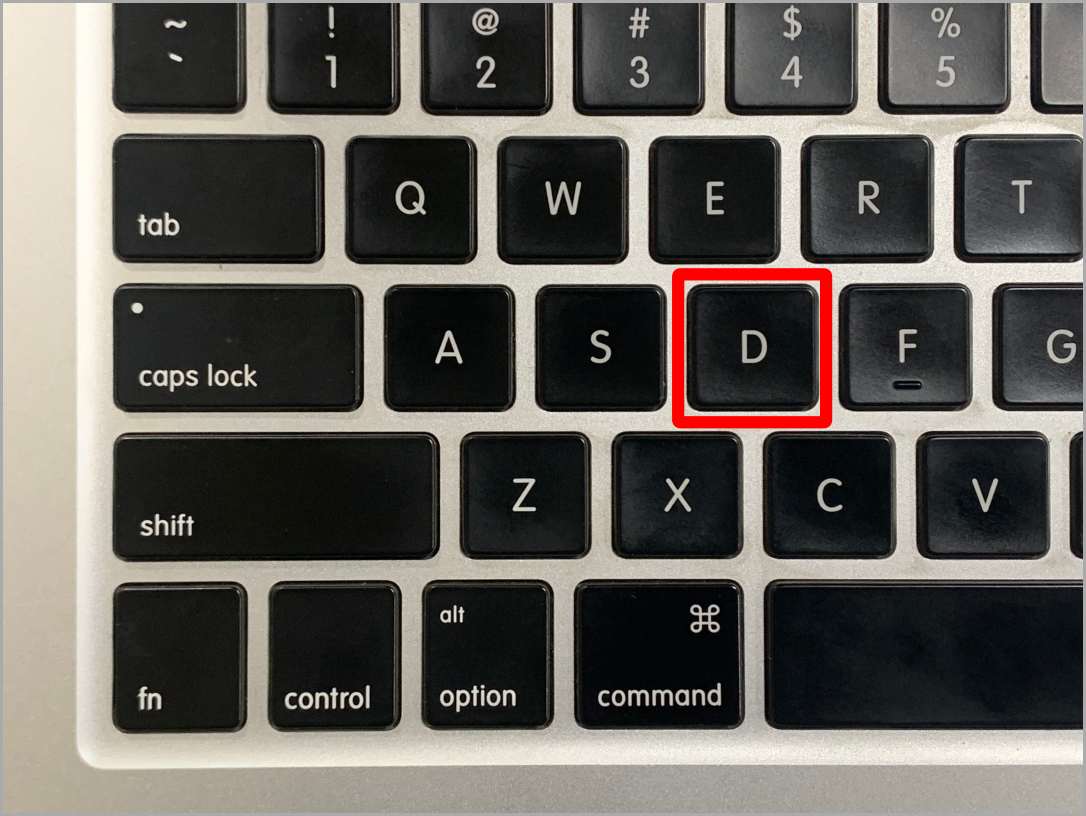
4. Press and hold Cmd + D on your keyboard to start a Diagnostic Test. And the Diagnostic Test will end with a reference code on the screen.

5. (Optional Step) If you want to rerun the Diagnostic Test, press Cmd + R, press R to restart, or press S to Shut Down your Mac.
Run Apple Diagnostic Test on Mac With Intel Processor
Let’s look at the steps to run an Apple Diagnostic Test on a Mac with an Intel processor.
1. Shut Down your Mac and ensure it is on a hard, flat surface and its vents are not blocked by anything.
2. Turn on your Mac by pressing the power key on your Mac.
3. Once the Mac starts to turn on, immediately hold the key D on the keyboard of your Mac.
4. Release it when you see a progress bar or a language selection prompt. And follow the on-screen instruction to run the test.
5. (Optional Step) If you are not satisfied with the result and want to rerun the Diagnostic Test, press Cmd + R, press R to restart, or press S to Shut Down your Mac.
Turn Your Mac Camera Back On
It’s always better to troubleshoot a problem on your Mac before you take it to Apple Care. By using these methods you can easily troubleshoot and fix the Mac camera on your own. And if still you are facing problems with the camera, going to professional care is advised. I hope this guide helped you fix the Mac camera not working issue.