Google Chrome remains one of the most popular desktop browsers even after tough competition from the likes of Microsoft Edge and Apple Safari. It has become more or less like an OS, where you can install themes, extensions, and apps. But with all these features and some bloatware, Chrome becomes sluggish. So here are some of the steps you can follow to make Chrome browser run faster.
Table of Contents
1. Check Your Internet Connection
Before you start cursing your Chrome browser, it’s best you check your internet connection. Sometimes even if we have a good internet connection, we may experience slow page loading. This mostly happens when multiple devices are connected to the same network.
Use SpeedTest, a free online tool, to test your internet connection speed.

Another reason why your Chrome browser might feel slow is when you’re connected to a public Wi-Fi network, which is often known for having slow internet speed.
Alternatively, if your existing internet plan comes with slow bandwidth, maybe it’s time for you to upgrade to a better plan that offers good internet speed.
2. Update Chrome to Latest Version
About every three to four weeks, Google releases an update for Chrome and sometimes, even a minor update can improve your browser performance. Generally, Chrome automatically updates itself in the background, but if you want to manually check for the latest updates, you can do so by following the below steps.
1. Click on the Kebab menu (three-dot icon) at the top right corner and then click on Settings.

2. On the left pane you will see a setting called About Chrome at the bottom. Click on it and it will automatically start looking for an update.

If an update is found, it will begin the download and installation process. Restart Chrome browser to finish the update. And even if the update doesn’t speed up your Google Chrome, you can still enjoy the latest security update, bug patches, and features.
It is worth noting that if you haven’t closed your Google Chrome for several days, you might see a small notification in the upper right corner of the browser, indicating the need for an update. The color of the notification will vary depending on how long it has been since the update was released:
- Green for two days
- Orange for four days
- Red for one week
Pro Tip: You can also type chrome://settings/help in the Address/Search bar to directly go to Chrome’s Update Setting.
3. Use Performance Mode
Like me, if you also have a habit of leaving tons of Chrome tabs open in the background, then this feature is just for people like us. The concept is simple: whenever Chrome notices that you are no longer using a tab for a while, it automatically freezes that inactive tab. This not only speeds up your browser but also saves a lot of your system resources and the laptop’s battery life.

By default, this feature is enabled in Google Chrome. But if you’re not sure, navigate to Chrome’s Settings, and on the left pane, you will see a tab called Performance. Make sure that Memory Saver is enabled and if you want to have any specific site remain active all the time, you can simply add the website URL by clicking on the Add button.
Alternatively, you can also use OneTab Extension, which is fundamentally similar to Memory Saver feature. The only difference is that instead of freezing all inactive tabs, it simply converts all of your tabs into a list. And whenever you want to access these tabs again, you can restore them individually or all at once. This will give your Chrome a massive boost in performance. Plus, your browser will not be cluttered with thousands of tabs.

To use OneTab Extension, all you need to do is click on the OneTab icon (located on your browser toolbar). After that, all your tabs will move to the OneTab page.
4. Remove Unused Extensions
Extensions are essential components of any browser, but they can also be one of the biggest culprits in slowing down Chrome. Maybe it’s time to streamline your browsing experience by removing Chrome extensions you no longer need or use. To do that, you can follow these simple steps:
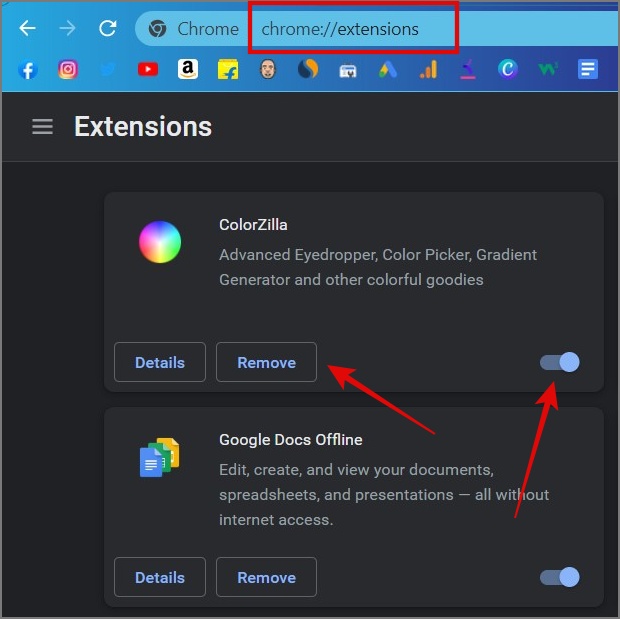
1. Click on the Kebab menu (three dots) and click or hover your mouse on the More Tools option and finally click on the Extensions. Alternatively, enter ‘chrome://extensions’ in your Address/Search bar to instantly go to the Extensions page.

2. Click on Remove to uninstall extensions. And if you think you might need a certain extension in the future, you can simply disable the extension by clicking on the toggle next to it.
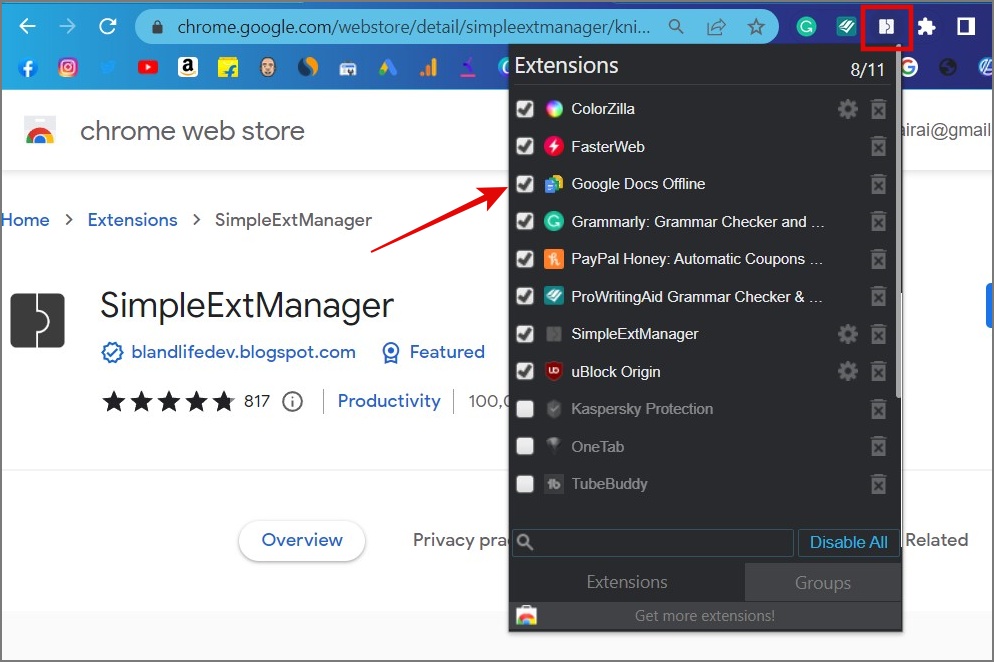
If you didn’t like this approach, then you can also try SimpleExtManager extension. It lets you enable and disable extensions on the fly. So whenever you require any extension on a specific website, use this extension to quickly enable it and, once you are done using it, disable it. This way you can make your Chrome faster and more efficient.
Pro Tip: You can also use Chrome’s built-in Task Manager tool (Shift + Esc) to see which extensions are consuming what amount of RAM, CPU, and other system resources. By doing so, you’ll be able to make an informed decision on which ones to keep and which ones to remove, ultimately improving your browser’s performance and efficiency.

5. Run a Malware Scan
Sometimes, the slow loading of webpages has nothing to do with your browser or internet connection. It can also be that your computer might be infected with malware, which slows down your whole computer. So make sure to scan your computer with any good anti-virus software of your choice. If you found anything unusual after the scan, make sure to take action immediately. We recommend Malwarebytes.
Note: Chrome used to come with a built-in Cleanup tool but it was retired some time ago.
6. Turn On Preload Page Feature
As its name suggests, it loads the web pages in advance even before you click on them. Google is able to do this by utilizing the vast amount of data they have about our browsing habits, and predicting which websites we’re more likely to visit. By preloading these pages in the background, sites load faster resulting in a snappier browsing experience.
You can find the Preload Page feature under Chrome Settings > Privacy & Security > Cookies and other site data.

By default, the Preload feature would be enabled. If not, then simply click on the toggle to do so.

Another excellent addition to your browsing experience could be the FasterWeb extension. It is somewhat similar to Chrome’s Preload feature, but it only preloads the page in the background when you hover your mouse pointer on a link for 65 milliseconds. And I think this approach is far better than Chrome because there is a higher chance that you will click on a web page that you are already pointing at and it also doesn’t have to predict which link you are more likely to click. This means that unnecessary web pages won’t be preloaded in the background, which can save you bandwidth.
7. Switch to a Better DNS Provider
Whenever you visit a website, your browser communicates with a DNS (Domain Name System) server to obtain the IP address where the site is located and then displays the content. Typically, this process is handled by your Internet Service Provider (ISP), but unfortunately, many ISPs don’t perform this task optimally.
But you can exponentially speed up your browsing experience by switching to a free, fast, and safer DNS provider like Google or Cloudflare.
8. Remove Theme from Chrome
Themes give browsers an aesthetic look but also make Chrome slightly sluggish. It’s better to stay away from those aesthetically pleasing themes if you want to optimize Chrome and make it faster.
To remove a theme from your Google Chrome, go back to Chrome’s Settings, select Appearance, and then click on Reset to default.
Pro Tip: You can directly go Appearance page by simply entering ‘chrome://settings/appearance’ on your Search/Address bar.

Also, avoid any extensions that change the look and feel of the Chrome browser.
9. Resetting Chrome Settings
If nothing is working for you, the last resort would be to reset your browser to its default state. This will reset your Chrome settings and shortcuts, disable themes and extensions, and delete cookies and other temporary site data. And don’t worry, your bookmarks, browsing history, and saved password won’t be affected.
To reset your Chrome settings, you can follow the below steps:
1. Go to Chrome Settings and select Reset Settings or you can type ‘chrome://settings/reset’ in your Search/Address bar to quickly go to the Reset page.
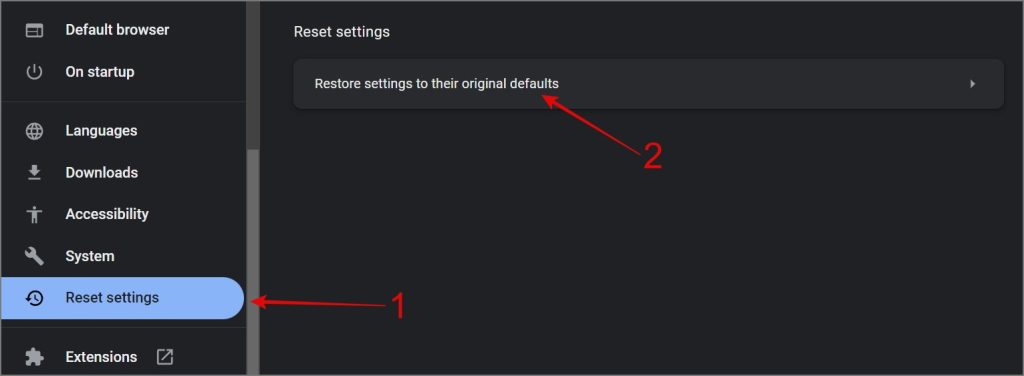
2. Next, click on Reset settings to their original defaults option.
3. You will be greeted with a pop-up. Just click on the Reset settings and your browser will go back to its original state.

If this solution worked for you, we recommend conducting a manual check to identify the root cause and prevent future occurrences.
Speed Up Chrome Browser
We added every possible solution that can help you make your Google Chrome faster. But if none of the above tips worked for you, maybe it’s something related to your computer’s hardware like insufficient memory, weak processor, or low storage. Also, as mentioned above, you should check for malware and your internet connection too before actually trying out the other advanced solutions.