Do you notice your Windows PC performance degrading over time? Your Windows computer requires regular maintenance, and with a few tweaks, you can maximize CPU performance on your PC.
Tips to Maximize CPU Performance on Windows 11
There could be several factors behind a sluggish PC performance. You can perform the tricks below, maximize CPU performance, and complete tasks quickly. We will start with some basic hardware checks first and move to advanced solutions to unleash the full potential of your computer CPU.
1. Remove Dust and Clean Internals
You should regularly clean your PC or laptop internals. You will be surprised to see the amount of dust PC fans collect. Such dust can lead to overheating and affect the CPU performance in the longer run.
However, you should be careful while cleaning dust from the PC. Make sure to damage or lose any wire in the setup. Laptop users need to open the bottom cover to remove dust.
2. Reapply Thermal Paste
Thermal paste keeps your laptop/PC CPU temperature in check. After some time (a year or two), the thermal evaporates and becomes ineffective. You must reapply thermal paste. If you don’t have an experience with thermal paste before, we would advise taking help from an expert. You can read Intel’s dedicated guide on applying the thermal paste on your computer. You should keep a few things in mind while applying thermal paste.
- Keep the CPU surface area clean and remove any old thermal paste.
- Take a sufficient amount of paste (around the size of a grain of rice) needed to cover the surface area.
- Don’t spread the thermal paste by yourself. Let the base plate or water block pressure do the job for you.
3. Optimize Power Mode for Best Performance
By default, Windows 11 sets power settings at Balanced. While it’s an ideal option to keep the performance and battery in check for a Windows ultrabook, PC users can tweak power settings to maximize CPU performance.
1. Open Windows 11 Settings menu (use Windows + I keys).
2. Navigate to the System > Power menu.

3. Expand Power mode and select Best performance.

4. Change Max Processor State When Plugged In
You can change the maximum processor state to 100% when plugged in and get the best performance. Here’s how you need to make a tweak from the Control Panel menu.
1. Open the Control Panel menu on Windows 11.
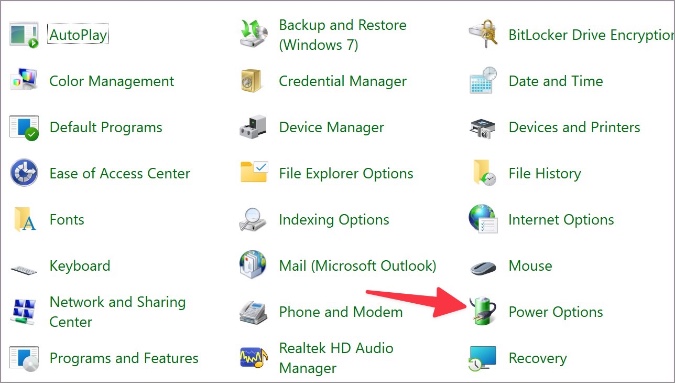
2. Select Power Options and open Change plan settings.
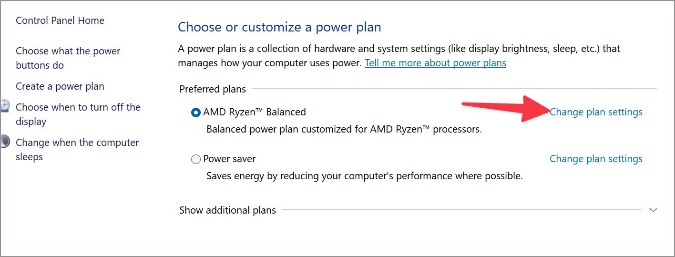
3. Select Change advanced power settings.

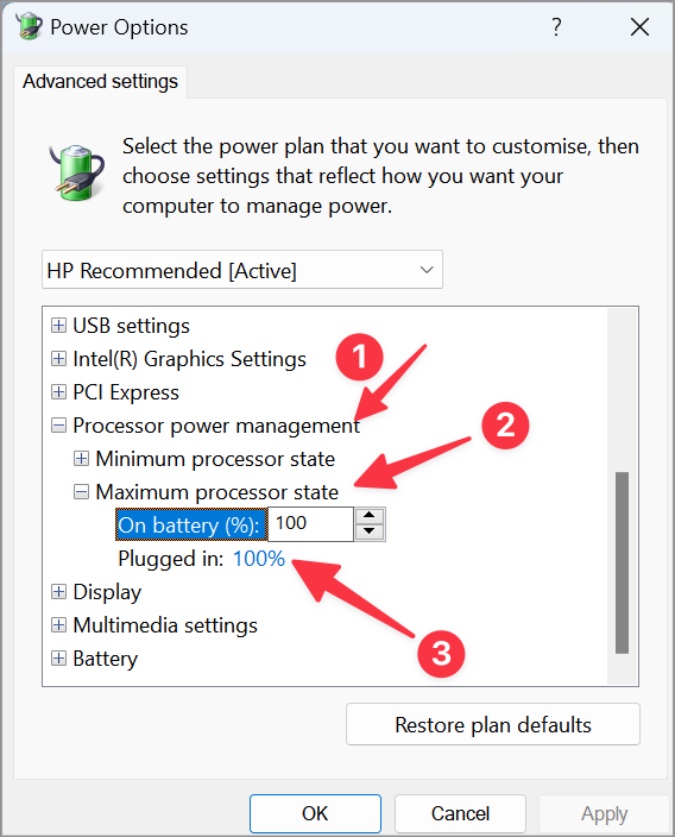
4. Scroll to Processor power management and expand it.
5. Expand the Maximum processor state and set it to 100% when plugged in.
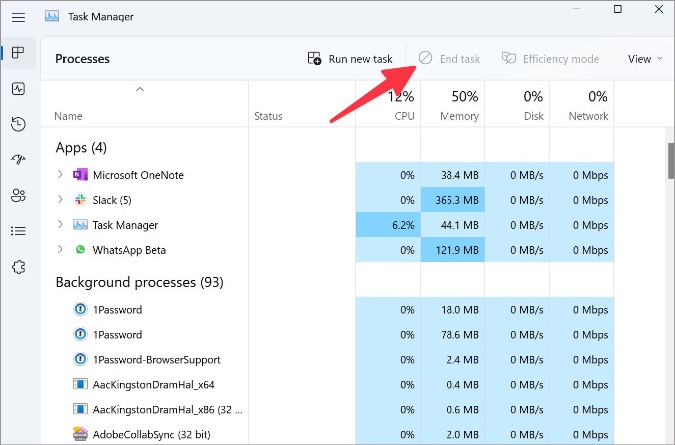
5. End Unnecessary Tasks and Apps
When dozens of apps run in the background, you may notice a considerable drop in performance in the currently active app. You must close unnecessary apps in the background to free up CPU resources.
You can always hit the X mark in the menu bar to close apps, but programs like Teams, Spotify, Slack, etc., keep running in the background. Follow the steps below to use task manager to close apps.
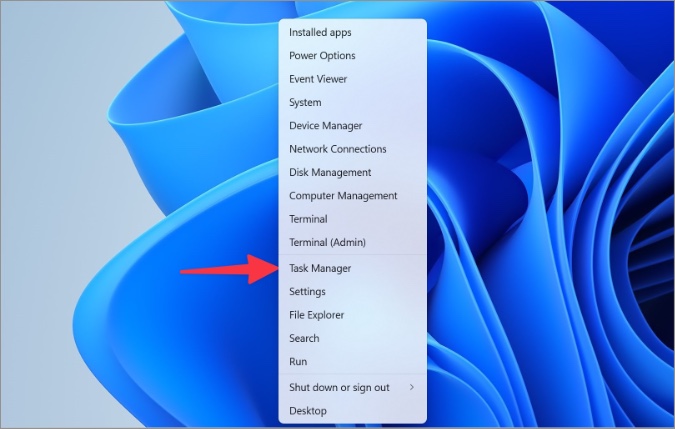
1. Right-click on the Windows key and open Task Manager.
2. Find unnecessary apps and hit the End task button in the top right corner.
6. Disable Startup Apps
Do you have too many apps launching at a system startup? Such behavior would lead to an unpleasant experience. You should revisit the Windows Settings menu and disable irrelevant apps opening at startup.
1. Open the Windows Settings menu (refer to the steps above).
2. Select Apps from the left sidebar.
3. Open the Startup menu.
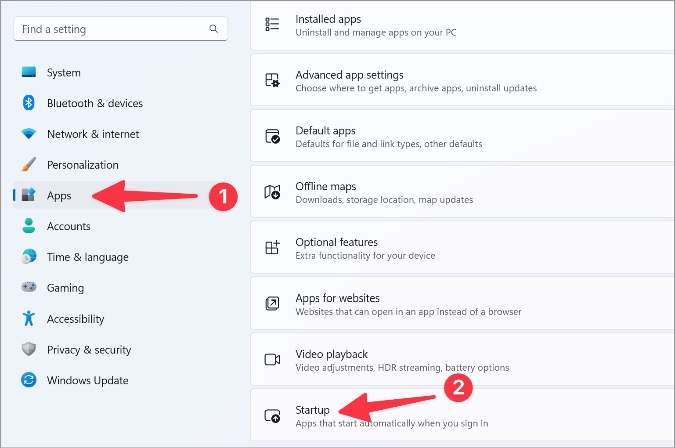
4. Check all apps opening at startup and their impact on the system. Disable app that you don’t require, and you are good to go.

7. Use Storage Sense to Remove Unnecessary Files
Even if you use a high-end CPU, you will notice the sluggish performance when you run out of storage. Windows 11 has a neat Storage Sense tool to free up space, delete temporary files, and manage locally available cloud content.
1. Open Windows Settings and go to System > Storage menu.

2. Scroll to Storage management and check cleanup recommendations.
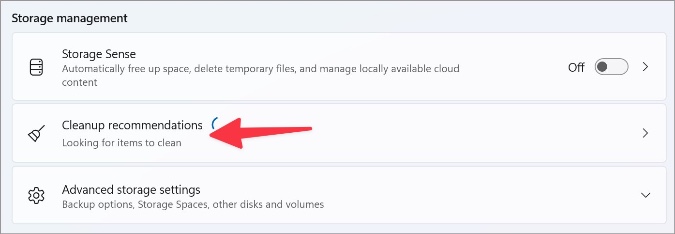
3. You can also enable Storage Sense to automatically perform cleanup when disk space is low.

8. Update Windows
Microsoft frequently releases new Windows 11 builds with new features and bug fixes. It’s essential to keep your computer up to date for a smooth performance. These Windows updates also pack driver updates for your CPU.
Head to Windows Settings > Windows Update and install the latest OS build.

Get Maximum Performance Out of Your Computer
If you are building a PC, you should invest in high-quality fans for better airflow. Bookmark this post, and revisit it every time you notice a below-average CPU performance on your computer.