If you are a frequent Adobe Photoshop user, I’m sure you have dreaded the scratch disk error. In my case, it has mostly popped up while I try to create a new file, however, multiple users have also faced scratch disk error editing midway. Since it’s a common problem, let’s understand what is Photoshop’s scratch disk error and how to fix it.
All You Need to Know About Photoshop Scratch Disk Error
What Is a Scratch Disk?
In simple terms, a scratch disk is a space that Photoshop uses temporarily as storage. Photoshop uses it to store parts of the file you’re working on that do not fit on your RAM memory. These are often placed in the root directory of the default storage disks in your PC.
How to Find Your Scratch Disk Drive
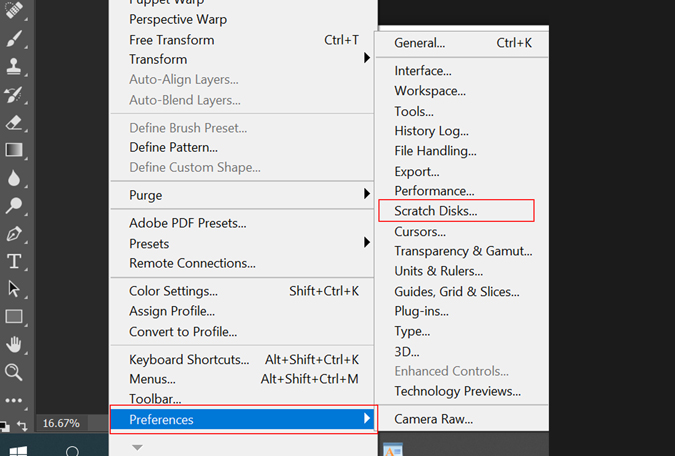
Adobe Photoshop by default uses the hard drive that consists of your operating system. However, if you’re working on a public computer, you can quickly ascertain which volume is being used as a scratch disk. To do that, Open Photoshop and go to the Edit tab at the top. Now scroll down to Preferences and from the pop-up menu select Scratch Disks.
This will show you all the volumes that are available along with the active scratch disk volume (continue reading to know more).
How to Change Scratch Disks
If you face frequent scratch disk errors in Photoshop, the first solution is changing the scratch disk volume. There are two ways you can do that. Firstly, by following the same method we talked about before or at the start-up. Here’s how you can change the scratch disks in Photoshop.
1. In Photoshop, click on Edit > Preferences > Scratch Disks. Now in the preferences window, click on the box under the Active? option on the left. Here, you can remove the default disk, add multiple disks, or change the scratch disk easily. Once done, click OK at the top right corner to save the changes.

2. You can also change the scratch disk preferences when you run Photoshop as well. Simply press and hold CTRL + ALT keys when you open Photoshop. This will open a Scratch Disk Preferences option. The first scratch disk will be the default OS volume. In the same tab, you can assign disk preferences that shall be used in case of low storage.

Ways to Fix Adobe Photoshop Scratch Disk Error
A list of solutions that we found to be working for scratch disk error users are facing on Adobe Photoshop.
- Perform a local disk clean-up for the default scratch disk drive. From the Windows Start menu, search for Disk Cleanup and select the default scratch disk drive. In the next window select Temporary files, Error reports, Thumbnails, and other folders you think are taking up unnecessary space and hit OK. You can preview the space you’ll free at the top.

- If you’re working with multiple layers, with every edit you are also adding to the content history (helps you to undo). These can take up a considerable amount of space as well. To clean that, go to Edit and select Purge. Click on All which clears up both Clipboard (stores what you copy) and History (steps) data.
Note: Once you clear the data, you won’t be able to paste what you last copied or view the history in your Photoshop project.

- Defragmenting disks is a maintenance task that helps keep your device healthy. It reorganizes data in the drive for faster app efficiency. Since Photoshop requires unfragmented space, this method might help. To optimize disks, open Defragmenter from the Start menu, select the scratch drive and click on Optimize.

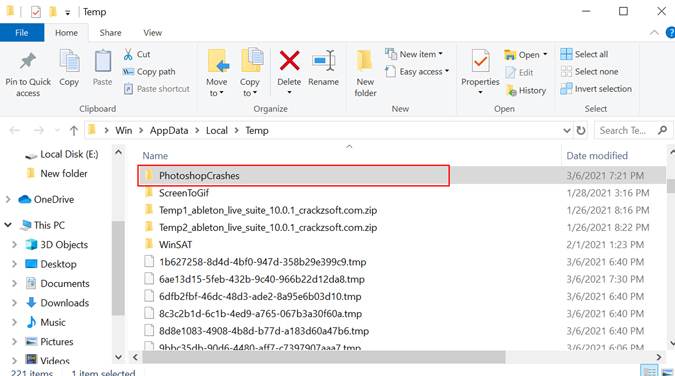
- Photoshop also generates temporary files such as crash reports. We can delete these by using the Run command. Press Windows button and R (key). Then type %temp% and hit Enter to open the temporary files folder. Search for Photoshop or PST file name and delete it.
- Other methods that are suggested by many like disabling auto-recovery or allowing more RAM to Photoshop. However, I don’t recommend it as it might affect your general workflow as well.
Workaround for Photoshop Scratch Disk Error
If the above methods worked for you then consider yourself lucky. For some reason, I still faced the issue even after trying every trick. Hence, a workaround that worked for me might help you as well. There are two methods that we’ll look at.
Revo Uninstaller
For the first method, we’re going to use a free uninstaller called Revo Uninstaller. It allows users to perform multiple clean-up tasks in one place and also delete leftover junk files upon uninstallation. We’re going to make use of the Junk Cleaner feature.
1. To begin, download Revo and select the Junk Files Cleaner option on the left sidebar. Then click on the Scan on top and wait for the process to finish. Once the junk files are displayed, click on Delete and you’re done.

Recent Project Trick
2. If you’re facing the scratch disk error when you try to create a new document, this method is for you. In most cases, you’ll be able to open projects from the recent documents (Photoshop start-up).
After that, you can simply adjust the canvas size and carry on with your work. Well, this is the only method that worked for me, hope it works for you as well.

Closing Remarks: Solve Photoshop’s Scratch Disk Error
These were a few ways you can solve the scratch disk issue in Adobe Photoshop. We hope that your issue was resolved and you can now edit images as usual.
Also Read: 7 Best Photoshop Alternatives For Android