By default, your router assigns dynamic IP Address to every device that connects to it. This is called DHCP (short for Dynamic Host Control Protocol). But sometimes, we need our devices to have the same IP address (i.e. Static IP) every time it connects to the network. Reason being,
- Access your computer from the Internet.
- Share data between two devices on the same network.
- Quickly access your Network Printer or NAS.
- Use your computer as a media server.
- Or your work WiFi requires you to use Static IP address.
What IP address should you choose?
If two devices on the network have the same IP address, then there will be conflicts. The Internet won’t work on one of them or both, depending on your router. So, it’s important to assign a unique IP address to your computer. There are a couple of ways to pick an unused IP address.
For instance– first find your device’s IP address, say it’s 192.168.1.7; then keep the first three values (i.e. 192.168.1) as it’s and replace the last digit with some far number like 192.168.1.222. Though make sure the last digit should be between a 0-255 range.
Assigning Static IP address to most devices is easy, just go to its network settings, look for DHCP option and turn it OFF. Once you do that, you’ll see a text area to enter Static IP address. Enter the new IP address there, save changes and that’s it.
So let’s see how to Assign Static IP address to various Operating Systems
1. Assign IP Address on Windows 10/8/7
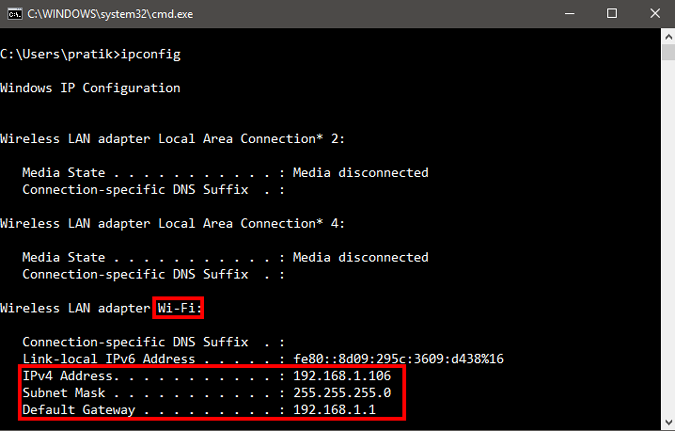
You can do this quickly through the command line. You will need to first find your subnet mask, default gateway, and network adapter name. In my case, I’m on a Wi-Fi network, so the adapter name is Wi-Fi. To find yours just type the following command.
ipconfig
Once you get the output, find for the Network Adapter which has IP listed under it. The adapter name is a one-word name suffixed to the end of the Network Title. You will also need the Subnet mask and the Default Gateway Address.
Once you have the adapter name, Subnet Mask and Default Gateway, run the following command.
netsh interface ip set address name="Wi-Fi" static 192.168.1.106 255.255.255.0 192.168.1.1
Wherein, Wi-Fi should be replaced by your adapter name and the IP, subnet mask and gateway address according to your configuration.
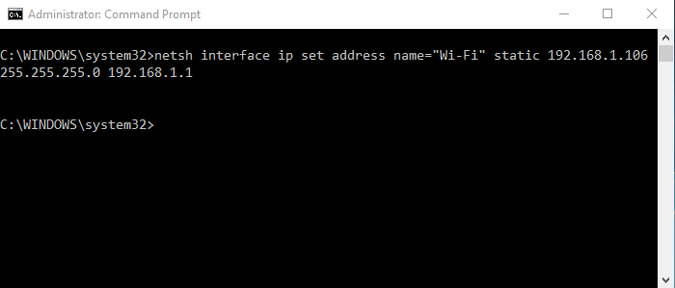
This will change your IP address from DHCP to manual with the static IP address you have specified.
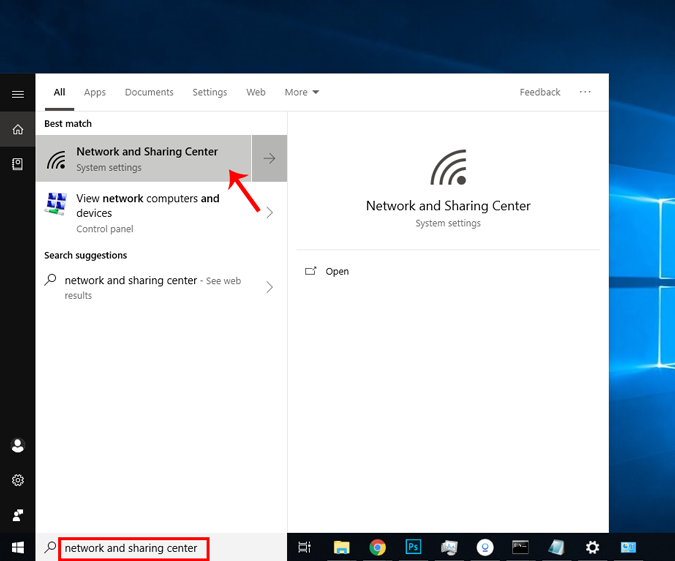
In case you find it too confusing, you are not alone. You can do the same via GUI which is much more intuitive. You’ll need the Subnet Mask and Default Gateway Address. You can refer to the above step on how to find these details. Once you have noted down the address, click on Start Menu and type in Network and Sharing Center. Click once you see the Network and Sharing Center Icon.
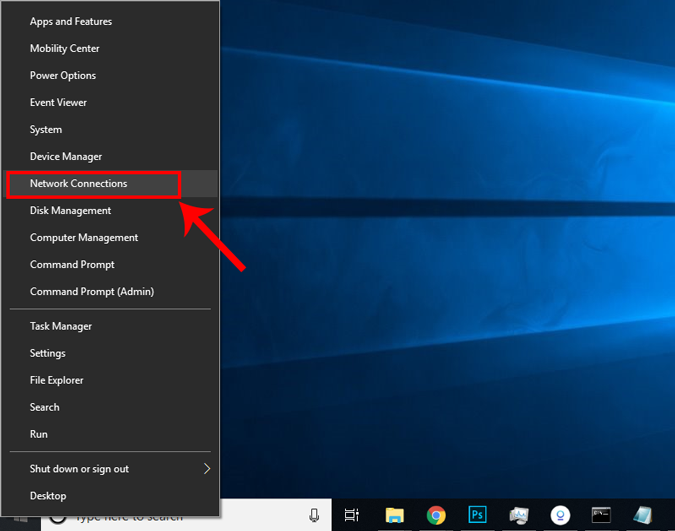
Alternatively, if you are in Windows 10 then you can right-click on the Start menu and click on “Network Connections“.
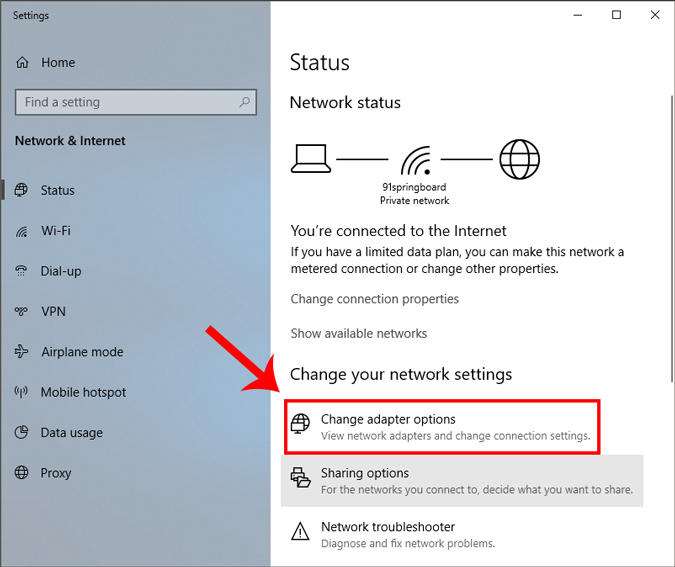
A new window will open, click on Change Adapter Options.
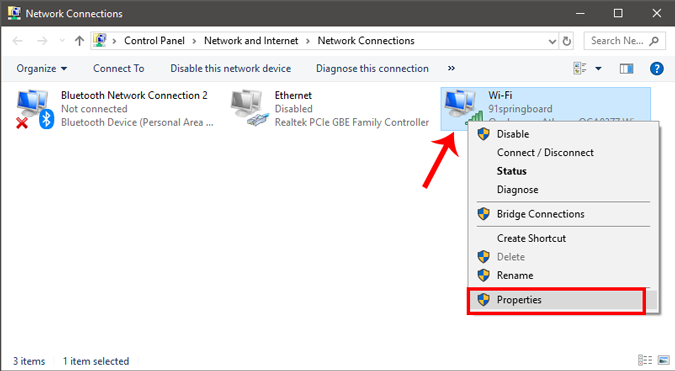
Right Click on your Current Network Adapter ( like WiFi) and choose Properties.
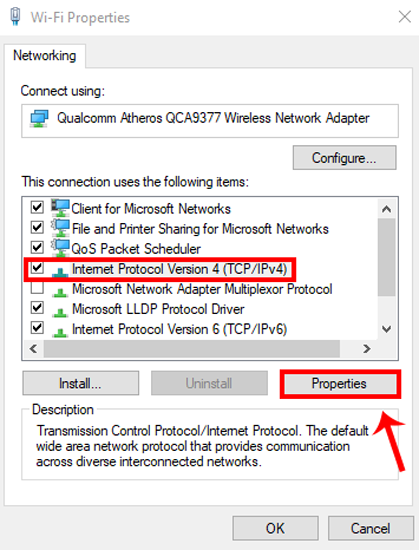
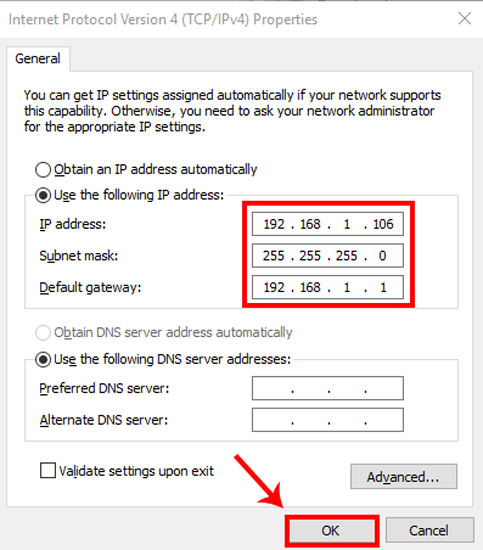
When the new window pops up, select Internet Protocol Version 4(TCP/IPv4) and click on Properties.
Once you get the pop-up window, select “Enter the IP address you want” and fil the IP Address, For Subnet Mask, and Default Gateway Address enter the values that you have noted down previously. Next, click on OK to save changes.
To switch to dynamic IP, click on Obtain the IP address automatically. Once this is enabled, your system will start picking an IP address dynamically from the router.
2. How to setup static IP on Ubuntu
On Ubuntu, you can set a static IP Address via the terminal or GUI. Firstly, let’s start with the command line. Right-click anywhere on the desktop to open the terminal.

Once the terminal window opens, we need to run a command. We need the subnet mask and network adapter name in order to set a static IP and to get that, run the following command on the terminal.
ifconfig -a
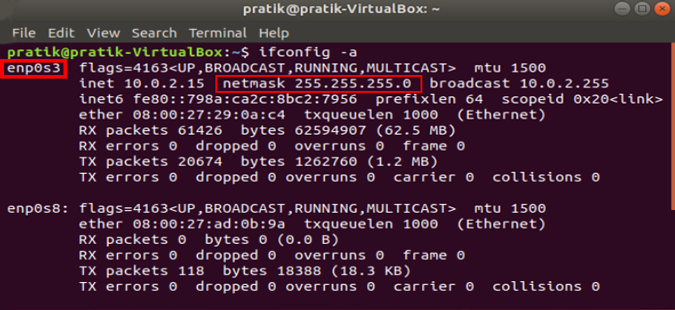
Once you have the subnet mask noted down, in my case, it’s 255.255.255.0, we can proceed further.
It is pretty simple and straight forward. We need to open the Network Adapter settings. To do that, click on the Network Icon at the top right corner of the desktop.
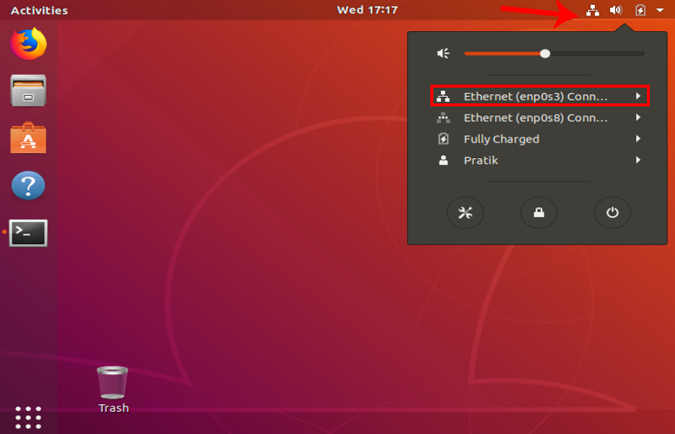
Now, navigate on the active network and click on the expand button for more options. Click on Wired Settings to open the Network menu.
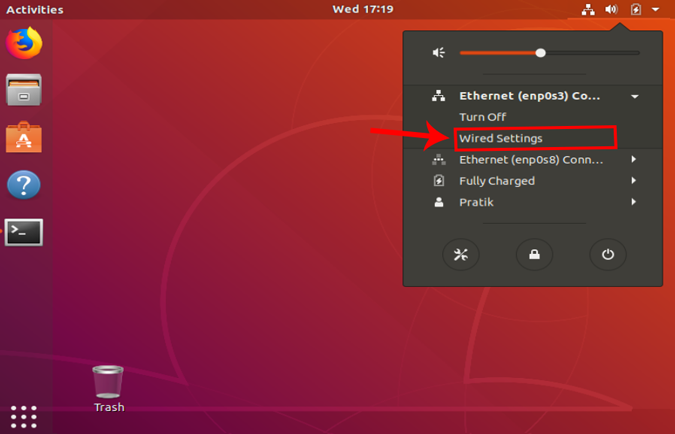
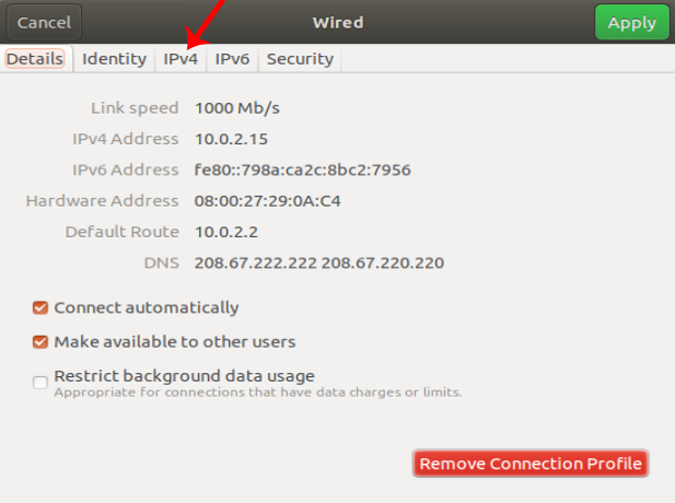
Once you get the Wired Settings dialogue, make sure you are on the Network page. Click on the Settings icon beside the active network to open the adapter properties.
![]()
When you get the pop-up, navigate to the IPv4 tab to change the IP settings.
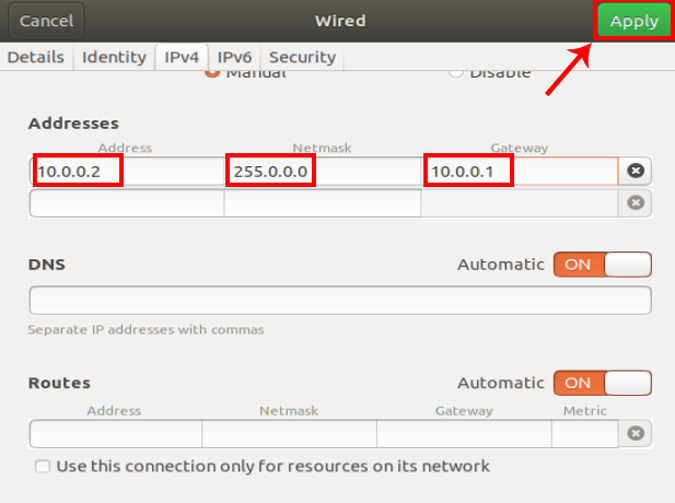
On the IPv4 tab, select the radio button which says “Manual“. Some text fields will appear, you need to enter the IP address, Netmask and Gateway accordingly. Once it is validated, you can click on the Apply button to register the changes.
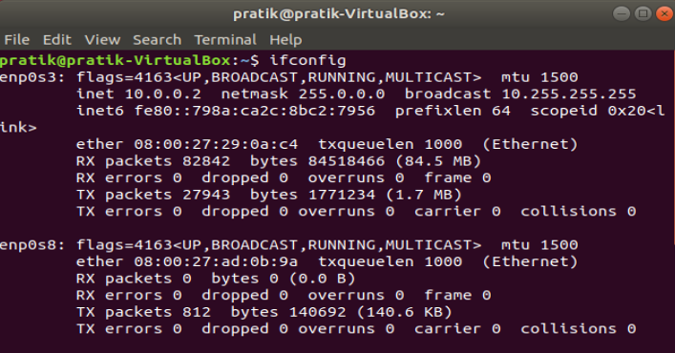
Again you need to restart the network for the changes to take effect. You can do it manually via command line or just switch off and switch on the Network adapter. Once done, run ifconfig on the terminal to check the IP address. It should be the same IP address which you have specified earlier.
3. How to setup static IP on Mac
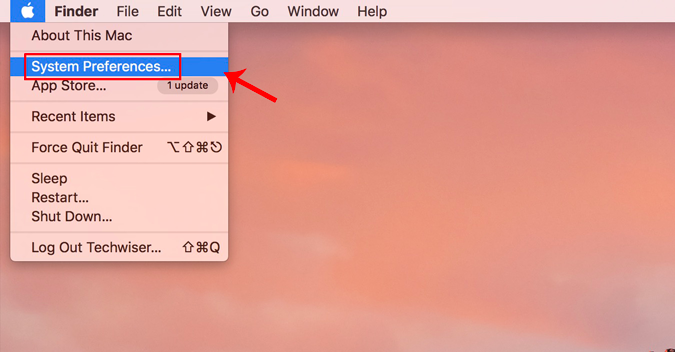
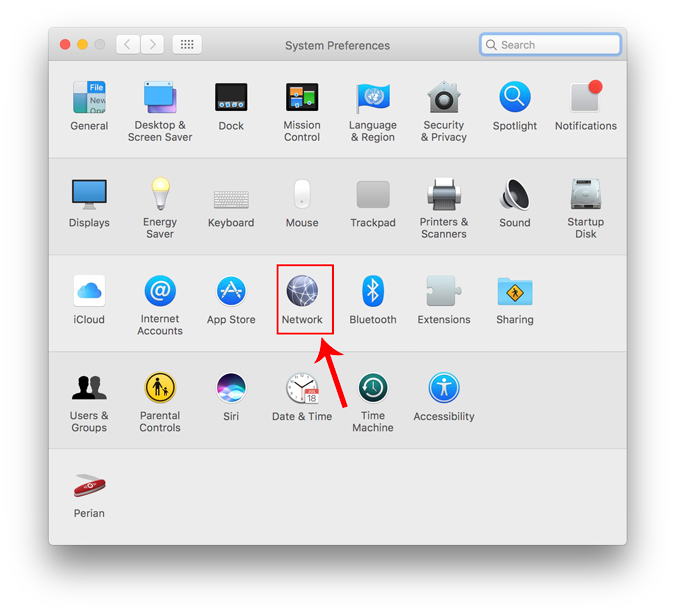
If you are on macOS, setting static IP is quite similar to that of Ubuntu. But, here you don’t need the subnet mask or Default Gateway Address. Right click on the apple icon at the top left corner of the desktop. Click on System Preferences from the dropdown list.
Once the System Preferences dialogue box displays, navigate to Network and click on it to open the Network Settings
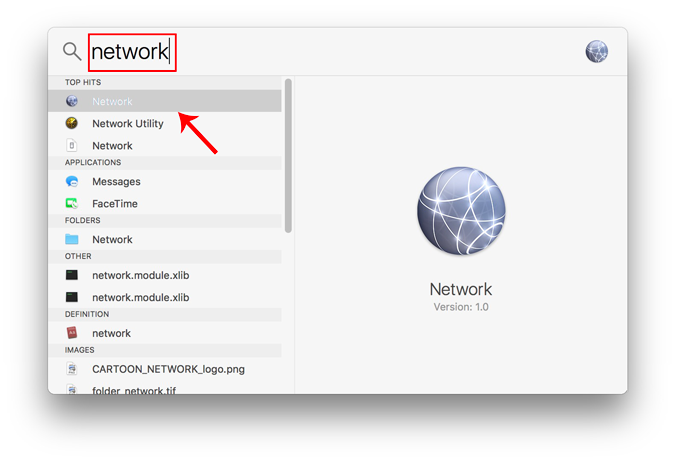
Alternatively, you can also hit Cmd+Space to trigger the Spotlight search. Type “Network” in the search bar and click on the icon once it appears. This will directly navigate you to the Network Settings.
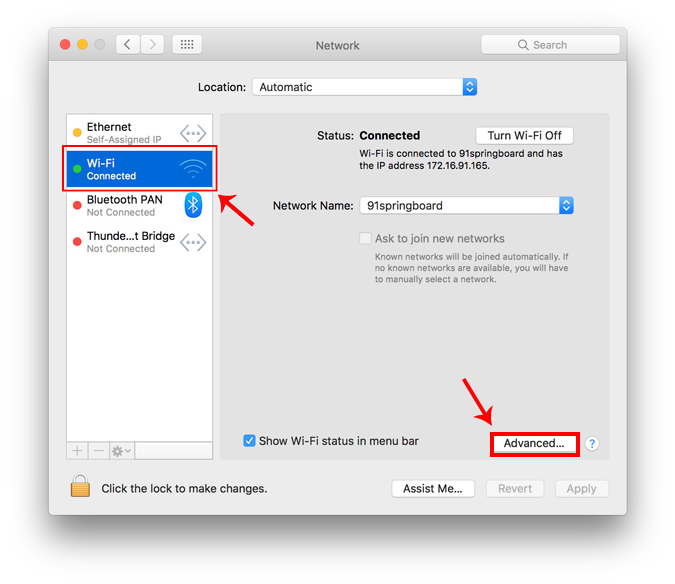
From the pop-up window, select an active network interface. For example, I am connected to a WiFi network so my active network is Wi-Fi. Make sure you are on the active network tab and then click on Advanced.
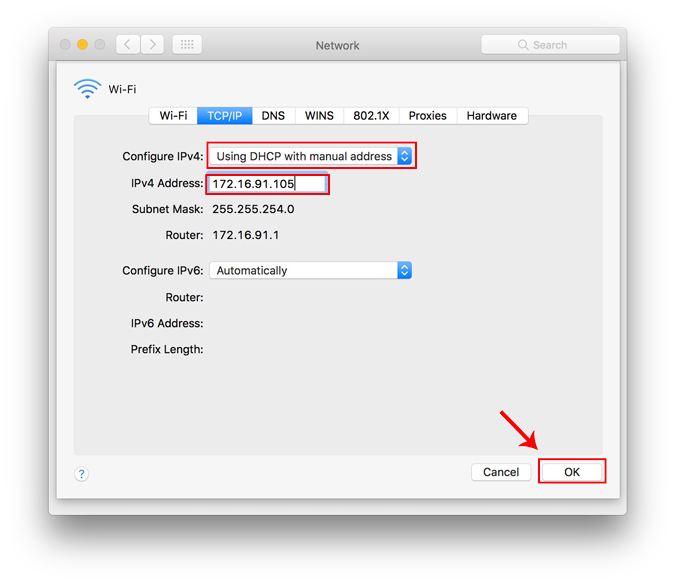
A new window will open the configuration settings for that adapter. Move over to the IP settings by clicking on the TCP/IP tab.
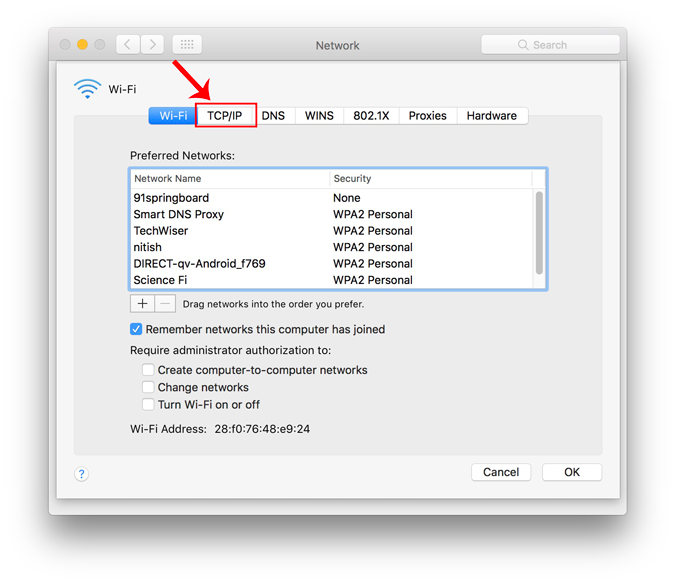
From the Configure IPv4 menu, choose Using DHCP with manual address. Enter a static IP address in the IPv4 Address and leave the Subnet Mask and Router field as default. Click Ok to save the changes.
Now when you do an ifconfig, the system should be using the static IP you have defined in the previous times. If the IP’s have not changed, try restarting the Wi-Fi and it should fix it.
To switch back to dynamic IP, move back to “Using DHCP” from the Configure IPv4 menu.
4. How to setup static IP on Android
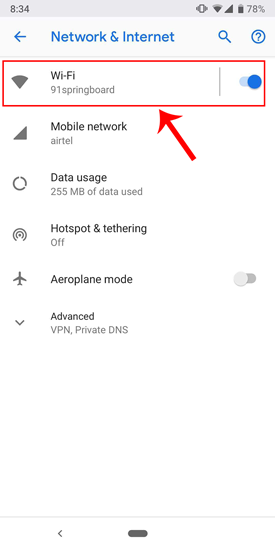
Setting a static IP can be natively done on Android. But the way to do it might be different on every phone due to the manufacturer skin. We will see how to do it on Pixel3 and the process should be similar on other phones as well. So head over to the Settings menu and tap on “Network & Internet”.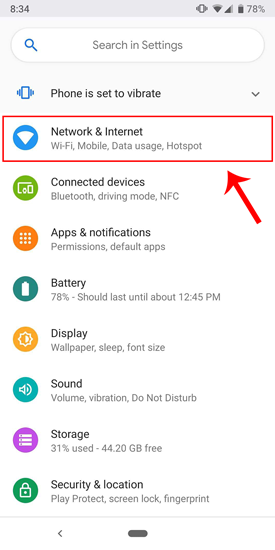 On top of the menu, you will see Wi-Fi, tap on it to get to the Wi-Fi Settings.
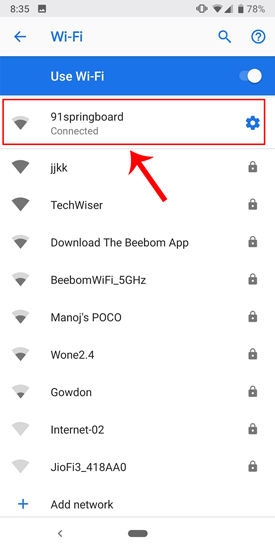
The network which you are connected to should be on top of the list. Tap on the settings icon beside the Wi-Fi network name.
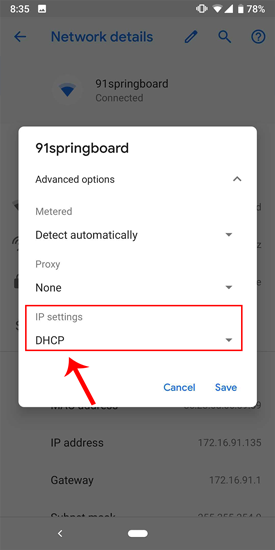
Once the pop-up opens, you will see IP settings at the bottom of the menu. The default option is “DHCP”. Tap on it to change the IP configuration.
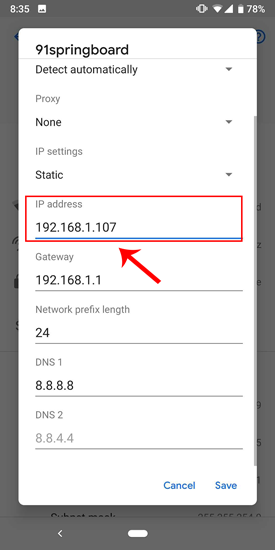
Select “Static” from the presented drop-down menu. Enter the desired IP address and leave the other options as default. Make sure that other devices are not using the same IP. You can see the IP address of the other devices in your network by using a small utility called Fing. For a detailed process, check our article on how to find the IP Address of any Device on your network. Once you have entered the IP, click on Save to register the change. Now, your Android phone should start using the desired IP Address.
In almost all the Android version, you get the option to set static IP Address. For some rare older Android versions, you can use a third-party app like WiFi Static. It’s free and it doesn’t require ROOT.
To switch back to dynamic IP, repeat the same procedure and select “DHCP” from the IP settings instead.
5. How to setup static IP on iPhone and iPad
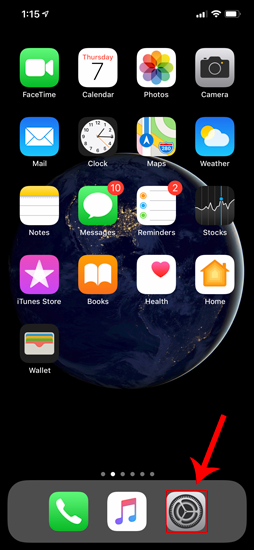
If you are using an iPhone or iPad, then you can set static IP Address natively. You would need the Subnet Mask of your network. This can be obtained from the Wi-Fi settings and we would see to it in the further steps. To get started, click on the Settings icon in the dock to get to the Settings menu.
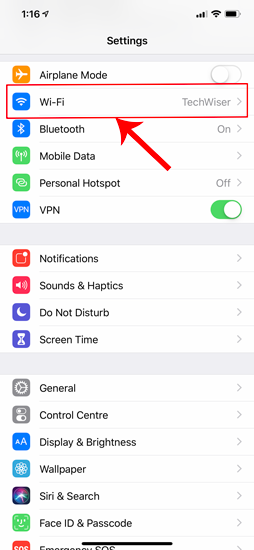
Now on the Settings menu page, tap on Wi-Fi to get to the Wi-Fi settings.
On the Wi-Fi page, you should see your connected Wi-Fi network at the top. Click on the “i” button beside it. This will open the Wi-Fi configuration window.

Once the Wi-Fi settings page appears, you will see an option called “Configure IP“. By Default, this would be set to automatic. Just below this option, you will see “Subnet Mask“, note it down as we will need it in the further steps. In order to set static IP, we need to change Configure IP it to Manual. Tap on it and it will open the IPv4 settings page.
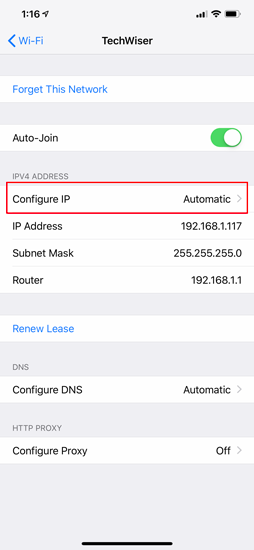
There should be 3 options available on the “Configure IPv4” page. Select “Manual” from it. As soon as Manual IP is enabled, you will get extra text fields at the bottom to enter the IP Address, Subnet Mask, Router. We need to fill in the IP Address of our choice and Subnet Mask which we noted down in the previous step. Now, after you fill both the fields, the save button at the top right corner will be enabled. Click on it to save the static IP configuration.

Now, when you return to the Wi-Fi settings page, you will see your device is using the Static IP address. This should be the same IP address we have set in the IP configuration menu.
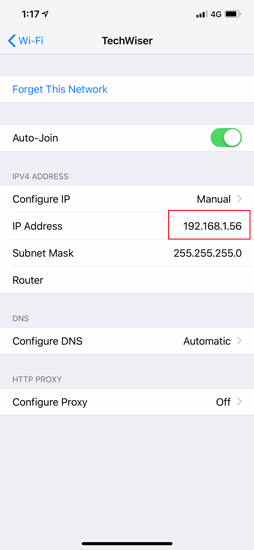
This static IP address will be applicable only to that particular Wi-Fi network. In case, you connect to some other Wi-Fi network the IP will change accordingly.
6. How to setup static IP to any Device from Router
Other network devices like your Wireless Printer, PS4, NAS, IP Camera, Raspberry Pi, etc. do not have an Interface. Hence, in order to configure the network, either you have to connect remotely or use the router. If you have access to the router, setting Static IP for network devices is the easiest and convenient way. I would recommend this method over any other.
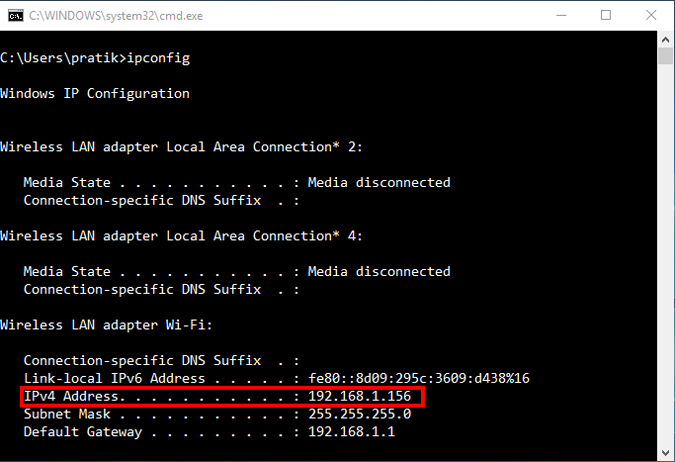
So, to assign a Static IP Address to any network device, you need to login to the web portal of the router. The web portal address, username, and password are mostly printed behind the router. In case you don’t have physical access to the router, the web portal URL is mostly the PC’s gateway address. To find that, open command prompt and type the following command.
ipconfig | findstr "Default Gateway"
Once you have the web portal loaded, log in with the credentials. Now every router has a different web UI, but the overall structure is the same. Basically, you will have to link the IP Address to the Mac Address and Hostname of the device. So, we need to find the MAC address & Hostname of the network device. To do that, look for DHCP client list which should look something like the following screenshot.
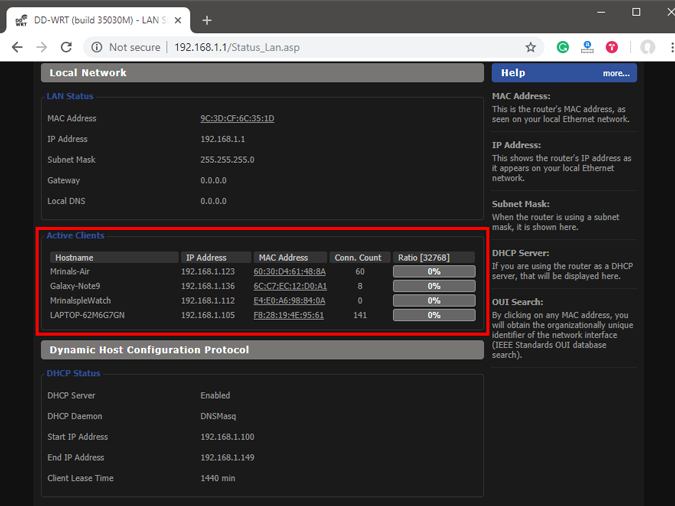
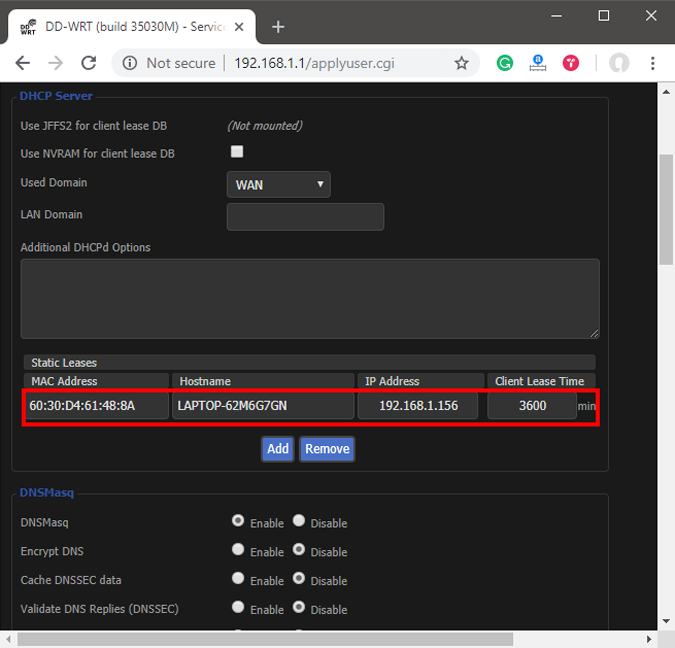
You can get your MAC Address & Hostname under DHCP Client list. Once, you have the MAC address & Hostname noted down, we can proceed further. On most of the routers, you will have the option to set a Static IP under the section IP Mac binding or DHCP Static IP option. In case you are on a custom ROM like dd-wrt, head over to Services tab and you will have DHCP Server. Under DHCP Server, add an entry for Static Leases by clicking on the Add button.
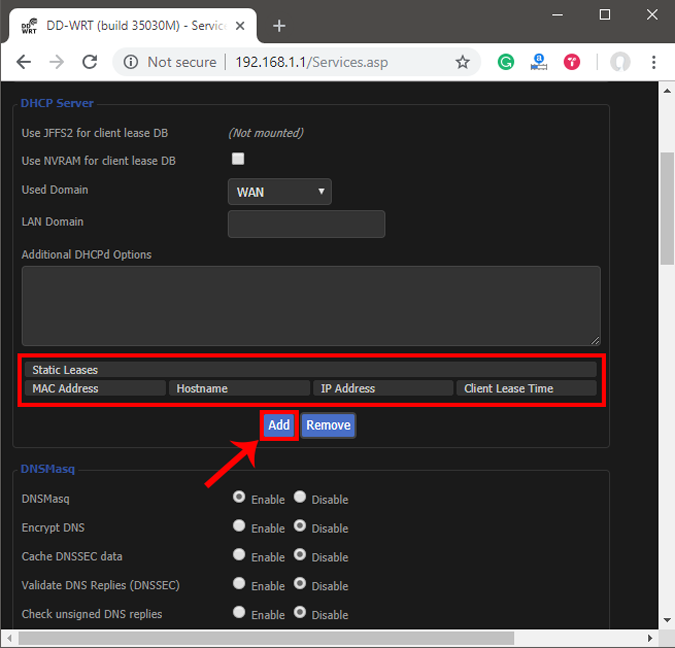
Clicking on the Add button will create a new row. You have to enter the MAC Address, Hostname, desired Static IP and Lease time. Lease time is a unit in minutes after which your IP will be renewed. Since we are adding only 1 entry for the particular host the IP will be the same even after the renewal. Once, done click on Save changes.
Once you have configured successfully on the router, just restart the Wi-Fi on the device. When it connects it should start using the static IP. In case of issues, make sure that you have the correct MAC Address and Hostname. To check, just run the command ipconfig or look back again in the router’s DHCP client list.
These changes are written to the ROM so restarting the router won’t make changes to the static IP configuration. In order to get back to Dynamic IP, just remove the entry from the IP leases.
What’s next
Once you have started configuring the IPs on Router and network devices, you are good to go configure telnet and SSH. Have a look at our brief article on How to Enable Telnet Server in Windows 10, Best SSH clients for iOS To Manages Remote Servers and 6 Best FTP Clients For Android. A word of caution would be to note down the static IPs assigned to devices as assigning the same IP to two network devices would render them useless.
Also Read: How To Change DNS on Windows|Mac|Android|iOS