There are plenty of reasons to prefer AirPods Pro over the regular AirPods but I mainly prefer it for the Active Noise Cancelling and Transparency Mode. While switching between Active Noise Cancellation and Transparency Mode is practically effortless, you still have to either press and hold the stem or do it manually on the iPhone. In this article, I’ll show you how to make your AirPods truly handsfree. Let’s begin.
With the new in-ear design, taking out one AirPod not that effortless compared with older AirPods. I find using the following methods much easier than just pulling out one AirPod and then struggling to stuff it in again.
1. Ask Siri (Nicely)
The need for this article originates directly from my workflow. I use the AirPods Pro with an iPhone and whenever someone walks up to me to talk, I turn on the Transparency Mode by simply pressing and holding the Stem, but you can ask Siri to switch between ANC and Transparency Mode for you, instead.
Just make sure you have “Listen for ‘Hey Siri’ ” enabled on your iPhone. You can go to Settings> Siri & Search> Turn on Listen for ‘Hey Siri’. Also, turn on ‘Allow Siri when locked‘ so that it would even work when your iPhone is locked.

Now, simply call Siri and tell it to switch to Transparency Mode on your AirPods. You’ll see a confirmation on the screen and Transparency Mode on your AirPods Pro. The only caveat with this method is that Siri doesn’t automatically pause the music which can be distracting when you’re talking to someone over the Transparency Mode. Don’t Worry, the next method solves this problem.

2. Use Siri Shortcuts App
While fiddling around in the Shortcuts app, I came across an Action that allows you to control the Noise Control feature of the AirPods Pro. You can create a simple Shortcut out of it which would pause anything that’s playing and turn on the Transparency Mode whenever activated. Let’s make one. Or, if you don’t want to do the hard work, simply install the shortcuts with the links below and use it directly with Siri.
If you can’t install these Shortcuts then grant the Shortcuts app permission. On your iPhone, navigate to Settings> Shortcuts> Turn On ‘Allow Untrusted Shortcuts’. Now, let’s build a shortcut from scratch.
Make sure you’re running the updated Shortcuts app on your iPhone. Open the app and tap the + button on the top right to create a new workflow. Tap ‘Add Action‘ to open the list.

Tap the search bar and search for Play/ Pause and add it to the workspace. You can change its behavior by tapping Play/Pause. Change it to Pause and add another Action by tapping the + button.

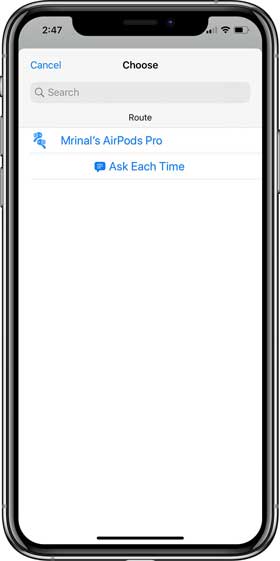
In the search bar, search for Noise Control, add it to your workspace. Tap the Route and Select ‘AirPods Pro’.

Make sure your AirPods Pro are connected to the iPhone or it won’t work. Tap the AirPods icon to proceed.
Now, we’ll set the Noise Control Mode for the AirPods Pro. You can choose from the list of available options. I chose Transparency Mode.
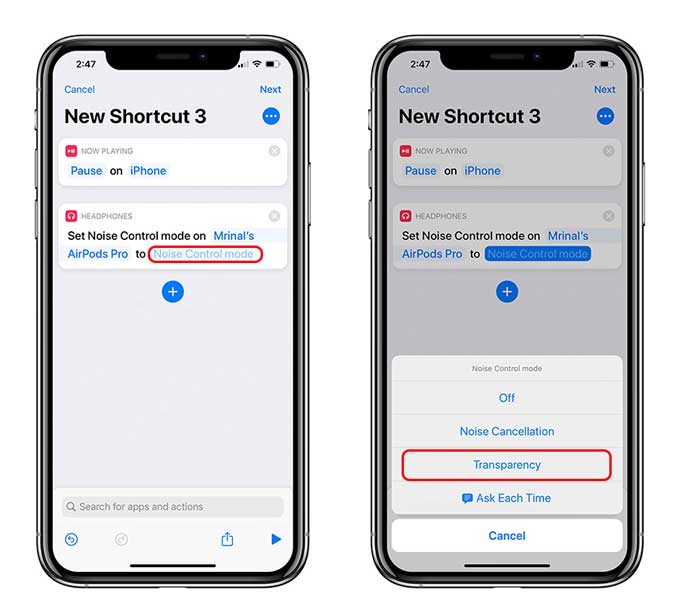
Now simply give your shortcut a name and you’re done. For example, I renamed my shortcut to “Let’s chat” so whenever I say “Hey Siri Let’s chat”, it would pause the media playing on my AirPods Pro and activate the Transparency Mode. Pretty Cool.

You can do the same and create another shortcut to resume the music and turn the ANC back on. I’ve already listed the shortcut links above if you want to customize these shortcuts or use them as is.
3. Automate it
While the Shortcuts work perfectly fine, I wanted to make it geekier. I bought this cheap NFC ring off Amazon which allows me to set the trigger for this automation. Let’s see how.
To make this work, your iPhone should have NFC built-in and should be running iOS 13. To set up an Automation, go to the Shortcuts app and select the Automation tab from the bottom. Tap Create Personal Automation. You can set a trigger based on events, location, or settings such as DND mode. Select ‘NFC’.

tap the ‘Scan NFC Tag‘ button, and bring your NFC tag close to the back of the iPhone. It would read the tag and ask you to name it, enter a suitable name and tap Next.

Just like we did with Shortcuts, we’ll assign the Automation to pause the media playing on the iPhone and switch the Noise control Mode to Transparency Mode.
Add Play/ Pause action and change it to Pause as shown in the image below. Tap the + button and add another Action ‘Noise Control Mode’. Select AirPods Pro as the route and set the Noise Control Mode to ‘Transparency Mode’. Make sure your AirPods are connected to the iPhone. Tap Next to proceed.

To make the Automation run even when the iPhone is locked, disable the Switch next to ‘Ask Before Running‘ and tap Done.

That’s it. Now, whenever you bring the NFC ring near the iPhone, the Automation would trigger the action. I know it sounds overkill for such a small gesture, but I created this to showcase the capabilities of the Shortcuts app and how well integrated it is to the entire Apple ecosystem. On that note, why don’t you check out the list of best Shortcuts app that you should be using? Let me know your thoughts on this method, in the comments below.