Whether you are writing a professional email or engaging in casual online conversations with friends, avoiding silly spelling mistakes is crucial. Chrome’s integrated spell check feature can help you achieve just that. However, there can be times when the spell check feature in Google Chrome stops working, resulting in overlooked typos. If you encounter this problem, here are some tips you can try to fix Google Chrome’s spell check feature.
Table of Contents
1. Make Sure Spell Check Is Enabled
Your first step is to ensure that you haven’t accidentally disabled the spell check feature in Google Chrome. Here’s how to check.
1. In Google Chrome, click the kebab menu (three-dot icon) in the top right corner and select Settings.

2. Select the Languages tab from the left pane and then enable the toggle next to Check for spelling errors when you type text on web pages.

Restart Chrome after turning on spell check and see if the issue is still there.
2. Check the Spell Check Language
Enabling the spell check feature in Chrome may not make any difference if you have selected the wrong language. Here’s how to change the spell check language in Chrome.
1. In Chrome, click the kebab menu in the top right corner and select Settings.
2. In the Languages tab, use the toggles under Use spell check for to enable your preferred spell check languages.

3. If the language in which you are writing is not available, click the Add languages button at the top.

4. Select the language you want to use and click Add.

5. After adding your language, use the toggle to enable spell check for it.

3. Disable the Website’s Native Spell Check
Some websites, such as Google Docs, have their own spell check feature. If the spell check not working issue in Chrome is limited to a specific website, it is possible that the website’s native spell check feature is interfering with the browser. In that case, you can try disabling the website’s native spell check feature to see if that solves the issue.

4. Disable the Spell Check Feature on Your Computer
Similarly, you should disable the spell-check feature on your Windows or Mac as well to avoid any interference. Here are the steps for the same.
Windows
1. Press the Windows key + S to access the search menu. Enter typing settings in the search box and select the first result that appears.

2. In the Settings window, disable the toggle for Autocorrect mispelled words and Highlight misspelled words.

Mac
1. Click the Apple menu in the top-left corner and select System Settings from the list.

2. Switch to the Keyboard tab. Then, click the Edit button under the Text Input section.

3. Disable the toggle next to the Correct Spelling Automatically option. Then, click Done.

5. Try Incognito Mode
Using Chrome in incognito mode allows you to load web pages without any interference from your extensions or existing browsing data. This can help you determine whether a faulty extension or corrupted browser data is causing problems with Google Chrome’s spell check feature.
Press Ctrl + Shift + N (on Windows) or Command + Shift + N (on Mac) to open an incognito window in Chrome. If the spell check feature works as expected in the incognito window, it means one of your extensions or browsing data is to blame.
6. Disable Extensions
An outdated or buggy extension can interfere with Chrome processes and cause features like spell check to stop working. To check for this possibility, you need to disable all the extensions and re-enable them one at a time.
In Google Chrome, type chrome://extensions in the address bar at the top and press Enter. Turn off the toggles next to the extensions to disable them.

Restart your browser and re-enable your extensions one by one until the issue occurs again. Once you find the problematic extension, consider removing it.
7. Clear Browsing Data
Corrupted Chrome cache and cookies can result in all kinds of browser issues, including the one discussed here. You can try clearing the existing browsing data to see if that gets the spell check feature to work in Chrome.
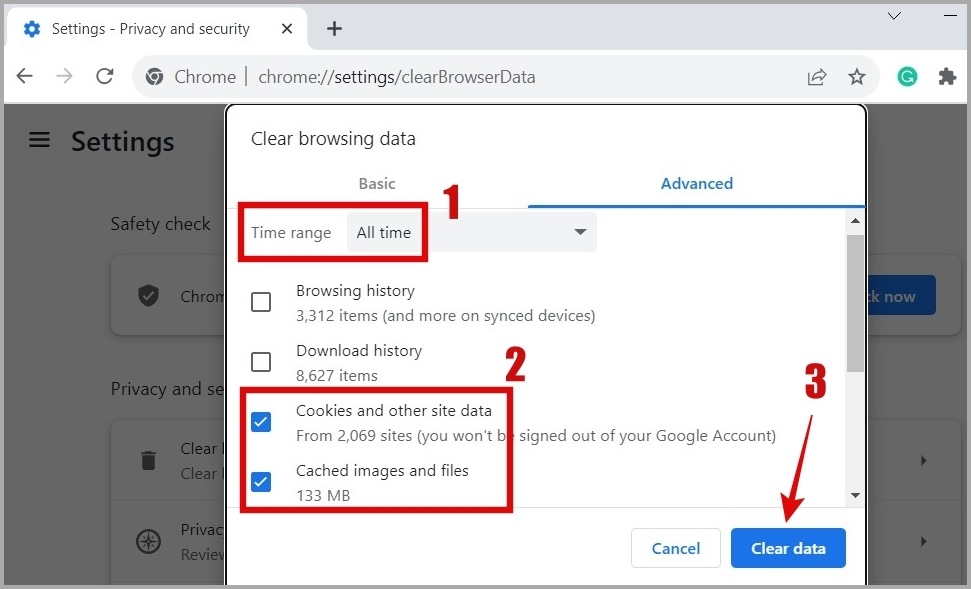
1. In Google Chrome, press Ctrl + Shift + Delete on your keyboard to open the Clear Browsing Data panel.
2. Select All time in the Time range menu. Tick the checkboxes that read Cookies and other site data and Cached images and files.
Then, click the Clear data button.
8. Reset Google Chrome
If clearing the browser data proves ineffective, you have no option but to reset Chrome to its default settings. To do so, use these steps:
1. In Google Chrome, type chrome://settings/reset in the URL bar and press Enter. Then, click the Restore settings to their original defaults option.

2. Hit Reset settings to confirm.

Spelling Perfection
One of the above tips should help fix the spell check not working issue in Google Chrome. However, if nothing works, you can always use an extension like Grammarly or Ginger to ensure your writing is error-free.