Google Docs has been the go-to word processor for many thanks to its easy-to-use interface. But that simplicity also meant a lack of useful features such as the ability to insert watermarks. This often forced users to go through workarounds to add watermarks in Google Docs. Well, not anymore. Your favorite word processor has finally made it possible and convenient for you to add a watermark to your documents. In this article, we’ll guide you through how to create, insert, and remove a watermark in Google Docs. So, let’s dive right into it.
Table of Contents
How to Insert Watermark in Google Docs
If you already have an image or a logo that you wish to use as a watermark in your document, here’s how you can insert it in a Google Docs document.
1. Open up your preferred web browser and navigate to your Google Docs document.
2. Click on the Insert menu at the top and choose Watermark from the dropdown menu.

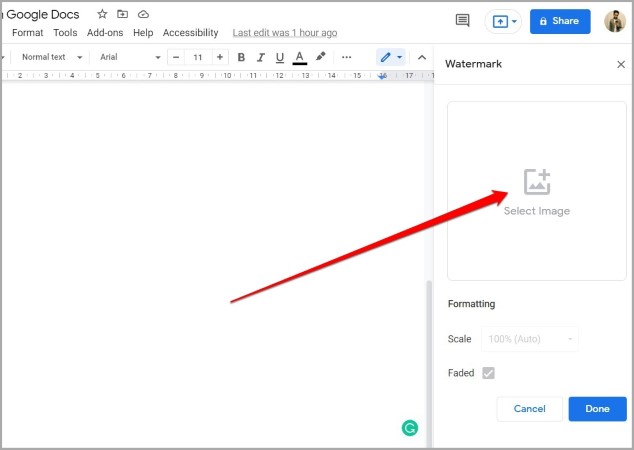
3. A Watermark panel will appear on the right. Click on the Select Image button to upload your watermark.

4. In the Insert watermark window that appears, upload your image from Google Drive, Google Photos, URL on the web, or local storage.

5. Once uploaded, the watermark will appear in your Google Docs document. If you’ve selected a wrong image by accident, click on the Pencil icon to pick a different image.

6. Optionally, you can also tweak the scale (increase or decrease size) of the watermark as well as apply a Faded effect to it using the checkbox. Lastly, click on Done to apply the watermark.

Once you complete the above steps, the watermark will be applied to every page of your Google Docs document.
How to Remove Watermark in Google Docs
If you wish to remove the a watermark from your document, follow the steps below.
1. Open up your Google Docs document. Click on the Insert menu and choose the Watermark option.
2. In the Watermark panel, click on the Remove watermark option at the bottom, followed by Done to save changes.

That’s it. The watermark will now be removed from every page on your document.
How to Create a Watermark in Google Docs
As we just saw, the watermark feature on Google Docs is quite straightforward if you already have an image that you can use. However, if that’s not the case, you can take advantage of the drawing feature in Google Docs to create a watermark yourself. Here’s how.
1. Open your Google Docs document. Click on the Insert menu at the top to navigate to Drawing > + New.

2. Click on the Text Box option from the toolbar at the top and draw a text box in your Drawing panel.

3. Add your text and click on the three-dot menu icon to format it using the toolbar.

4. Once you’re satisfied with your creation, expand the Actions menu, go to Download and choose a preferred format for your image.

Once downloaded, you can use the method mentioned above to easily insert your image as a watermark.
How to Add watermark on Picture in Google Docs
1. Open the Insert menu and navigate to Drawing > + New. Now click on the Image option from the toolbar to upload the picture which you wish to watermark.

2. Click on the Image option again to upload your watermark. You can either use an existing image or draw a watermark yourself using the steps mentioned above.
3. Once added, move the watermark image to your preferred place. Lastly, click on Save and Close.

That’s it. Now your watermarked image will be added to Google Docs.

FAQs
Is the watermark feature available in the Google Docs app?
At the moment, the watermark feature is only available in the web version of Google Docs and not in the Android or iOS apps.
Wrap Up: Insert Watermark in Google Docs
The watermark feature is a welcome addition to Google Docs. Hopefully, we shall see more of the same and expect Google Docs to release such useful features in the mobile apps as well. Until then, you can count on these add-ons to enhance your Google Docs experience.
Also Read: How to Draw and Sign on Google Docs