Most Android smartphones come with 64 GB of storage. But if you have an old smartphone, chances are you’ll have either 16 or 32 GB variant. Thankfully, you can easily expand the memory by using external storage, like a pen drive or a hard drive. This comes in handy when you are traveling and want to watch your favorite movies on the go.
Related: How to Use USB Flash Drive on Android and iOS
Now connecting a pen drive to an Android is simple. Simply buy a cheap OTG cable, then use it to connect your Android and Pendrive. Next, open any file manager such as Solid Explorer, look under the device menu, you will find your Pendrive. That’s it.

But what about connecting an external HDD to Android?
For instance, I want to use my 2 TB hard drive with my Android. Will, that work?
Well, Yes and NO.
Usually, external hard drives don’t work right out of the box with Android devices. Though in my testing, I found this to be a gray area. Since every Android runs a different version of OS and has a different manufacturer, it’s not possible to say anything for sure. For instance —
#1 Some low-end devices (like my dad’s moto e) do not support OTG. And there is nothing we can do here. To find out, if your device supports OTG or not, you can use USB OTG Helper. The app is free on Google play and does not need ROOT.
#2 Mid-range devices (like moto g) support OTG with pen drive but don’t detect external HDD formatted with NTFS and HFS+. We can fix this.
#3 And finally some high-end devices (like my Nexus6) support both FAT32 and NTFS volume without using any software. But, it can not read other formats like HFS or exFAT. We will see how to fix that.
Why my External HDD Don’t Work With Android?
When you connect an external hard drive to Android, you may face 2 problems.
#1 Hard Drive is not detected
You will either hear a clicking noise or the lights on your hard drive will not blink, this means the disk inside your drive is not spinning properly.
Reason: Unlike pen drives, External HDDs needs a lot more power. And if they are not externally powered then it will take power from the device itself. So, if your smartphone is not powerful enough to power an external HDD, then it will not work.
For instance, my WD 2TB hard drive works fine with Nexus 6 but doesn’t work on my raspberry pi without external power.
Solution: Use a powered USB hub or externally powered OTG cable.
#2 Hard drive is detected but not Opening
Reason: File system error. There are many file system out there and every O.S prefer one of their own. For instance, Android supports FAT32 by default and since pen drives are also in FAT32 format, we don’t face any problem with pen drives.
But, most external HDDs uses the NTFS file system (Windows default FS) and sometimes in HFS (MAC default FS). So this mismatch in file system results in the error.
Related: Why External HDD Do Not Work with All Operating System
So let’s see how to fix it. Well, we have two option here.
#1 Format your Hard drive
You can format your Hard drive to FAT32 using your computer and then use it on your Android. Since FAT32 is compatible with all OS, it will work right away with your Android, in fact, after this, you will never face compatibility issues with any platform.
Related How to format Hard drive on Windows, Mac, Linux, and Android
However, I don’t recommend formatting HDD to FAT32. Why? Well, because FAT is an old file system and lacks important features like journaling (prevent data loss), encryption. And the maximum single file size is limited to 4GB.
#2 Use 3rd Party Apps
With this method, you can retain your original File System of your HDD. Simply use a free app like Paragon NTFS or Stick Mount to use it on your Android. I have been using this for months and never had any problem. So let’s see how it works
External HDD on Android
1. USB Media Importer (Paid)
This app is designed for Nexus devices, but based on its play store reviews, it also works with non-nexus devices like moto-x and many others. Though, before you spend money, make sure you try the USB Photo Viewer. It’s from the same dev but free.
Once you install this app, it will auto-detected an external drive and you can start using it right away. However, this is read-only i.e. you cannot copy data from your Android to external HDD. Moreover, it also does not support HFS formatted drives.
Bottom line: First, try other free alternatives and if they don’t work, go for it.
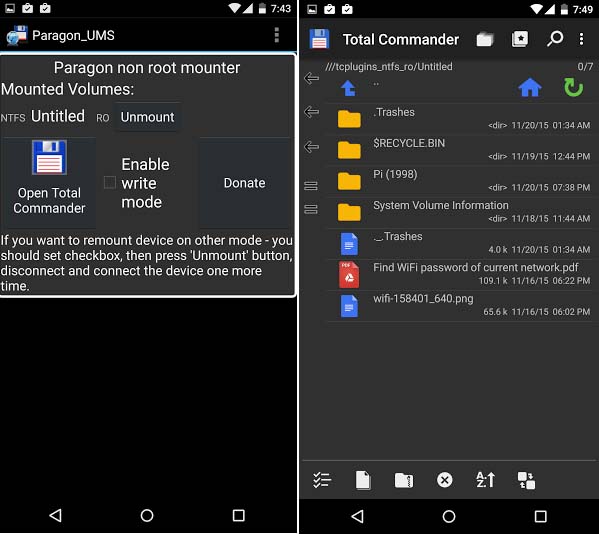
2. Total commander with USB – plugin
This is the most popular (and also a free) way to use NTFS formatted HDD on Android. Here you need to install two free apps from Google Play.
First, install the total commander app – it’s a file browser that will help us to browse the content of our drive.
Next, install USB plugin for Total Commander— it’s an extension for the file browser that will do the actual job i.e. mounting the external Hard drive.
Once done, connect your hard drive to your Android using OTG cable. Again the app will recognize your volume and you will see a notification at the bottom saying, open the drive with Paragon UMS. However, if you don’t see the notification, then simply open the app and refresh it. It should work.
There is also an option to get write access. However, since this app is still in beta, the write feature didn’t work for me. But the good part is, along with NTFS, it can also read HFS formatted drives.

3. Stick Mount (Root)
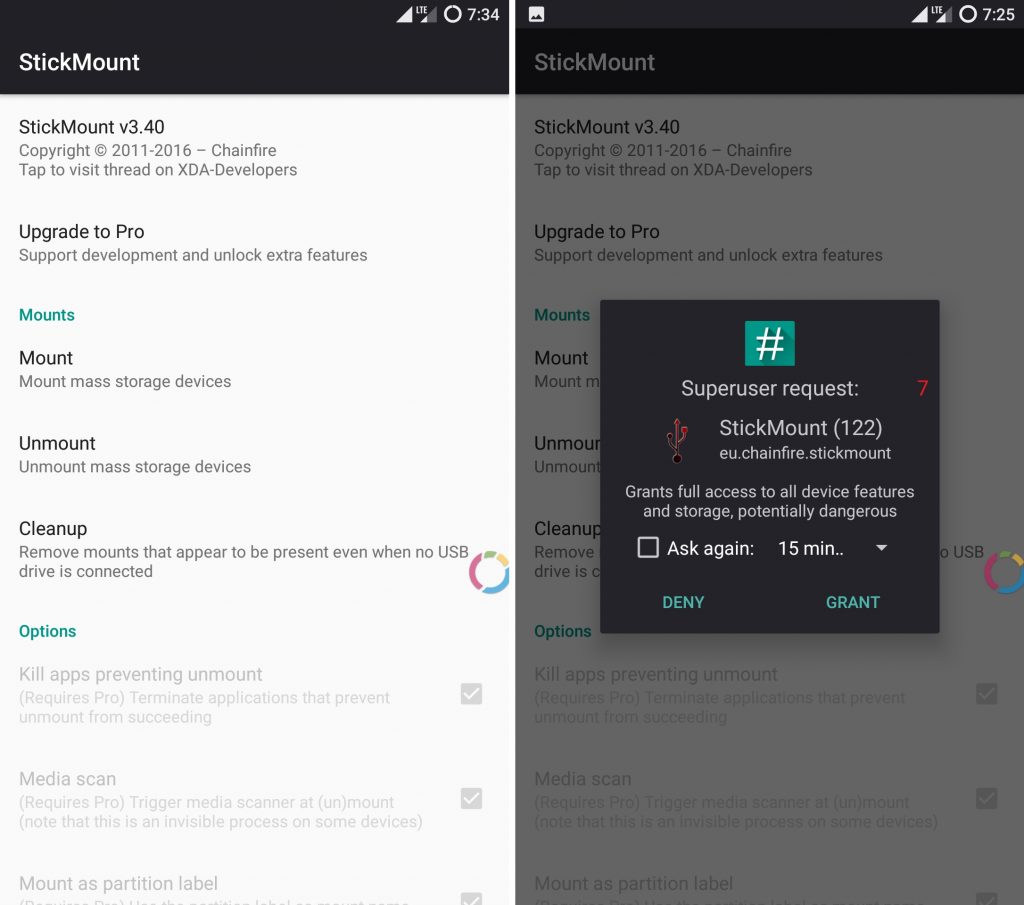
This app is made by chainfire (the developer of SuperSU). Basically, stick mount helps you to mount an NTFS partition on Android. So, you will still need to have a file manager to browse the content of your drive.
Install Stick mount from Google play and then insert your external drive and it will automatically mount it. Usually, it mounts the drive under Sdcard > USB storage, but you can find the mount location by opening the app and tap on mount option.
Bottom line: It’s free and works well. However, it still does not let you write data on your drive, neither does it support HFS drive. So better try the next option.

4. Paragon HFS, NTFS, and exFAT (Root)
Paragon is popularly known for its software to access HFS drive on Windows and NTFS drive on MAC. And guess what, they have an android app as well but this time it’s free.
This app is similar to all the other app. Install the app, connect your external HDD and it will automatically mount it and show you the path. There is also an option to format your drive, but it’s hidden under settings.
Bottom line: This is the best way. It’s free and lets you both read and write, support both NTFS drive and HFS. However, even though it’s in the name, it actually does not support exFAT (since its Microsoft propriety format) but you can use stick mount for that.

If nothing works?
Usually, an external HDD require you to plug in a cable to your computer (or in this case to your Android). But thanks to modern technology, we now have Wireless Hard drives. And it does what it says, i.e. it when you press a button on this HDD, it’ll create a Hotspot, which you can connect from your smartphone and then browse all the content of the drive using a File manager app.
You can stream your HDD from multiple devices (usually not more than 3 devices). And it also has a built-in battery, so you can use it while traveling in a car or train. However, on the flip side. It’ll cost twice as much for the same storage. For instance, a typical Seagate 1 TB external HDD cost you around $60, while a Seagate Wireless Plus 1TB will cost around $140. The HDD supports NTFS by default. So, you can not use on iOS devices.
