InShot is one of the coolest video and photo editing apps available for free. You can use it for both basic and advanced editing on Android as well as iPhone and iPad. When it comes to video editing, InShot lets you trim, split, merge videos, change aspect ratio, and much more. If you are new to InShot, this tutorial will guide you on how to use the various features of the app to edit videos. Let’s get rolling.
Table of Contents
Add Photos or Videos to Video
You can create a video by merging individual video clips, photos, or both.
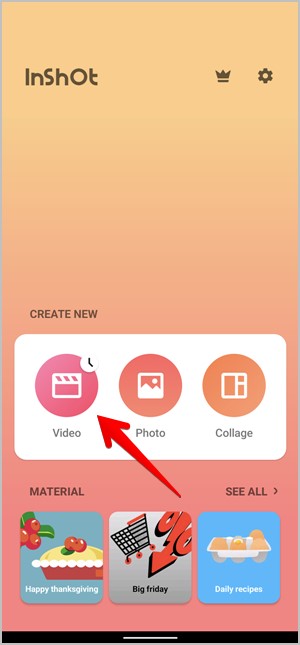
1. Open the InShot app on your phone. You will be greeted by the home screen where you will see three options: Video, Photo, and Collage. The Video option lets you create a video from videos or photos. Use the Photo option if you want to edit photos. The last option is self-explanatory. Since we are interested in editing videos, tap on Video.
Tip: The Clock icon on the Video option means that you have pending drafts.
2. After you tap on the Video tab, press the New button to create or edit a new video. If you have already edited a video in InShot, it will appear here as a draft. Tap on a draft to edit it.

3. Select the clips that you want in the video on the screen that appears. You will find Video, Photo, and All tab. Tap on the photos and videos to select them. If you want to create a video from scratch, tap on the Blank option. Finally, press the green checkmark icon at the bottom.

Tip: To create a video from pictures alone, like a slideshow, tap on the Photo tab and select the photos.
The video editor screen will open where you can start editing your video.
Import More Photos or Videos
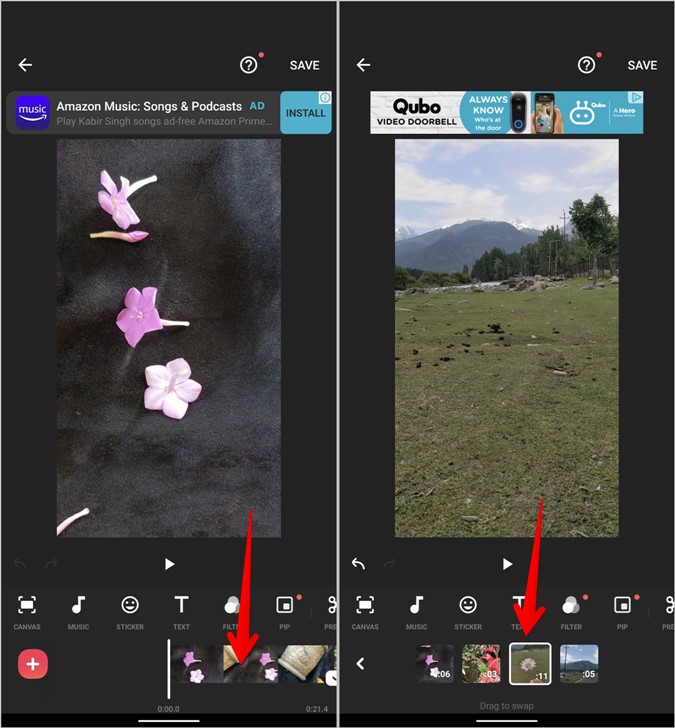
After you add the initial clips, you can easily add more clips if you miss out on something. On the video editor screen, tap on the + (Add) icon present on the left side of the timeline.

Rearrange Clips
The clips are arranged on the timeline in the order they were added to the video. But you can change their position anytime. Simply touch and hold any video clip in the timeline to enter the rearranging mode. Then, drag the clip thumbnail to a new position.
Zoom Timeline
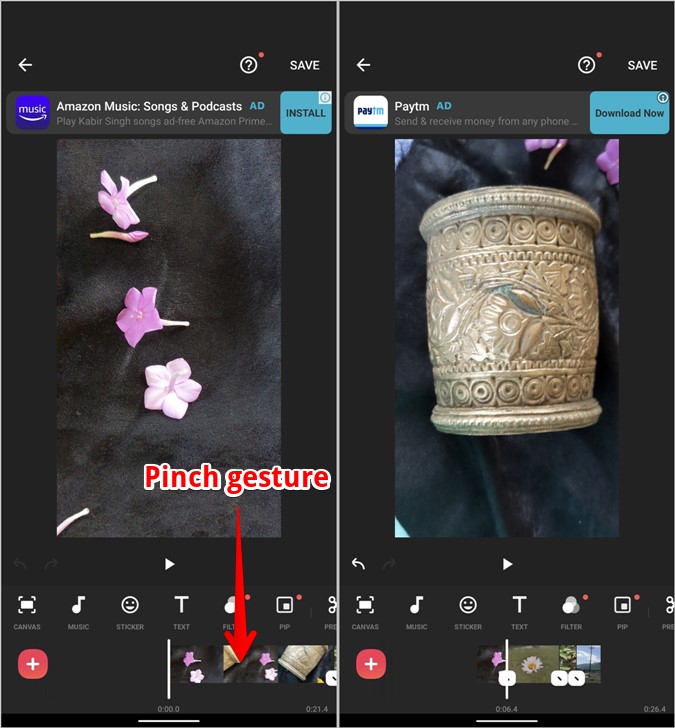
Use the pinch in and out gesture on the video timeline to zoom in and out of the clip previews. This gives you a better idea of what you are working with.
Delete Clip
To remove an individual clip from the video, tap on it to select it. You will see a white border around it. Then, tap on the Delete tool in the toolbar at the bottom.

Apply Effect or Edit to All Video Clips
Generally, when you are editing clips, any effect or change that you make will apply to that particular clip if you press the single checkmark icon. But you can apply the change to all clips by tapping on the double checkmark icon instead of the single.
Change Video Size
Many times, you want to convert a horizontal video to a portrait one or vice versa or publish a video that you uploaded in the Instagram story on YouTube. The aspect ratio of the videos is different in such cases. So, instead of recreating the videos from scratch, you should change their canvas size. It’s not an ideal solution as your video could have blank borders or the video could be cropped. However, you can give it a try.
In the InShot video editor, tap on the Canvas option and select the required aspect ratio from the available options. Use the pinch in and out gesture to zoom in and out of the video. Tap on the single checkmark icon to apply the new video size to the current clip or tap on the double checkmark icon to apply to all clips.

Change Background
If your video has white background after changing the aspect ratio, you can fill it with color or add a blur effect. For that, tap on the Background tool in the toolbar on Android. And, on iPhone, you will find the Background option inside the Canvas tool itself. Choose the preferred color or effect from the available options.

Tip: Add a black background and zoom out the video to add black bars around the video.
Crop Video
In case you don’t want the video to have a background, you can crop the video depending on the required size. For that, tap on the Crop tool in the toolbar. Choose a size from the options and move the selection box to fit the desired area inside it. You will lose some portions of the video, as expected.

Add Audio or Music to Video
InShot offers multiple ways to add audio to your video. You can choose music from InShot’s built-in music library, add a track from your own local folder, or record something. Tap on the Music tool in the toolbar to go to the audio screen. Tap on the desired option from Tracks, Effects, or Record and add the sound to your video.

Add Audio from Video
InShot also lets you extract audio from any video on your phone and use it in the current video. Let’s say you have an Instagram reel video on your phone whose audio you want to use in the video that you are editing. Go to the Tracks option inside Music and tap on the Extract audio from video option. Select the video file.

Extract Audio From Current Video
You can also extract the audio from the video that you are editing. This lets you edit the audio separately from the video. You can change its duration and volume, or duplicate and split it.
To do so, go to the Music tool and tap on the video clip at the bottom. Tap on the Extract audio option. You will be taken to the Music screen where you will see a separate audio layer. Use the options at the top to edit it.

Tip: If you can’t download a song on your phone, screen record the song from YouTube or any other music app and use the Extract audio option to add it to the video.
Remove Background Voice from Video
To remove any existing audio from your video, go to the Volume tool in the toolbar and decrease the volume to the minimum. Tap on the double checkmark icon to remove audio from all clips. You can change the volume or remove it completely from the Music tool as well.

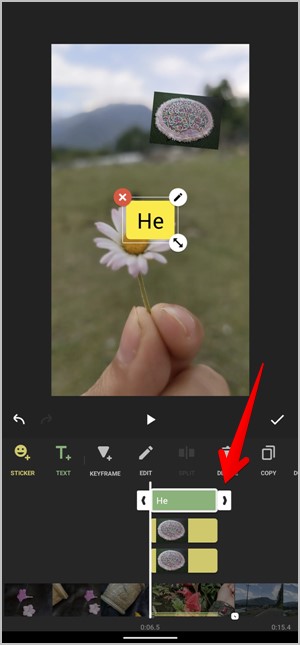
Add Sticker
Use the sticker tool to add emojis, animate stickers, and GIFs to your video. You can use the Sticker tool to add a PNG image, such as a watermark to your video. For that, tap on the Sticker tool followed by the Gallery icon. Press the Add button and select the image.

Once added, tap on the sticker in the timeline and adjust its duration, or press the Edit button to add transition effects.

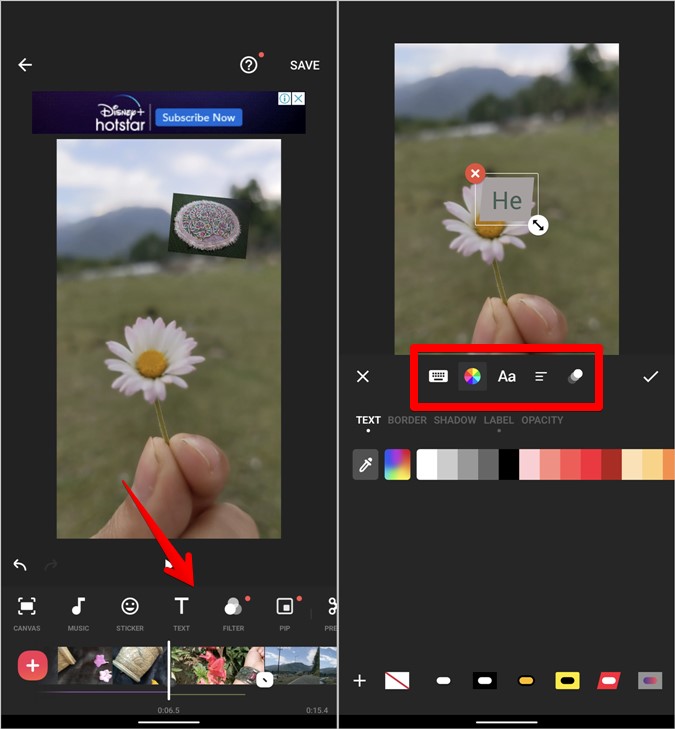
Customize Text
Press the Text tool to add text to your video. You can customize its color, style, opacity, font, and alignment. All these options are available on the text editing screen.
You can even add transition effects to the text. For that, press the last icon in the Text editing toolbar. Select the transition effect. Tap on the In and Out options to choose the desired effect for the text entry and exit.

Once added, change the duration of the text using its preview in the timeline by dragging the end edges.
Add Filter and Effects
Tap on the Filter tool to adjust the brightness, contrast, saturation, and other things manually. You can also apply pre-made filters or add effects like Glitch, Zoom, Fade, etc. After adding an effect, tap on it in the timeline to adjust its duration.

Add Transition
On the video timeline, press the clock icon between the video clips to open the Transition screen. Select the desired transition effect.

Add Multiple Video Clips in One Frame
Using the PIP tool, you can play multiple clips in one single frame, like a video collage. Tap on the PIP tool and add the desired clips to layer them.

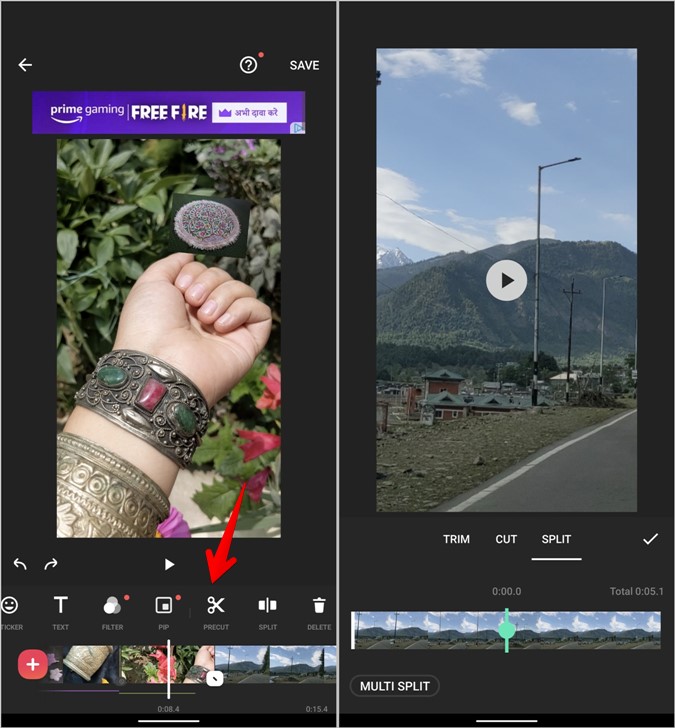
Trim, Cut, and Split Video
Tap on the Precut tool to trim, cut, or split the video.
- The Trim tool lets you cut the undesired parts of the video from the end points. Drag the end edges to trim the video.
- The Cut tool removes the middle portion of the video, merging the parts that are left. Drag the green selection boxes to keep the portions that you need in the video.
- The Split tool allows you to break down the video into smaller parts where each part acts as an individual clip. Keep the green marker at the position where you want to split video.
Rotate, Flip, and Speed
As expected, use these tools to rotate the video, flip, or increase or decrease the speed of the video.
Tip: To add slow motion to a portion of the video, split the portion and change its speed.
Freeze Frame
The Freeze tool lets you freeze a frame for the selected duration. Basically, the video will focus on the selected frame. Keep the pointer at the frame that you want to freeze and press the Freeze tool.

Remove Watermark From Video
If you see the InShot watermark while editing the video, tap on it and watch the video advertisement to remove it without the pro version.
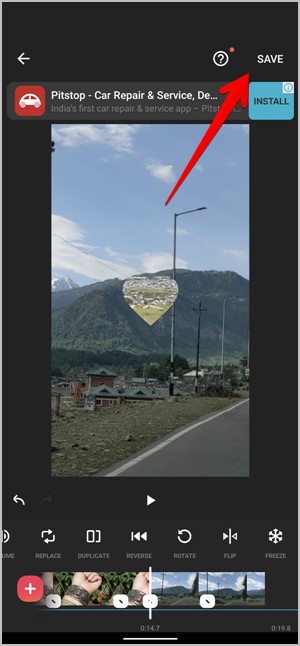
Save Video
When done editing the video, tap on the Save button at the top to export the video. Choose the desired resolution and frame rate, and hit the Save button. The video will be saved in your phone’s gallery.
Edit Videos for Social Media
I hope this guide helped you in creating and editing videos on the InShot app. Once you have mastered it, you can use InShot to edit videos for social media, like Instagram Reels, YouTube videos, or create videos with pictures. The possibilities are endless. Check out other video editing apps for Android and iOS.