You connect an external drive to your Windows 10 or 11 computer and instead of data, you are greeted with the ‘Access is denied’ pop-up error. It says that the drive is ‘not accessible’. So where is your data and how can you access it? There are a couple of reasons behind the access denied error on Windows as we will discuss below along with solutions.
Table of Contents
1. Use Different Cable, Port, PC
It can be as simple as a broken or severed cable problem. Cables often suffer from wear and tear, especially near the connector area where they are often bent at awkward angles.
Another reason can be a malfunctioning USB port. Reasons could include dust, hardware, or even a software bug.
Finally, check if you get the access denied error on your Windows 10/11 PC while connecting the external hard drive on a different laptop or computer. If not, there is something wrong with your PC. If yes, read on.
Also Read: Do you own a PS5? If yes, here are some of the best hard drives for you.
2. Use Error Checking Tool
The Error Checking tool will perform the same function as the CHKDSK command in Command Prompt does. However, if you know what you are doing and work with command line tools, check disk command offers more options. The tool will check the disk’s integrity and try to correct any errors it finds.
1. Right-click on the external drive folder in File Explorer and select Properties.

2. In the pop-up that follows, click on the Check button under the Tools tab.
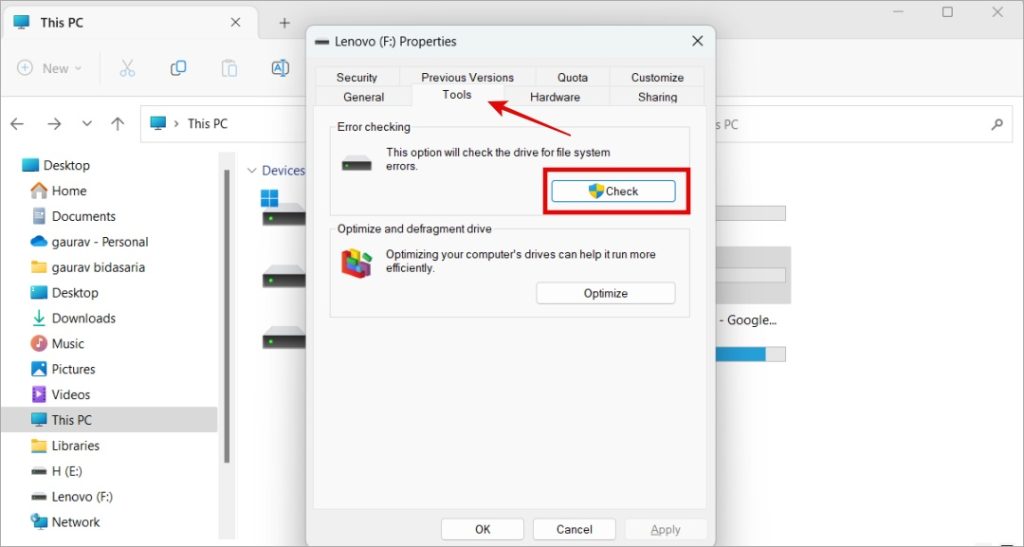
3. If no errors are found, Windows will suggest you scan the external hard drive to figure out the cause of the access denied error. We recommend that you click on Scan drive.

3. Reset User Permissions
A simple command can reset permissions for all user accounts making it easier to use external hard drives and remove access denied pop-ups.
1. Press Windows key and type CMD. Now click on Run as administrator to open Command Prompt with admin rights.

2. Copy-paste the command below and hit Enter.
ICACLS * /reset /t /c /q
3. Let the command run and then close the Command Prompt window. Ideally, you should be able to open the external drive folder now.
4. Enable Built-In Administrator
Every Windows installation has a built-in administrator account for emergencies. It has root access and can open and access any file and folder on your computer. Again, enabling this admin account is as easy as executing a command.
1. Open CMD again as you did in the previous step.
2. Now copy-paste the command below and wait for it execute.
net user administrator /active:yes
3. Close CMD when done.
That’s it.
5. Take Ownership of Drive
Taking ownership of the drive that you are trying to access is important, otherwise, you will see the access denied screen. It denotes that you own the drive and hence are eligible to access the same.
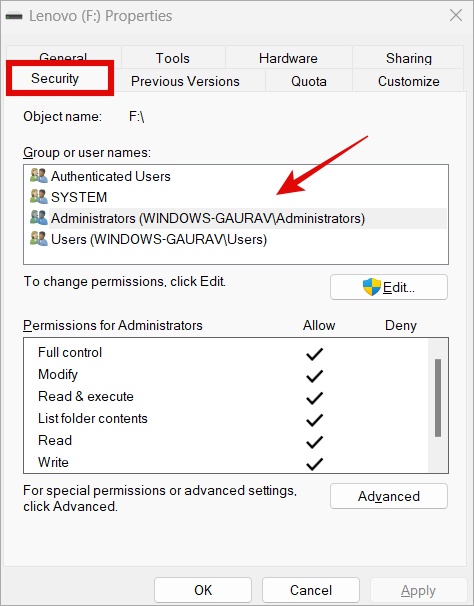
1. Right-click on the external drive and select Properties.
2. Under the Security tab, click on Advanced button.

3. Click on Change permissions.
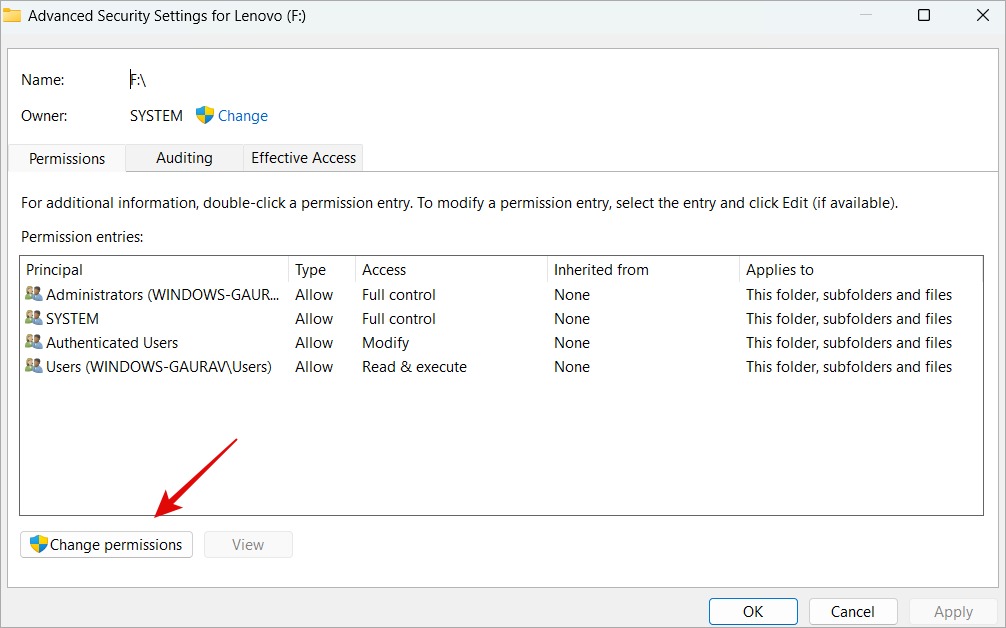
4. In the next screen, double-click on your username or account. It should be something like Administrators (WINDOWS-USERNAME).

5. In the next pop-up, you can give permission to the user account to read, write, modify, etc. Select This folder, subfolders and files option from the drop-down menu and then check all the options below except Special permissions.

6. Click on OK to save all changes.
Now try again and open the external drive folder.
Pro Tip: You can also connect and use NTFS hard drive on your Android phone. If connecting to Windows is throwing the ‘access denied’ error, try smartphone.
6. Add Account With Permissions
If the Windows user account that you are using to access the external hard drive doesn’t have administrator permissions, you will be greeted with ‘access denied’ screen. If you are working in an office or enterprise, contact your superior or IT team. If it is a personal computer, follow the steps below.
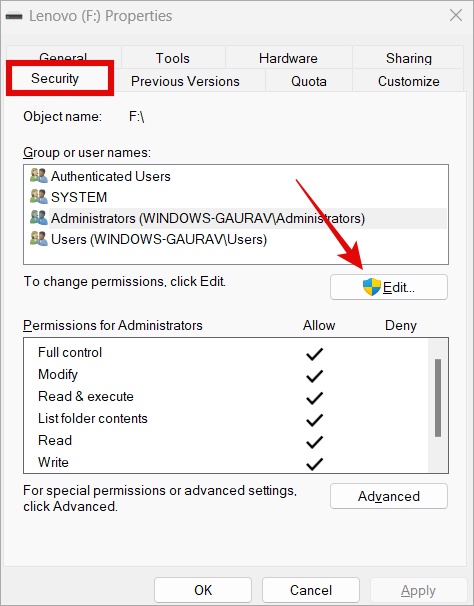
1. Right-click on the external hard drive folder and select Properties.
2. Under the Security tab, you should see a list of users who can access the said drive. It should be something like WINDOWS-USERNAME.
3. Click on the Edit button if your Windows username doesn’t have the necessary permissions.
4. Click on Add in the next pop-up to add a new user with the correct permissions.

5. Type administrator in the given field (no space before or after the word) and click on Check Names button on the right.

6. Your Windows computer’s admin username should be visible now. Click on OK on all open pop-ups to save changes.

7. Now refresh and try accessing the external hard drive again. If you are still greeted with the Access Denied pop-up, remove the drive, reboot your computer, and reconnect to check again.
7. Give Everyone Access
Your Windows computer has user accounts where some accounts like Admin has access to all folders and files. If adding doesn’t work above, try giving access to ‘everyone’.
1. Right-click on the Drive letter and select Properties again.
2. Under the Security tab, click on Edit button.
3. Click on Add in the next pop-up.

4. Type everyone in the given field below and click on Check Names.

5. Click on Advanced on the same pop-up window as above.
6. In the Owner tab, click on Edit.
7. Click on Other users or groups.
8. Type Everyone. Click on OK and and Save to save all changes.
Note: If you don’t see options mentioned form step 5 or 6 onwards above, save changes after step 4 and you should be good to go.
8. Change Drive Letter
Windows assigns an alphabet to each drive on your computer. For example, the OS is saved in the C drive usually. Sometimes, changing the drive letter of the external drive can help resolve the access denied issue.
1. Press Windows+S to open Windows Search. Type Disk Management and open Create and format hard disk partitions from the search results.

2. Right-click on the external hard drive letter and select Change Drive Letters and Paths.

3. Click on Change in the pop-up that follows.

4. In yet another pop-up, you can choose a new drive letter from the drop-down menu. Note that you must select a drive letter that’s not already in use by another drive. Click on OK to save changes.

Note: If you see a warning pop-up saying something like ‘some programs that rely on that drive letter may not run properly’, click on OK to continue.
Access Denied? Regain Now
The ‘access denied’ is quite a common error when you are working with external hard drives or flash drives. More often than not, your data is safe and intact. It’s just that for one reason or another, you can’t access it temporarily because you do not have the right permissions or there is some bug. Hopefully, that is resolved now.
You can also try some hard drive health checker apps for Windows that will further scan for errors and help you figure out what the problem is.