Usually, you will see the MSVCP140.dll is missing error while installing an app and VCRUNTIME140.dll is missing or not found error while launching an application on your Windows 10 and 11 computers. Sometimes, it is vice versa, so I have decided to address both in the same post.
Table of Contents
What’s Happening
Both MSVCP140.dll and VCRUNTIME140.dll files are part of the Microsoft Visual C++ library. While they are mainly used when you are running apps developed or using Visual Studio, there are many games that also require these two DLL files. This is why there are so many gamers looking for this file.
DLL files help the Windows OS function correctly. Now that’s an oversimplification but explaining more than that will require a separate article as it is beyond the scope of this one. For now, know that the file is missing and we need to find a way to restore it to the correct folder. Here’s how to restore the missing MSVCP140.dll and VCRUNTIME140.dll files back on your Windows 10/11 PC.
1. Download DLL Files
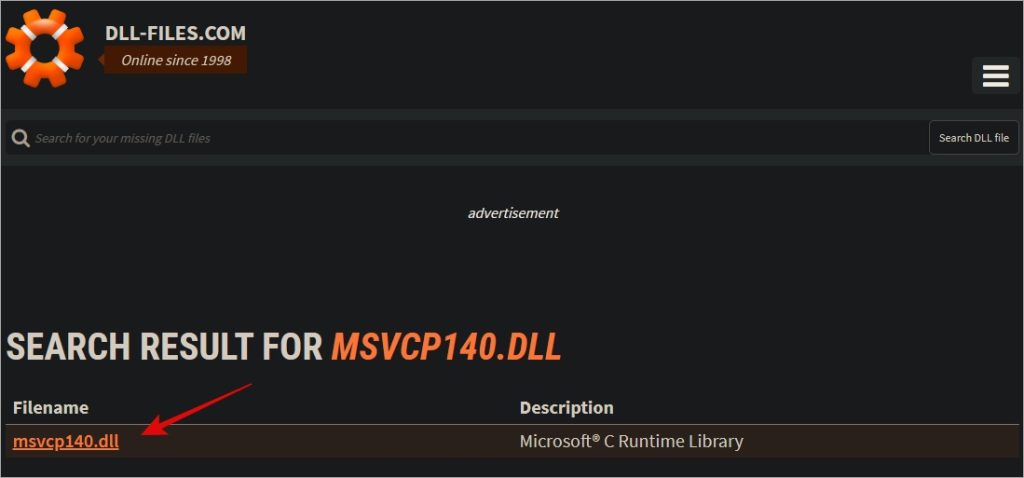
DLL Files is the largest and most up-to-date repository of DLL files for the Windows ecosystem. A real lifesaver, if you ask me. Simply copy-paste the name of the DLL file in the search and click on the file name to read more.

You will now see a help page explaining what the file is and download links for various versions. If you know which version to download, go for that. If not, always download the latest version for your architecture which is either 32-bit or 64-bit. Most modern computers are 64-bit these days. Repeat the steps for both MSVCP140.dll and VCRUNTIME140.dll files.
Now replace the original file with the one that you just downloaded. If you don’t know the location of the original file, try searching for it in File Explorer’s C drive which is where the Windows OS is usually located.

If you can’t find the file location, paste the file into C:/Windows/System32 folder (64-bit) and C:/Windows/SysWOW64 (32-bit) folder. If this is not working for you, read on.
2. Copy From Another PC
Most Windows 10 and 11 computers have the two DLL files that you are looking for. You can simply copy-paste the files from another computer to yours. Ask your friend to search for it in C drive and share it with you. Then you can replace the original file with the new one to fix it. Refer to point 1 above if you can’t find the folder.
3. Reinstall Microsoft Visual C++
The two DLL files, MSVCP140.dll and VCRUNTIME140.dll, are both parts of the Microsoft Visual C++ Redistributable package that’s available to download on Microsoft’s website. You can simply reinstall the whole package, along with the said DLL files, to resolve the missing MSVCP140.dll and VCRUNTIME140.dll files error.
You will find the latest version for downloading at the link below. Note that you will need to find out the architecture of the PC where you will be installing it. You can do that from Settings > System > About.

Mine is a 64-bit x86-based processor.
Download Microsoft Visual C++ Redistributable
4. Run SFC Scan
The System File Checker or the SFC scan will look for corrupt system files and attempt to either restore those files. That also includes DLL files or Dynamic Link Libraries files.
1. Press Windows+S to open Windows Search and type CMD. Now click on Run as administrator to open the Command Prompt from the search results.

2. Type the command below or copy-paste it.
sfc /scannow

Press Enter to execute it and wait for it to run. When it runs to 100%, check again if you get the MSVCP140.dll or VCRUNTIME140.dll found missing error during installation.
Pro Tip: 8 Best Windows 10/11 Apps for Personal Productivity
5. Re-Register DLL File
Each DLL file on your Windows computer has to be registered. Fortunately, it is easy to do so. In the step above, we saw how to open the CMD or Command Prompt with admin rights. Open it again and this time, give the below two commands but one at a time.
regsvr32 /u MSVCP140.dll
regsvr32 MSVCP140.dll
Replace the name of the file if it is the other DLL file that you are getting errors for.
regsvr32 /u VCRUNTIME140.dll
regsvr32 VCRUNTIME140.dll
Reboot your computer once and try again.
6. Run Defender and Malwarebytes Scan
The built-in Windows Security Center has everything that you need to keep your computer secure. Open it and run Virus & threat protection scan. You can also download Malwarebytes for advanced security measures. Either way, make sure that your PC is not infected with a virus or malware.

7. System Restore
What this will do is restore your computer to a previous state in time when everything was running as it should. Think of it as a time machine. Only user data will not be deleted. Only system files.
1. Press Windows key to open search and type system restore. Now open Create a restore point.

2. Under System Protection tab, click on System Restore option.

3. You will see a list of all the restore points that Windows has created. For me, one was recently created after a recent Windows update was installed. You will also see date and time. Select a restore point when you feel everything was working just fine and click on Next to follow the on-screen instructions.

DLL Found Missing
MSVCP140.dll or VCRUNTIME140.dll files are often found missing on Windows 10 and 11 computers. It’s not that big of a deal however can be scary if you don’t know what to do. Hopefully, the issue is resolved now and you are able to install or uninstall an app correctly.
To save you some time, take a look at some of the best file explorer tips and tricks for Windows 11.