Windows Installer Service is one of the most essential components of the Windows operating system. It is the one that is responsible for handling the installation, removal, and maintenance of your software applications. And this is just the beginning – the Windows Installer Service has other functions. In this guide, you’ll discover everything about it, from its benefits to how to disable it on your PC.
Table of Contents
Key Features of Windows Installer Service
- In case of installation failure, Windows Installer can roll back to the previous installation state, preventing any incomplete or erroneous changes from affecting your system.
- It can detect and repair damaged or missing files, registry entries, and other components of installed applications.
- When you uninstall an application, it ensures that the application is correctly and clearly uninstalled, removing all the associated files, registry entries, and other traces.
- Windows Installer divides the software into smaller units called components. This makes it possible to install or update individual components without affecting the rest of the application.
Tip: Are you into gaming? Here are 21 ways to enhance your gaming experience on a PC.
Enable/Disable Windows Installer Service on Windows 10/11
By default, the Windows Installer Service is enabled on all Windows versions. However, if you want to disable it on your computer, there are multiple ways to do it.
Method 1: Windows Services
One of the easiest methods to enable or disable the Windows Installer Service is by using the Services console. Here’s a quick guide:
1. Launch the Run dialog (Windows Key + R) and enter “services.msc” and then hit OK.

Alternatively, you can also search for Services using Windows Search.
2. After opening the Services window, scroll down until you locate the Windows Insider Service. Once you’ve found it, double-click to access its Properties.

3. Now inside the General tab, click on the drop-down menu next to the Startup type and switch from Manual to Automatic.
4. Once that part is done, move to the Service status section and hit the Stop button.
5. Now all you need to do is click Apply and then the OK button to save the changes.

That’s it. You have successfully disabled the Windows Installer Services on your PC. To enable it back, you can follow the above procedure and hit the Start button.
Tip: Learn how to find your Windows 10/11 product key.
Method 2: Registry Editor
1. Open the Run program and enter “regedit” to launch Registry Editor and then hit the Enter key.

Alternatively, you can also search for Registry Editor using Windows Search.
2. Hit the Yes button if the UAC (User Account Control) prompt appears.
3. After opening the Registry Editor, head over to the Address bar and enter the following path to directly jump to the Windows Installer settings.
Computer\HKEY_LOCAL_MACHINE\SYSTEM\CurrentControlSet\Services\msiserver
4. Towards the right, you’ll find the Start registry file. Simply double-click it to access its properties.
5. After that, enter the following Value data based on your preference:
- Automatic: 2
- Manual: 3
- Disabled: 4

6. Once done, hit the OK button. That’s all there is to it.
Method 3: Group Policy
Another great way to enable or disable Windows Installer Service on your Windows 10 or 11 is via Group Policy. Fair warning, this method will only work on Windows Pro or Enterprise Edition.
1. Open the Windows Search and look for Group Policy and then open Edit group policy.

2. Next, navigate to the following path and double-click on the Turn off Windows Installer option.
Computer Configuration > Administrative Templates > Windows Components > Windows Installer
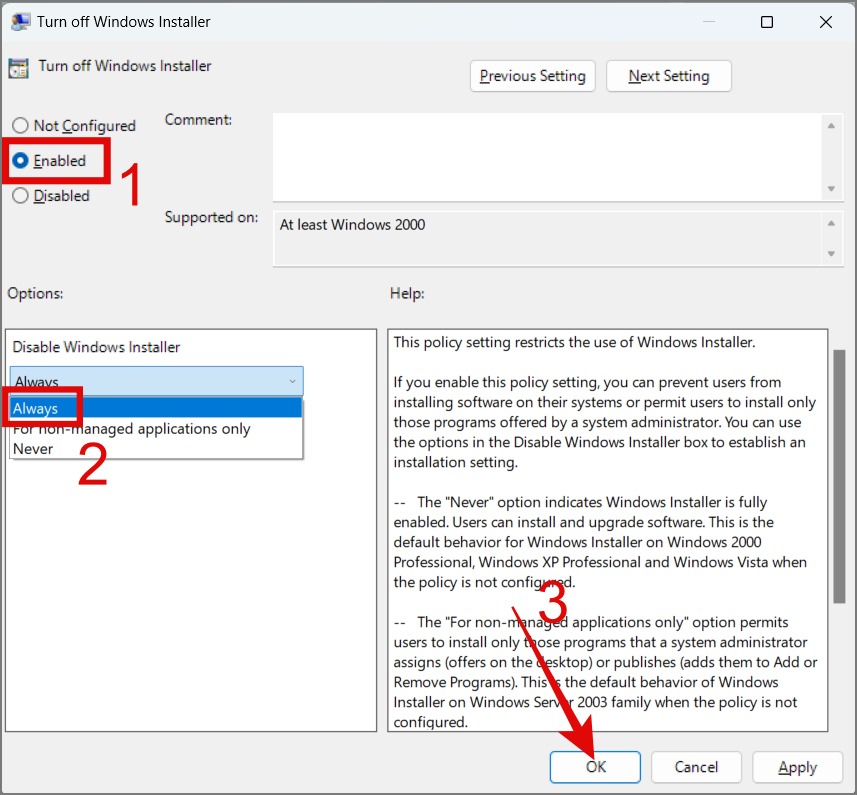
3. Now select the Enabled option and after that, click the drop-down menu and select Always.

4. Finally, hit the Apply and then the OK button to save changes.
Disadvantages of Disabling Windows Installer Service
Before you disable Windows Installer Service on your computer, here are a few things to consider:
- One of the biggest disadvantages of disabling Windows Installer Service is you won’t be able to install or update any application on your Windows, especially those that are using the standard “.msi” installation packages.
- It will make it hard for you to completely remove the application or program, leading to leftover files, registry entries, and potential conflicts.
- Some Windows update or feature might require Windows Installer Service to properly install required files. This may lead to potential errors or disruptions in the Windows functionality.
FAQs
1. Why should I disable Windows Installer Service?
If you’re worried about unauthorized software installation on your personal or organizational computer, you can disable the Windows Installer Service to protect it. This will also reduce the risk of malware infecting your PC.
Unveiling the Windows Installer Service
The Windows Installer Service is an incredible feature that performs numerous tasks in the background, exceeding your imagination. We hope the above guide gave you some clarity on this topic and helped you make a wise decision regarding when to enable or disable the Windows Installer Service on your computer.