Tired of experiencing low FPS, lag, or screen tearing while gaming? Then you’ve come to the right place. In this article, we will provide several methods to help you boost your gaming performance on your Windows 10 and 11 PC. Let’s dive right in.
Table of Contents
1. Upgrade to SSD
Quick Note: Skip this step if you already have an SSD inside your computer.
If your computer or laptop runs on a hard disk, it’s time to upgrade to SSD. It’s a one-stop solution to boost your gaming performance. Personally, when I transitioned from my old gaming laptop with an HDD to a new gaming laptop equipped with an SSD, I noticed a remarkable improvement in gaming performance during gameplay.
2. Enable Game Mode
Now that you’ve already got an SSD, the next step would be to enable the Game Mode on your Windows device. This will prevent Windows from performing any system-level update in the background. Furthermore, it prioritizes your game and gives you access to all the system resources, especially CPU and GPU.
To turn the Game Mode on your Windows 11 or 10, Navigate to Windows Settings (Windows Key + I) > Gaming > Game Mode > Enable Game Mode.

3. Adjust Power Settings
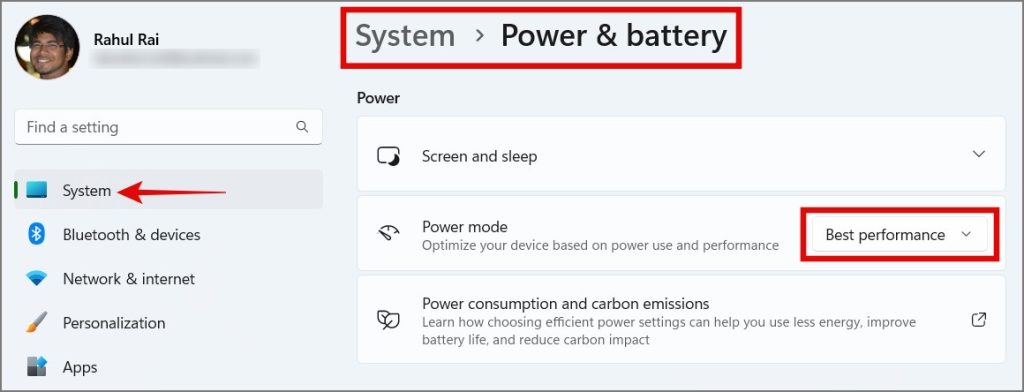
To take your gaming performance to the next level, another step you can take is changing your power setting to the performance mode. This will give a slight boost to your PC performance. However, it’s worth noting that this mode may slightly impact your laptop’s battery backup. Therefore, we recommend enabling this mode only when you’re about to play a game.
To switch to performance mode, Windows 11 users can open the Settings App, navigate to Power & battery, and select the Best performance option under Power mode.
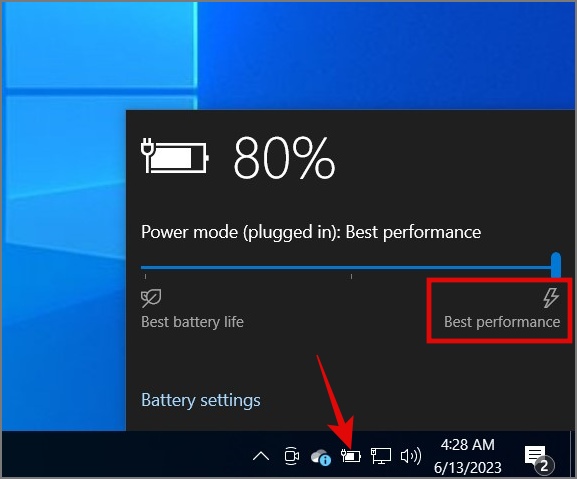
Windows 10 users can simply click on the Battery icon on the Taskbar and then drag the slider to the right side (Best Performance).
4. Update Your Graphics Card Driver
If you experience stuttering on your PC while gaming, it could be related to your graphics driver. Therefore, it is recommended to keep your drivers up to date, as this may fix any bugs that may cause a drop in your gaming performance. Updating a driver is pretty straightforward, just press Windows Key + X hotkey and select the Device Manager. From there, right-click on your graphics card and hit the Update Driver option.

Alternatively, you can also update the graphics card by going to the manufacturer’s site and downloading the latest version of the graphics card driver. Nvidia and AMD are major players in this segment.
Download Nvidia or AMD graphics Driver
Tip: Learn how to reset your graphics card on Windows 11
5. Lower the Game’s Graphics Settings
If your game starts to lag, it might be because you don’t have a powerful enough graphics card to handle the game, or you may be playing a demanding game on a lower-end system. So the best thing you can do to optimize your gameplay is by lowering your game resolution and disabling a few graphics intense settings. That way, you might get a smoother gameplay experience.
6. Disable Nagle’s Algorithm on Windows
Nagle’s Algorithm is a network optimization algorithm used to improve the efficiency of your internet connection by bundling the packages. However, this may also lead to latency issues when playing online multiplayer games. So if you’re also experiencing the frame drop or latency issue during your gameplay session, follow the below guide to fix it:
1. Press Windows Key + S to open the Windows Search and look for Command Prompt or Windows Powershell.

2. Open any of them and type “ipconfig” and hit Enter key.
3. Next, note down the IPv4 Address.

Note: Search for the IPv4 address to which you are currently connected, such as through Wi-Fi or Ethernet.
4. After that, again use the Windows Key + S hotkey and this time look for Registry Editor.

5. Open it and copy & paste the following path into your address bar:
HKEY_LOCAL_MACHINE\SYSTEM\CurrentControlSet\Services\Tcpip\Parameters\Interfaces
6. Now under the Interfaces folder, carefully examine each folder individually and look for DhcpIPAddress that matches your IPv4 Address.
7. Once you find out the matching folder, right-click on the folder (left pane) > click New > Select DWORD (32-bit) Value.

8. Name the file “TcpAckFrequency”.
9. Repeat Step 7 and this time name it “TCPNoDelay”.
10. After that, double-click on each file and change the “Value data” to 1.

That’s it. Restart your PC and Nagle’s algorithm will be disabled. If you run into any problems, you can revert back to your previous settings.
7. Switch to Faster DNS
DNS can also be the reason why you’re witnessing a drop in your gaming performance, particularly in online gaming. Many internet service providers (ISPs) have their own DNS servers, but they often lack reliability. So it’s better to switch to more reliable and safe DNS providers like Google and Cloudflare.
To change the DNS server address, simply navigate to Networks & internet > select Wi-Fi or Ethernet connection (whichever you’re connected to) > Hardware properties > Edit DNS server assignment > select Manual > Enable IPv4 > Enter DNS IP Address > Save.

8. Use a Dedicated Graphics Card
It would be fair to assume that your Windows PC might be using the integrated graphics card instead of the dedicated graphics card during gameplay. This is not a new problem and can easily be fixed. You can read our detailed guide on how to force a game to use a dedicated graphics card on a computer.
9. Disable Background Running Apps
If there are lots of unnecessary apps running in the background, it’s no surprise that your PC starts to lag when playing games. To fix this issue, disable any apps from running in the background that are affecting your computer’s performance. Here’s how:
Windows 10: Navigate to Settings > Privacy > Background Apps. Now toggle off the apps that you no longer need.

Windows 11: Go to Settings > Apps > Installed Apps > Select Apps > Click meatball menu (3-dot icon) > Advanced options > Let this app run in the background > Select Never.

Alternatively, you can also use the Task Manager (Ctrl + Shift + Esc) to disable apps from running at the startup.

10. Prevent Steam From Auto-Updating Games in the Background
While there is no option to completely disable auto-update for Steam games, you can at least prevent Steam from automatically updating games in the background. By doing so, you can stop Steam from eating up your system resources while playing games, leading to a smoother gameplay experience on your PC.
Simply go to the game’s Properties, jump to the Updates section, and select the options – Only update this game when I launch it and pause background downloads while I’m playing.

Tip: Slow downloading speed on Steam? Here are 13 ways to fix it.
11. Tweak Windows Visual Effects
If you’re willing to compromise on the appearance and user experience of your Windows PC in exchange for optimal gaming performance, switch to the best performance mode.
Warning: This mode disables all animations, taskbar thumbnail previews, UI shadows, and more.
To enable this mode, press the Windows Key + S and search for “Adjust the appearance and performance of Windows”. This will open the Performance Options. Simply select “Adjust for best performance” and click the OK button.
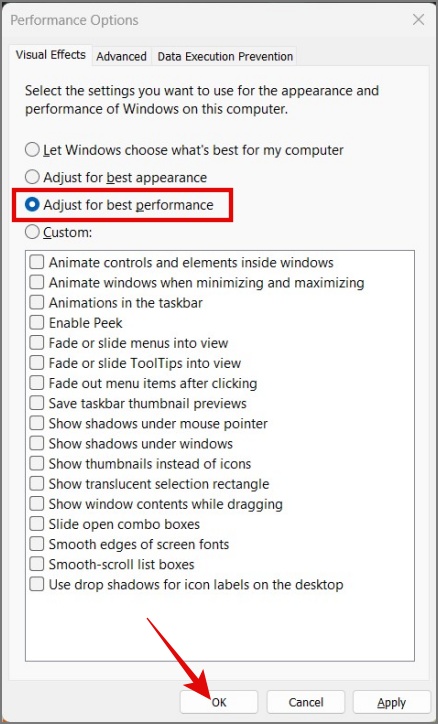
That’s it. You will start to feel your Windows PC has gotten snappier.
12. Use Wired Keyboard and Mouse
When it comes to gaming, we would recommend you use a wired keyboard and mouse over the wireless one. As there’s a possibility that other electronic devices may interfere with your wireless connection and this could lead to choppy movement or delayed input during gameplay.
13. Upgrade Your Mouse
One more way to optimize your Windows for gaming is by upgrading your mouse. Even the slightest delay in mouse input can get you killed in the game ruining your gaming experience. So we would suggest you go with a mouse that has at least a 1000 Hz polling rate.
In case you don’t know what is mouse’s polling rate, it is the frequency at which it reports its position to your computer. For instance, a mouse with a 125 Hz polling rate will report its position 125 times per second or every 8 milliseconds. So basically higher the polling rate, the shorter the delay input.
| Polling Rate | Delay |
|---|---|
| 125 Hz | 8 ms |
| 250 Hz | 4 ms |
| 500 Hz | 2 ms |
| 1000 Hz | 1 ms |
| 4000 Hz | 0.25 ms |
| 8000 Hz | 0.125 ms |
Tip: Is your mouse cursor keeps moving on its own on Windows 10/11? Here are 12 fixes.
14. Uninstall Redundant Apps or Bloatware
When you first time boot your Windows PC, it may come with lots of bloatware, both from Microsoft or PC manufacturers. And most of them are nothing more than pieces of garbage that hog your system resources in the background. So we would recommend you uninstall all the unnecessary apps or bloatware from your computer.
Windows 10: Go to Windows Settings > Apps > Apps & features. After that, select the app and hit the Uninstall button.

Windows 11: Navigate to Windows Settings > Apps > Installed Apps. Once there, click on the three-dotted icon next to the desired app and select the Uninstall button.

Tip: Learn how to disable ads from everywhere on Windows 11
15. Increase RAM Capacity
Another reason could be low RAM availability. If your PC frequently runs low on memory or constantly operates on the edge, it’s high time for you to consider upgrading your RAM. Otherwise, your PC will continue to deliver subpar gaming performance, especially when playing a demanding game.
16. Install the Latest Version of DirectX
With each iteration of DirectX, Microsoft has brought a significant improvement in gaming performance. And with the latest DirectX 12, you will get features like Ray Tracing, Variable Rate Shading, Mesh Shading, and more. This can greatly enhance your gaming experience.
You may already have the latest version of DirectX installed on your computer. However, if you want to manually check the version, press Windows Key + R to open the Run program, then type “dxdiag” (without quotes) and hit the Enter key. This will open the DirectX Diagnostic Tool. From there, you can check your DirectX version. If it is an older version, you can look for updates by navigating to the Windows Update screen.

17. Use Ethernet Over Wi-Fi
If you’re encountering a drop in frame rate or lag during gameplay, it is important to note that the issue may not always be hardware-related. In some cases, it could be because of poor internet connectivity, especially when playing online multiplayer games where Wi-Fi interference can lead to sudden drops in FPS. Therefore, if possible, we would suggest that you use an Ethernet connection to enjoy a smoother gameplay experience.
Tip: Learn why your Wi-Fi is not working, but ethernet is
18. Enable/Disable Enhance Mouse Pointer Precision
By enabling enhance pointer precision on your Windows PC, you will get more accurate, responsive, and smoother cursor movement, allowing you to achieve precise aiming or targeting in the game. However, if you have a mouse with a good sensor and a polling rate of over 1000 Hz, you may need to disable this feature to avoid potential conflicts. If it has the opposite effect, revert back to the original state.
To access the mouse properties, go to Windows Settings > Bluetooth & devices > Mouse > Additional mouse settings > Pointer Options. Once there, check or uncheck the box next to Enhance pointer precision and then hit the OK button.

19. Switch to Better Monitor
Upgrading your monitor can make a world of difference in your overall computing or gaming experience. For instance, if you own a monitor that has a 1 ms response time and 144 Hz refresh rate, you’re more likely to get smoother and more responsive gameplay or visual experience compared to a monitor that has a 4 ms response time and 60 Hz refresh rate.
Recommended Specs for Monitor:
- IPS Panel
- 1 ms response time
- Minimum 120 Hz refresh rate
- 2K or above display resolution
- AMD FreeSync or NVIDIA G-SYNC
20. Upgrade Your Graphics Card
One quick way to boost your gaming performance on Windows 11 or 10 PC is by upgrading your graphics card. By doing so, you can eliminate issues like screen tearing, lag, frame drops, and more, resulting in a smoother and more enjoyable gaming experience.
Of course, buying a good graphics card may come with a higher price tag, and you also have to worry about compatibility with your system. However, the difference you will notice in your gaming performance makes it a worthwhile investment.
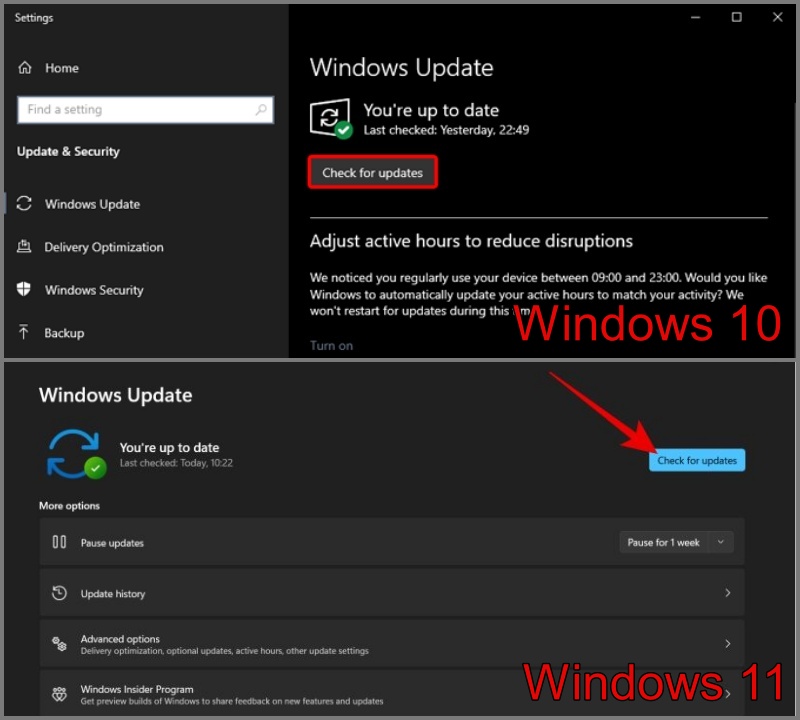
21. Update Windows
Every once in a while Windows delivers a major update but due to some bugs, compatibility issues, or glitches during the update, you may notice a drop in your PC performance. That’s why we strongly urge you to keep your PC updated at all times to avoid any potential issues or disruptions.
To check update availability, open Windows Settings and move to the Windows Update section. Once there, you can click on the Check for updates button.
Maximize Your Gaming Performance on Windows 10 and 11
It can be frustrating if your gameplay always gets ruined because of constant lags and lower picture quality. That’s why we have come up with multiple solutions that would help you figure out the way to optimize your Windows PC for gaming. If things don’t work out, you can try reinstalling Windows on your PC. This may fix any issues that might be impacting your gaming performance.