Lightroom Mobile, no doubt is one of the best mobile phone editors for both Android and iOS. With all the heavy editing tools and stuff, the most annoying thing about it is the cloud sync. It runs in the background, deletes your previews. And when you open the app again, you have no clue where the Images went. I understand that the entire Adobe Suite is built around the Adobe cloud experience. But it would have been better if they had given an option to stop the cloud sync. So, here is how to stop cloud sync both in Lightroom desktop and mobile.
How to Stop Cloud Sync in Lightroom Desktop
You would be better off using the old Lightroom classic 2015 if you don’t want the cloud features. But, in case you are using Lightroom 2019, there is a way to stop the cloud sync within the Creative Cloud app.
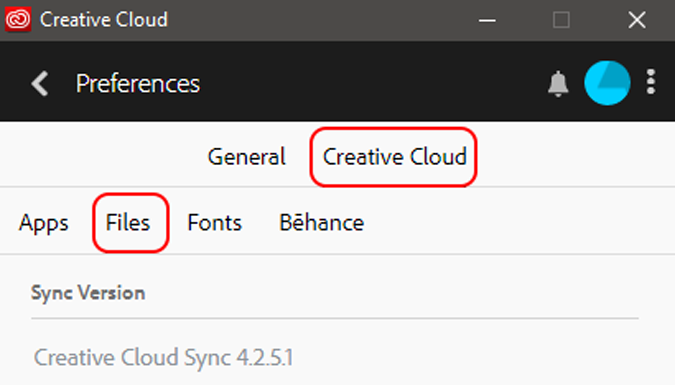
Open the Adobe Creative Cloud application, switch to the Creative Cloud Tab and navigate to the “Files” tab.
Read: 9 Lightroom Mobile Tips And Tricks to Use it Like a Pro
Under the “Files” tab, you can switch off the Creative Cloud Sync by unchecking the box. This would turn off the cloud sync and files wouldn’t be deleted locally.

How to Stop Cloud Sync in Lightroom Mobile
But unfortunately, in the Lightroom mobile version, there is no option to disable the cloud sync. But, like always there is a workaround and you can use a third-party app. Since no editing tool in Lightroom mobile is dependent on the Internet, we can safely block the Internet for the application to stop cloud syncing.
To block the Internet for the Lightroom mobile app, you can either do that by disabling the Internet permission via Setting or by using a third-party app. The later one comes in handy when you want granular controls over WiFi and Mobile data.
Since Android doesn’t allow users to restrict Internet access for an app natively, you’ll need a firewall app. I prefer the NetGuard – no-root firewall, but any firewall app will work. Once you have installed the application, open it and initially it will ask you permission to create a VPN. Firewalls for Android generally work by creating a local VPN, you can read our article on best Firewall apps for Android to know more about Firewall Apps on Android. After you have provided the necessary permission, you will be presented with a list of installed applications as follows.

On the installed app screen, navigate to the Lightroom app and tap on the Wi-Fi and Cellular Network icon. This will disable Internet access to Lightroom both via Wi-Fi and cellular network.


Closing Words
Lightroom is no doubt one of the best editing tools on mobile. One of the best features is the seamless cloud syncing between devices. If you have multiple devices with Lightroom installed on it, the cloud sync makes sense. For everyone else, this is how you can stop your images or previews from getting deleted locally.
Also Read: Lightroom vs Snapseed: Which is a Better Photo Editor?