Not getting App notifications on your Android? There could be many reasons behind it. Usually, it’s either the battery optimization issue or problem with the notification access. Here’s a step by step guide on how to fix “Android App Not Sending Notifications”. We’ll start off with some basic but necessary checks and then gradually move towards troubleshooting the issue.
Fix Android App Not Sending Push Notifications
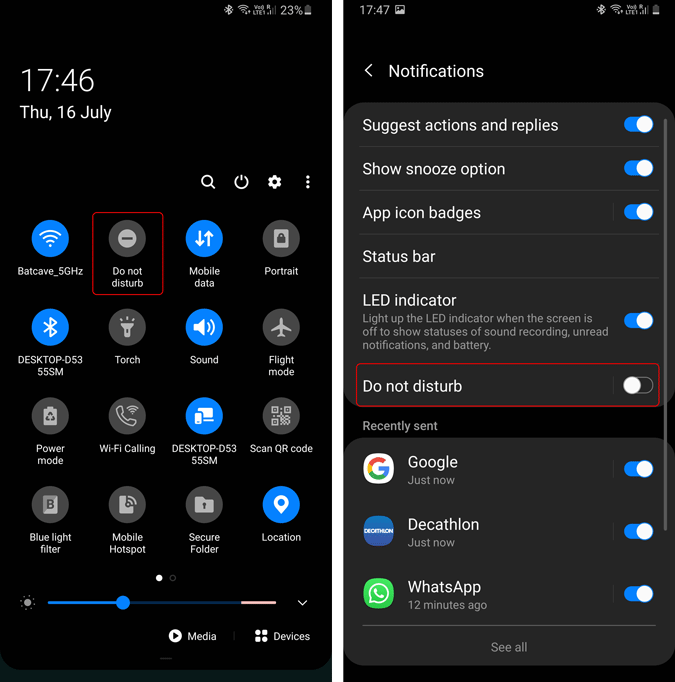
Step 1: Check the “Do not disturb” mode.
If you are not getting app notification from most of the apps, chances are you have forgot to disable DND mode. Irrespective of the Android device you use, DND (Do not disturb) mode will totally block all Android app notifications. Hence, make sure the DND mode is turned off.
To check the DND status, pull down the Notification shade. Check if the”Do not disturb” mode is enabled or not.
Step 2: Update the app
If you are not getting notification from a single app, check whether the app is updated to the latest version. The latest update mostly gets rid of the unnecessary bugs.
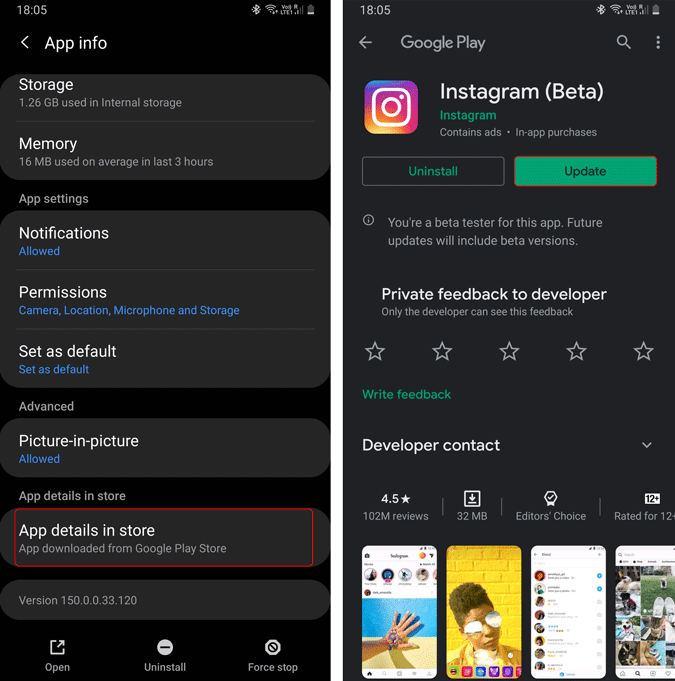
In order to update the app, long-press on the app, and tap on “App info”.

On the “App info” page, navigate to the bottom and tap on “App details in store”. It directly takes you to the app listing on the Google Play Store. In case you see something like the following screenshot, the app needs to be updated and tap on the “Update” button. If there’s no update for the app, you will have an “Open” button instead.
Step 3: Notification Access
An app requires notification access in order to send push notifications. This notification permission is provided by default. However, at times, unknowingly the permission access may have been revoked.
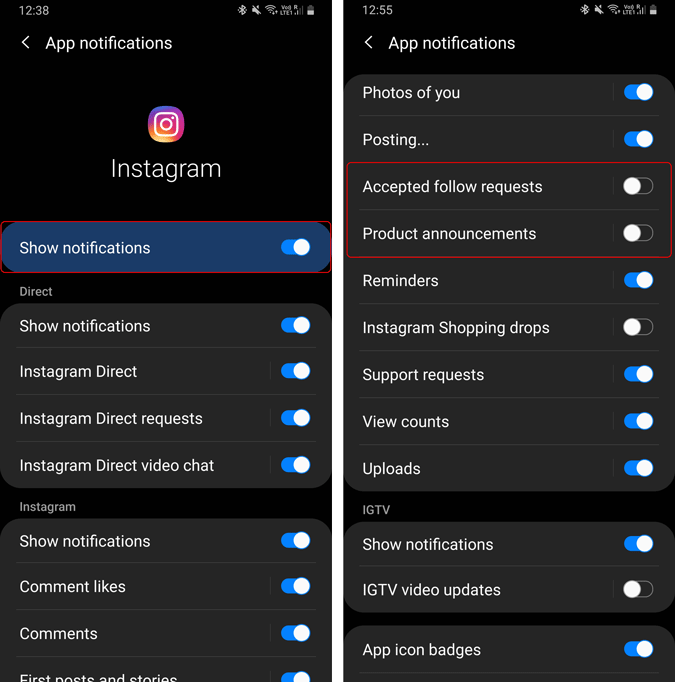
Hence, foremost, we need to check if the app has sufficient permission to send you notifications. For that, long press on the app and select “App Info”. Under App Info, tap on “Notifications”.

Under App notifications, make sure that the toggle beside “Show notifications” is turned on. Now, starting Android 10, you would various categories within notifications.
For instance, in the following screenshot, you would see separate notification toggle for Instagram DMs, likes, comments, and IGTV. I can choose to turn off notifications for IGTV, likes, comments, product announcements but turn on Instagram DMs and message requests.
Step 4: Check background access
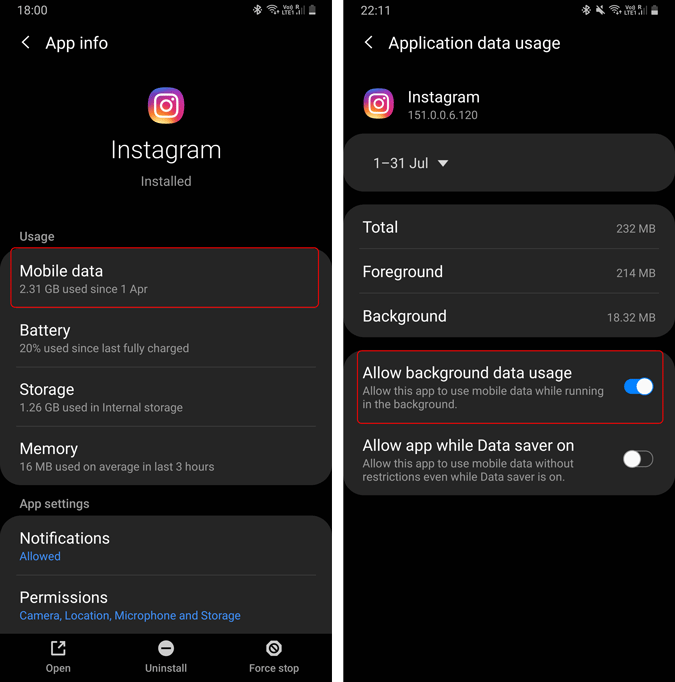
On the same App info page, tap on “Mobile data”. On the Application data usage page, check if “Allow background data usage” is turned on. In case it’s turned off, tap on the toggle beside “Allow background data usage” to turn it on.
Step 5: Whitelist App
One of the biggest reasons, an App is not sending the notification is the Adaptive battery.
In Android 9.0, Google introduced Adaptive Battery. This basically learns the way you use your Android phone and shuts down apps that you don’t use. It improves your Android smartphone’s battery life. But, other Android manufacturers like Samsung, OnePlus, Xiaomi took this a step further in their devices. They started aggressively killing apps that you even tend to use a lot. Android 10 has further worsened this problem and here’s a ranking page developed by a third-party app creator to rank the OEMs based on the app killings.
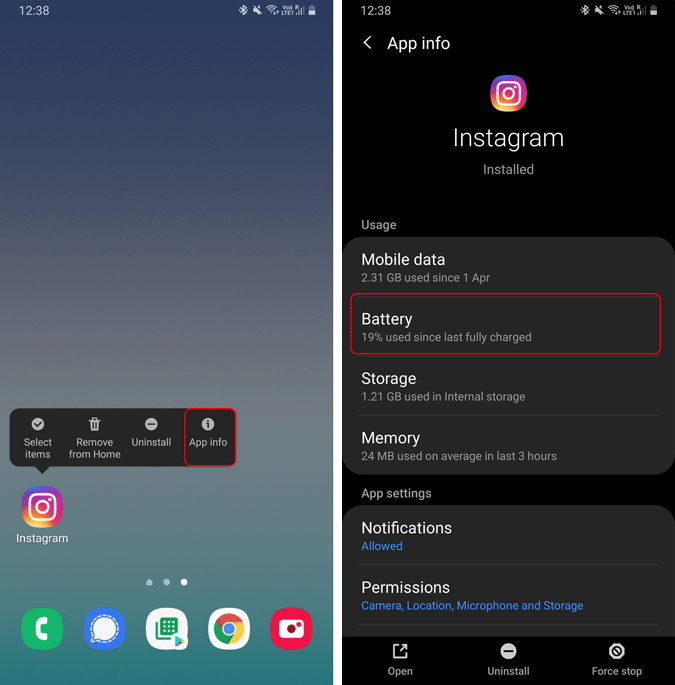
In order to fix that, we would have to whitelist our application or give it a free pass to work in the background. To do that, long press on the app and tap on “App info”. Under App Info, tap on “Battery”.
Under the Battery “Use details” tab, tap on “Optimise battery usage”. On the “Optimise battery usage” page, tap on “Apps not optimised” and select “All”.
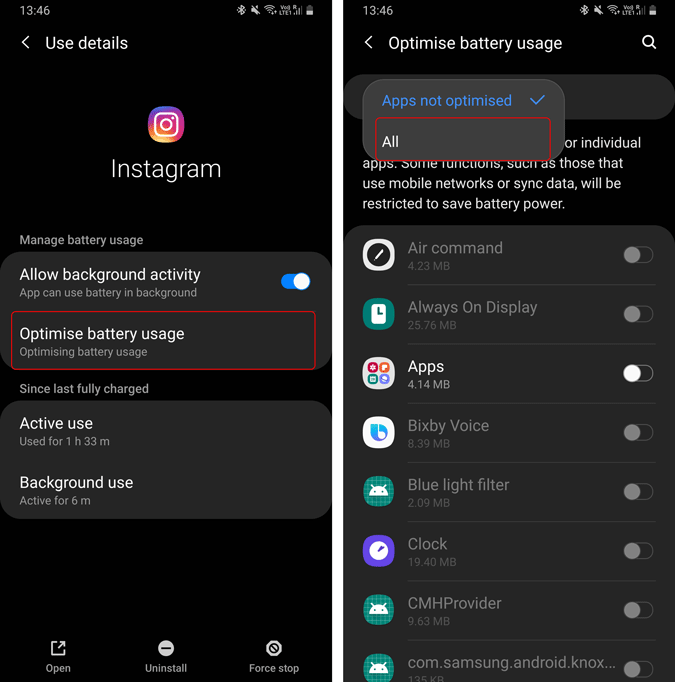
Once you have switched to “All Apps”, tap on the search icon beside the Optimise battery usage label. Search for Instagram and tap on it to turn off battery optimisations for this particular app. Likewise, you can disable the toggle for multiple apps.
Step 6: Turn off Adaptive Battery
In case the adaptive battery is going out of hands (i.e. OnePlus), instead of turning off battery optimisations for multiple apps, it’s better to turn off Adaptive Battery.
Now, turning off Adaptive Battery is different depending on the Android skin you are using. In Samsung’s OneUI, it’s called “Adaptive power saving” instead of Adaptive battery. I’ll demonstrate how to turn it off on stock Android.
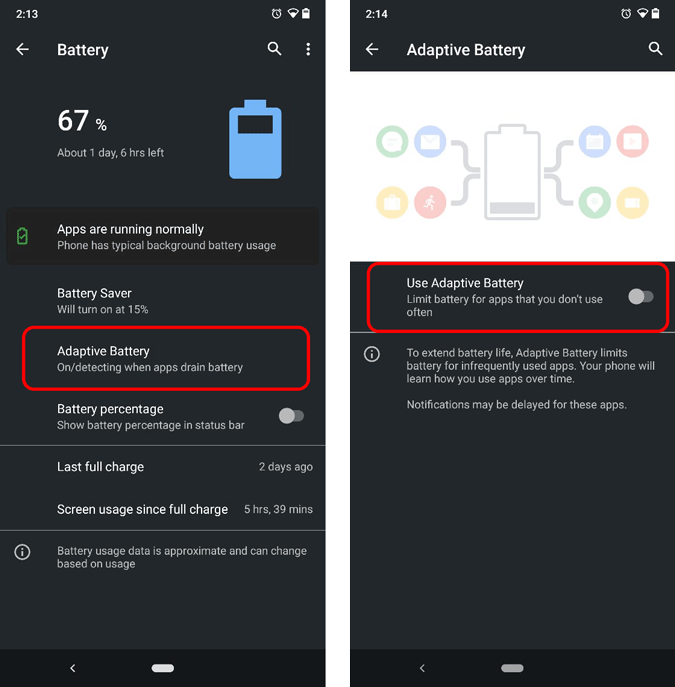
Head over to the Settings menu and tap on Battery.

Under the Battery settings, tap on “Adaptive Battery”. On the Adaptive Battery page, tap on the toggle beside the Adaptive Battery to turn it off.
Step 7: Clear App Data
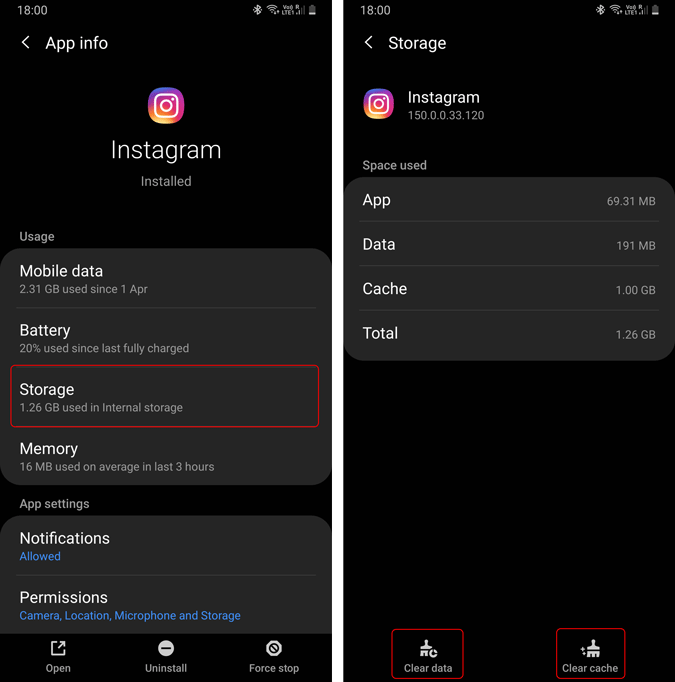
Clearing App Data might also help reset the app’s settings and preferences. To do that, long-press on the app and tap on “App Info”. On the App Info page, tap on Storage. On the Storage page, click on “Clear Data” and “Clear cache” at the bottom of the page.
Turning off Adaptive Battery will reduce your device’s battery life. But, hey at least you get to reply to your Instagram friends on time.
Step 8: Reinstall the app
In case all the above methods don’t work, reinstall the application from the Play Store.
Step 9: Check for Errors
If all of these methods didn’t work, there can be a possibility that the app is malfunctioning. A quick google search about the app and notification issue can provide you the information. Additionally, you can also check the app review on the Play Store about the issue.
Step 10: Factory reset your Android
Finally, if nothing works, we would have to go the hard way and factory reset the Android device. This would erase all your data, uninstall the third-party apps, and log out of your Google account. Hence, make sure you backup your data before the factory reset.
To factory reset, head over to the device settings and navigate to the bottom and tap on “General management”. Under General management, tap on “Reset”.
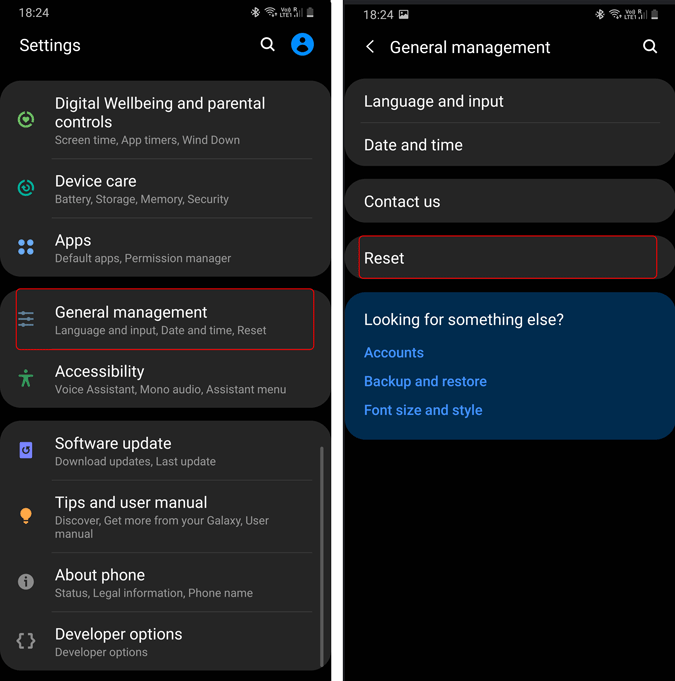
On the Reset page, tap on “Factory data reset” and follow further instructions. A factory data reset might take a while and make sure your device is charged above 70%.
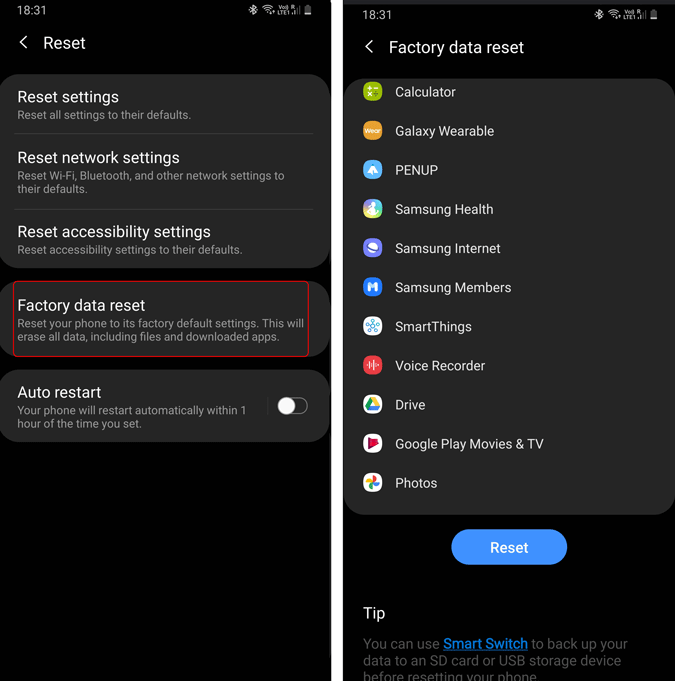
After the factory data reset, log in with your Google account. Your Android device will be able to pull up your backup and download, restore all the apps.
Closing Words
I have been switching mobile devices quite a lot due to the nature of my work. Previously, when I wrote an opinion piece on Pixel, I mentioned this Adaptive Battery issue on other devices. As OEMs are starting to aggressively double up on this adaptive battery, third-party apps are on the losing end. A few days ago there was an AMA on Reddit by Android’s engineering team and the most asked question was Adaptive Battery.
Let’s hope things get better with Android 11. Until then, let’s shut it off!
Also Read: How to Turn off “Show Simplified View” Pop-Up on Chrome on Android