Image compression is quite common if you deal with web uploads, a web server, or a blog. We have been compressing PNG’s, JPG’s, and even GIFs every single day to optimize the rendering time of our website. It’s a no brainer that smaller image sizes would make your website loading time faster. But, what are the tools that would help you do that?
Well, you can also use Ubuntu’s built-in Shotwell photo viewer app. All you have to do is open the image, select “Save as” and adjust the image quality options accordingly. However, Shotwell is not efficient in size reduction and the loss in quality is noticeable.

On that note, here’s a compiled list of best image compression apps for Linux which will not compress images but also transform, edit, resize them for you.
Table of Contents
Best Image Compression Apps For Ubuntu
Before we begin with the list, I would like to note down a couple of things. We have a standard process where we use JPGs for color images and PNGs for text-based images. In general, PNG is a lossless compression and compressing them takes a lot of time and the result in insignificantly smaller file size. So, you might be good with resizing a PNG rather than compressing it. JPGs are lossy compression and compressing a JPG is much more worthwhile.
Command-Line Tools
1. ExifTool
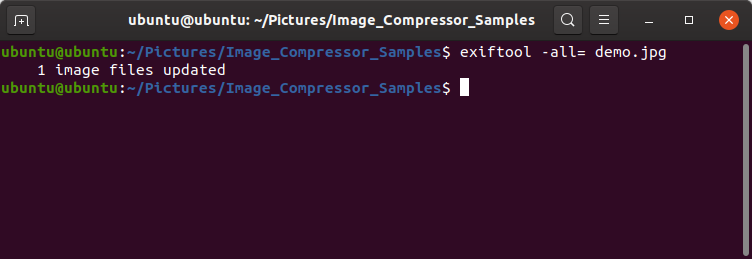
EXIF and metadata comprise a minor part of the overall image file size. In some cases, it is pointless to upload an image with all the EXIF and metadata. In such a case, you can use the EXIF tool which can view, edit, and delete EXIF data. To view the EXIF data of your image, use the following command.
exiftool -all demo.jpgTo remove all the EXIF and metadata, use the following command. Do note that, not all of the metadata can be deleted using any tool.
exiftool -all= demo.jpgSupported Image Formats: JPG, PNG, CR2, etc
2.FFmpeg
FFmpeg is the most useful command-line media tool for Linux. It can download files, videos, compress and convert media, and a whole lot of other stuff. You can use FFmpeg to compress and convert images to the required format. If you haven’t installed FFmpeg, you can quickly do so by using the following command.
snap install ffmpegThe command to compress an image is as follows. You can toggle the compression value by changing the value beside the option “-compression_level”.
ffmpeg -i input_file_name.jpg -compression_level 70 output_file_name.jpg
Additionally, you can also scale images in the same command by adding “-vf scale=675:407”. So the final command will look like the following.
ffmpeg -i input_file_name.jpg -vf scale=675:407 -compression_level 70 output_file_name.jpgYou can also batch process images within a particular directory using FFmpeg. However, I would recommend doing that only if you are writing a script for the server-side.
Supported Image Formats: JPG, PNG, CR2, SVG, BMP, GIF, etc
Visit FFmpeg GitHub
3. ImageMagic
ImageMagic is the most advanced free command-line software suite available for image compression and manipulation. It’s essentially built to be used on RHEL or CentOS servers and supports compression for over 200+ image formats. However, you can still download and use it on other Linux distros. For Debian-based, it’s available in the apt repository and for other distros, you need to download and compile the source code. Below are the set of commands to do that.
load/ImageMagick.tar.gz
tar xvzf ImageMagick.tar.gz
cd ImageMagick-7.0.8-26/
./configure
make
sudo make install
sudo ldconfig /usr/local/lib
ImageMagic has 2 commands, namely mogrify and convert, to compress, convert, and edit images. By default, mogrify modifies the original image whereas convert creates a modified copy of it. It’s easy to batch compress multiple images using these commands. In our case, it’s tedious to transfer images one-by-one in GIMP or Photoshop and resize them. We upload images to our website with a resolution of 675×450 pixels. Hence, in order to batch convert all the screenshots to the required format, I run the following command. The “*.*” denotes that every file in the directory needs to be resized to 675×450.
mogrify -path /file-directory-location -resize 675X450 *.*In case you get image delegation error, you need to install the open-source libraries for the particular image file type. Head over to this page for information.
In case you just want to remove the EXIF and metadata from the image without compressing it, you can use the following convert command.
convert <input-file> -strip <output-file>
mogrify -strip <input-file>.jpg
Supported Image Formats: JPG, PNG, CR2, SVG, BMP, GIF, and 200+
What’s good?
- Batch compression and conversion of images
- Command-line options to edit, resize, convert images
- Can be used in conjunction with the find command to automate image compression via crontab
- Option for lossless compression of photos
What’s not?
- Dependency on delegates makes the set up quite complex
Download ImageMagick for Ubuntu
GUI-based Apps
4. Trimage
Trimage is a GUI based open-source image compression tool which uses the ImageOptim API. You can seldom use the ImageOptim webpage for a one-off scenario. Alternatively, you can also try the GUI desktop version which is the Trimage Image Compressor.
Trimage Image Compressor is quite intuitive to use however it had 2 major problems. Foremost, it replaces the original image with the compressed ones, so I had to always backup the original image. Secondly, there is no way to change the compression level and the default compression level is feeble.

Supported Image Formats: JPG, PNG
What’s good?
- Drag-and-drop multiple images on the UI
- Option to recompress within the app
- Command-line tool availability
What’s not?
- Supports only JPG and PNG
- Modifies the source file
- Cannot control the compression level
Installation command:
sudo apt-get install trimageVisit Trimage GitHub
4. XnConvert
XnConvert is a tool provided by XnSoft to compress, convert, edit various image files. It is cross-platform and quite powerful when compared to Trimage. Foremost, unlike Trimage, it works with a variety of image types like CR2, DNG, BMP, JPG, PNG, etc. Next up, you get drilled down controls like adjusting the size, filter, color balance, etc. It is more like Photoshop or GIMP but the editing work in batch for multiple images.
To edit the image, you need to set up actions from the action tab by clicking on the action tab. On the same tab, you also get a preview of how the image will look like post the edit.

Supported Image Formats: JPG, PNG, CR2, SVG, BMP, GIF, DNG, etc
What’s good?
- Supports multiple file formats like CR2, DNG, PNG, JPG, etc
- Batch edit, convert and compress photos
- Advanced editing tools like Color Correction, Histogram, HLS, etc.
- Option to remove EXIF and metadata
What’s not?
- The options are not well-categorized and might get heavy for first-time users
Download XnConvert for Ubuntu
Online Tools
5. Caesium
Caesium is a popular cross-platform image compressor build for web, photographers, etc. It also has a Linux variant but we will be only discussing the web app. The web app is quite intuitive and supports conversion of upto 5 images which can be a maximum of 10 MB each. Caesium doesn’t store your images on the server which is good if you are dealing with sensitive images. The web app lets you control the quality of compression where 100 being the highest and 1 being the lowest. You can also opt-in for lossless compression in case you want to reduce the image size on your storage.
Apart from the web app, the Linux variant requires you to download and compile the source-code using Qt5. Since, the application is not tested on Linux as per the GitHub repo, I doubt the stability of the app.

Supported Image Formats: JPG, PNG
What’s good?
- Drag and drop multiple images on the UI
- Custom control of the image quality
- Lossless compression and the option to recompress the same Image
- Displays the before and after image size
- Batch image conversion up to 5 images
- Doesn’t upload images on the server
What’s not?
- Only supports JPG, PNG file format.
Visit Caesium Online Image Compressor
Web API Solutions
6. Cloudinary
Cloudinary is an enterprise-level image compression solution. In case your web portal deals with lots of image and video data, you can use the Cloudinary API to compress, convert media on-the-fly. Cloudinary has a free variant which is limited to 25000 image transformation or 200 minutes of video compression per month. You have to implement the API within your web app code and there’s enough documentation available on the Cloudinary website.
Supported Image Formats: JPG, PNG, CR2, DNG, SVG, BMP, etc
What’s good?
- On-the-fly image and video compression
- Lots of documentation available on the web page
- The free variant would suffice the need of most individual blogs
- Search images using the API
Visit Cloudinary Web Media API
Closing Words
FFmpeg is a good solution for one-time usage. If you deal with a lot of JPGs and PNGs, ImageMagic is a good command-line option. For a standalone tool, XnConvert works well with diverse image formats and I personally use it for batch image processing. In case you handle a web server and you want a wholesome solution for image compression, Cloudinary is a good solution.
For more issues or queries regarding image compression, let me know in the comments below.
Also Read: How to Download High-Quality Images from Google Play and App Store