Antimalware Service Executable, a part of Defender integrated into Windows Security suite, is a legitimate process and not a malware or a security threat. It was designed to protect your PC from malware, however, while doing so, it may begin to consume too many system resources like RAM and CPU. This affects PC’s performance.
Pro Tip: Top 8 Ways to Maximize CPU Performance on Windows 11
Table of Contents
Should You Disable It
No. Antimalware Service Executable, as the name suggests, protects your PC from malware threats. It runs a periodic scan. When Defender runs, you will see a temporary CPU and RAM usage spike. However, usage levels should return to normal once Scan is complete.
Also, even if you disable the Antimalware Service Executable process, Defender will restart it automatically. You can only stop it from running by completely disabling Windows Security which is also not recommended as it leaves your PC at risk.
The information about this process on forums and social media sites is misleading. One is that installing another antivirus app will stop this process. I have Malwarebytes Premium installed, and Antimalware Service Executable still runs in the background on my PC.
When Should You Troubleshoot?

You need to troubleshoot the Antimalware Service Executable for high RAM and CPU usage only when it constantly uses an unusually high amount of resources. On my PC, the CPU shows 0% while the memory is just 108MB. Once the Scan is complete and any detected threat has been dealt with, Antimalware Service Executable should return to its previous state.

Press Ctrl+Shift+Esc keyboard shortcut to open Task Manager and search for MsMpEng.exe or Antimalware Service Executable to find it. You will see a screen like the above screenshot where you can view system resources being used.
1. Run a Manual Scan and Get Malwarebytes
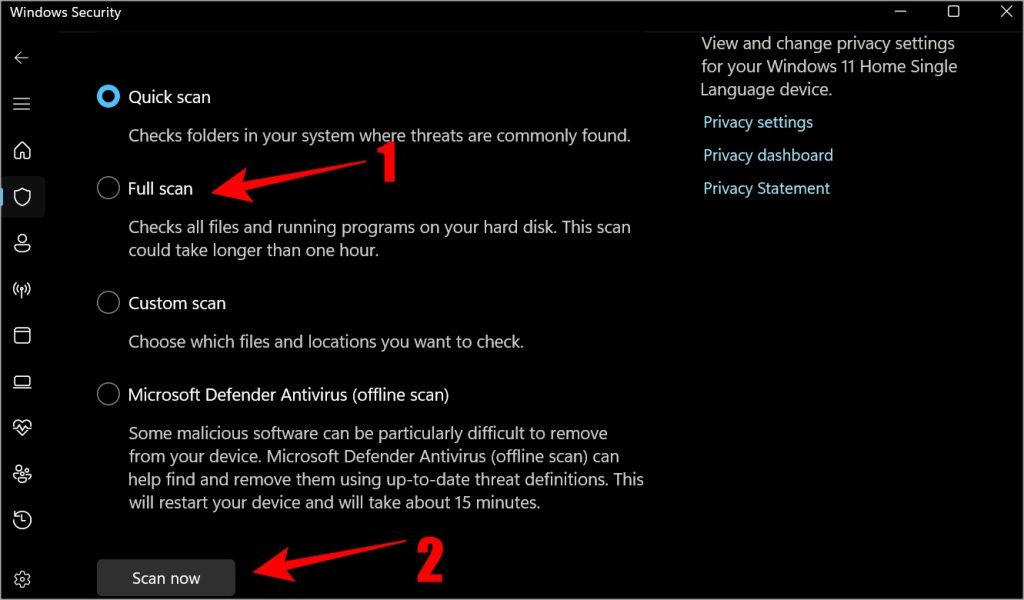
Run a manual scan using Defender:
- Open Windows Security using Windows Search.
- Select Virus & threat protection.
- Select Scan options under Quick Scan.
- Select Full scan and click on Scan now.
Malwarebytes is a trusted name and you can use it to do two things:
- Remove all malware threats Defender failed to detect or remove.
- Replace Defender reducing over usage of resources by Antimalware Service Executable though the service will still run in the background.
Download: Malwarebytes
We don’t recommend that you use two antivirus programs on the same machine at the same time. Installing Malwarebytes will disable Defender automatically.
Microsoft has a standalone tool called Microsoft Safety Scanner to find and remove malware form your computer. You will have to download a fresh copy every time you want to run it as it is not updated automatically and doesn’t have to be installed.
2. Turn Off and On the Real-Time Protection
Several Windows users found this simple tip to resolve Antimalware Service Executable process consuming too much RAM and processing power.
- Go to Windows Security > Virus & threat protection > Manage settings.
- Turn off the toggle below Real-time protection. Wait a few moments, and turn it on again. If turning it off resolves the problem but turning it back on brings it back, continue reading.

3. Change Windows Defender’s Schedule
Windows Security runs periodic scans in the background. It could be running these scans when you work. Rescheduling the scan may fix Antimalware Service Executable process taking too much CPU and RAM. Instead of daily, you can schedule it to run weekly.
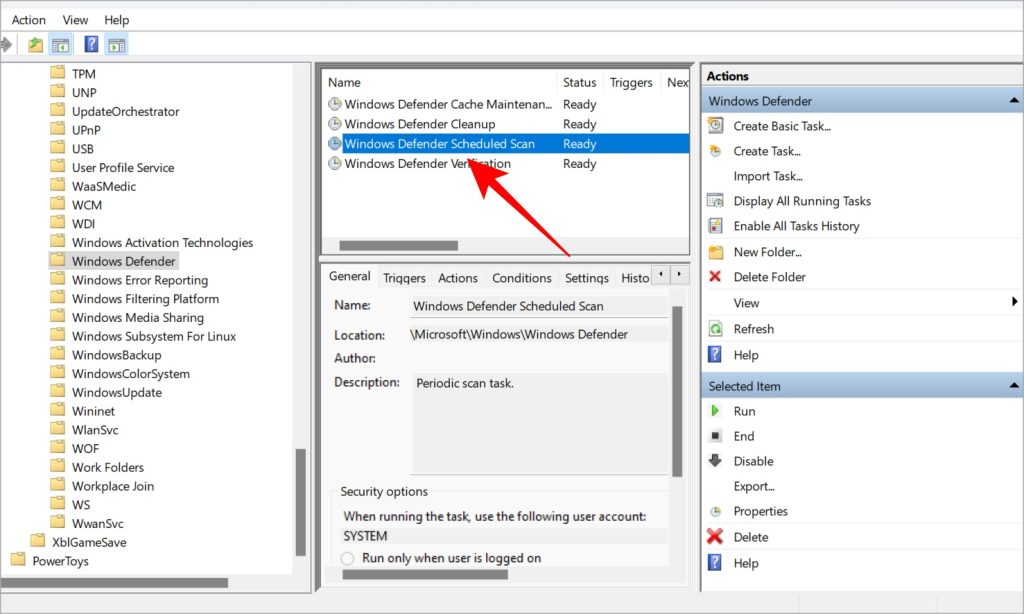
- Open Task Scheduler from Windows Search.
- In the left window pane, navigate to Task Scheduler Library > Microsoft > Windows > Windows Defender.
- Double-click on Windows Defender Scheduled Scan option in the middle window pane under the Name column.
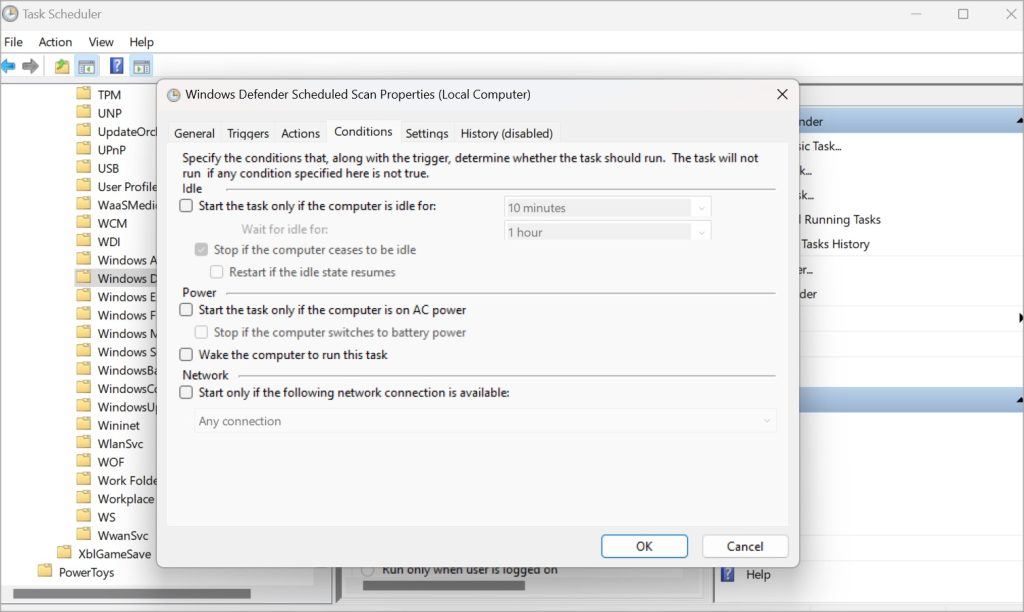
- In the pop-up that follows, uncheck Run with highest privileges option under General tab.
- Uncheck everything under the Conditions tab.
- Click on OK to save all settings in all open windows and check again if Antimalware Service Executable is consuming too many resources in the Task Manager (press Ctrl+Shift+Esc keyboard shortcut to open directly).
- To set a new schedule, go to the Triggers tab, and click on New. On the pop-up, select Weekly and check Enabled.
- Repeat the same steps for Windows Defender Cache Maintenance, Windows Defender Cleanup, Windows Defender Verification in the middle window-pane. Go back to step 3 above.


4. Disable AntiSpyware
This issue, discovered by members of Windows Insiders users, traces back to a Registry Editor key. Here’s how to fix it:
- Open Registry Editor with admin rights using Windows Search.
- Navigate to HKEY_LOCAL_MACHINE\SOFTWARE\Policies\Microsoft\Windows Defender folder structure from the left window-pane.
- You will find DisableAntiSpyware file in the right window pane. If not, right-click anywhere and select New > DWORD (32-bit) Value.
- Rename the file as DisableAntiSpyware.
- Double-click to open the newly created file and enter the Value data as 1.
- Save all changes. Reboot your computer.


5. Disable Exploit Protection Service
At times, Defender is unable to close a stubborn service. This leads to a continuous loop where Antimalware Service Executable is continuously running in the background trying, failing, and then retrying to finish the task resulting in high CPU and RAM usage.
- Open PowerShell with admin rights from Windows Search.
- Copy and past the command below and hit Enter:
powershell “ForEach($v in (Get-Command -Name \”Set-ProcessMitigation\”).Parameters[\”Disable\”].Attributes.ValidValues){Set-ProcessMitigation -System -Disable $v.ToString().Replace(\” \”, \”\”).Replace(\”`n\”, \”\”) -ErrorAction SilentlyContinue}”6. Clean Boot and Reset Option
A clean boot will load your Windows OS with the bare minimum of drivers and apps that are essential to run the OS. Microsoft has an excellent guide on how to perform a clean boot. Once done, read the Reset the computer to start normally after clean boot troubleshooting to reboot the computer in regular mode with all apps and features including startup programs.
7. Add MsMpEng.exe to Exclusion List
What happens is that when scanning for malware, Antimalware Service Executable also scans its folder where it is saved. This may again create a loop of sorts leading to high CPU and RAM usage. Adding the associated process to the exclusion list will prevent that.
- Launch Microsoft Defender from Windows Search.
- Go to Virus & threat protection > Manage settings under Virus & threat protection settings.
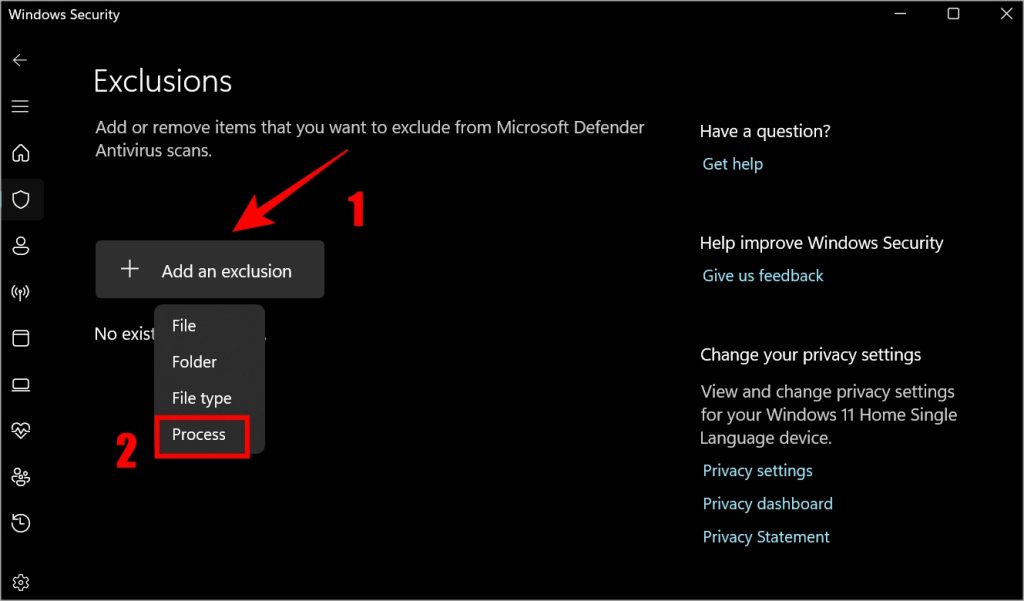
- At the bottom, click on Add or remove exclusions under Exclusions.
- Click on Add an exclusion and select Process from the drop-down menu.
- Type MsMpEng.exe and click Add.

Antimalware Service Executable Process
The process itself is legit. The only problem is when it begins to consume more resources than it should. That’s when you experience a slow PC. We don’t recommend disabling Defender without enabling another antivirus app. We also don’t recommend disabling critical services using Group Policy Editor. Instead, there are some workarounds that you can use to fix Antimalware Service Executable process running in loops.