Google Calendar is excellent for scheduling and sharing events. You can also create tasks but they pale in comparison to Todoist. Similarly, Todoist is better for creating and managing tasks and sub-tasks but also comes with a calendar. Are you using both apps? If yes, you might want to integrate Todoist with Google Calendar and start synchronizing all new tasks to get everything in either place to mitigate the issue.
Table of Contents
Integrate, Sync Todoist and Google Calendar Tasks Natively
Todoist offers an in-built option to connect with Google Calendar. It is a 2-way synchronization, meaning you can find all your tasks on Todoist and Google Calendar irrespective of where you added them initially.
This particular option is available only on the web version of Todoist. However, once it is set up, you shall find your tasks on the mobile apps too.
Before getting started with the steps, you should know the backend story. Here is what happens when you connect Todoist with Google Calendar.
- First of all, this process creates a new calendar in Google Calendar named Todoist. If you create tasks in that particular calendar, you can view the same on your Todoist account.
- Similarly, it asks you to select or create a project on Todoist while connecting the two accounts. This particular project or Inbox (default) shows your Google Calendar tasks on Todoist. If you create a task in the predefined project on Todoist, Google Calendar will display the same in the newly created Todoist calendar.
- While connecting Todoist with Google Calendar, it creates a new label called GCal. You can use this tag or label on Todoist to synchronize a task with Google Calendar irrespective of the project. It is handy only when you do not want to add a task to your common project but just want to synchronize it with Google Calendar.
If you are fine with all these conditions, follow the steps below to connect Todoist and Google Calendar.
1. Open the official website of Todoist and log in to your account.
2. Click on your profile picture visible on the top-right corner and select the Settings option.
3. Switch to the Integrations tab and click on Connect calendar option under the Google Calendar heading.

4. It would open the Google Calendar website and ask you to sign in to your Google Calendar account. Enter Gmail account’s username and password to log in to your account and allow Todoist to access all the Calendar entries.
For your information, Todoist requires access to see, edit, and permanently delete all the calendars.
5. Click on the Allow and Agree buttons to approve the sign-in.

6. Once done, you can find a button called Add calendar. Click on it to add a Google Calendar in Todoist.

7. Here, you can set up a few things — Todoist project for new Google events, whether you want to keep or delete overdue tasks, etc. Set everything according to your requirements and click the Connect button.
Google Calendar should begin syncing with Todoist now.
The native method works flawlessly but there could be times when you want to dig deeper and get the most out of these two productivity powerhouses. Let’s say you want to add a Todoist task in Google Calendar only after it is completed or add a Google Calendar task in Todoist only if it has a particular word in it. All these things are possible with two well-known automation services called IFTTT and Zapier.
IFTTT allows you to create three applets for free whereas Zapier offers five Zaps (max. 100 tasks/month). You can use any or both the services to connect Google Calendar to Todoist and synchronize tasks conditionally. IFTTT and Zapier have some ready-made applets that you can too.
However, if you want to create an applet or zap manually to customize it just the way you need, here is how you can do that.
Connect Todoist and Google Calendar Using IFTTT
The following steps show how you can connect Todoist and Google Calendar via IFTTT using an applet. However, you can follow the same steps to create and customize any applet as per your requirements.
1. Visit the IFTTT website and log into your account. If you don’t have an account, you can create one with your Google, Apple, or Facebook account.
2. Click on the Create button visible in the top menu bar and click on the Add button to start the process.

3. Search for Google Calendar and select it. Please note that you have to search for Google Calendar if you want to send Google Calendar tasks to Todoist. On the other hand, if you want to send Todoist tasks to Google Calendar, you have to search for Todoist.
4. Choose a task that suits your needs and click the Connect button to connect your Google Calendar/Todoist account.
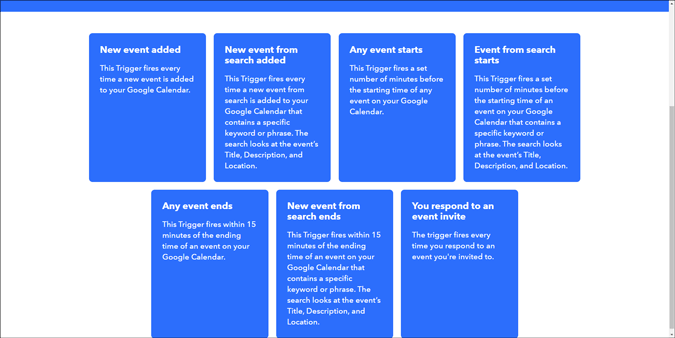
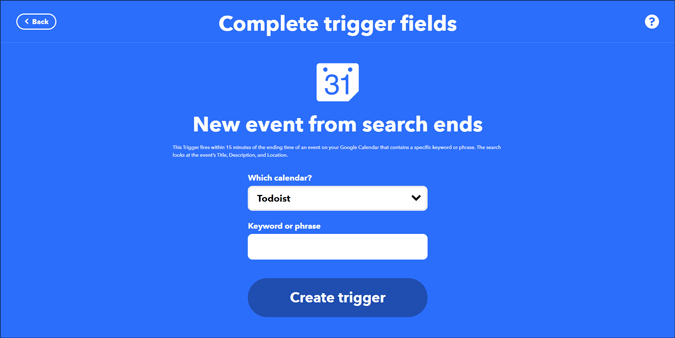
5. Based on your selected task, IFTTT will ask you to select a trigger. Let’s say you want to send a task from Google Calendar only when the task contains a particular word. In that case, finding that keyword is the trigger. After choosing a trigger, click on the Create trigger button.
6. Now click the Add button and search for Google Calendar/Todoist. If you selected Google Calendar earlier, you have to select Todoist now.
7. Here you have to choose an action. Explaining the previous example, if you want to create a task on Todoist based on a particular keyword in Google Calendar, creating the Todoist entry is called an Action. After selecting, click the Connect button to connect Todoist.
8. Now, you can customize the task as per your wish to quickly recognize the synchronized tasks. Once done, click on the Create action button.

9. Click the Continue button to run the applet now.

Also Read: 15 Best IFTTT Google Home Recipes You Should Try
How to Connect Todoist and Google Calendar to Zapier
Zapier is similar to IFTTT. The basic principle remains the same. You have to choose two apps, select a trigger and action, and finish it by connecting those two apps/services.
Here are the steps.
1. Open the Zapier website and log in to your account. If you do not have an account, you can create one using your Google, Microsoft, or Facebook account.
2. Click on the Connect this app and with this one box to select Google Calendar and Todoist respectively. You have to choose the apps correctly and according to your requirements.

3. Now choose a Trigger (when to initiate) and Action (what to do).

4. Click the Try it button and connect two accounts one after one.

5. Click on the Turn on Zap button to start running the zap.
Wrapping Up: Integrate and Sync Todoist and Google Calendar Tasks
Switching between two apps or websites on mobile or computer could be a chore and cost valuable time. Fortunately, there are ways to connect, integrate and synchronize Todoist and Google Calendar tasks using these three methods. If you are already using IFTTT or Zapier, it makes sense to use them. The native way is pretty limited in functionality.
Also Read: 8 Best IFTTT Alternatives You Need to Try