Randomized MAC Address is baked into a lot of OS like Android, iPhone, and Windows 10. On macOS and Linux, with a workaround, you can still get this feature. So, here’s how you enable a randomized MAC address on any device.
How To Get Randomized MAC Address On Any Device
What is a randomized MAC address?
MAC address is a 12-digit unique alphanumeric that is assigned to every device that can connect to a network. This MAC address is hardcoded by the manufacturer on the device’s network chip and hence, unlike IP addresses, MAC addresses don’t change. Now, in the simplest terms, MAC randomization blocks your device to use it’s original MAC address. Instead, it builds up a random 12-digit alphanumeric and passes it as your device’s original MAC address. If you like to change your MAC address to something specific, check out this article instead.
Android
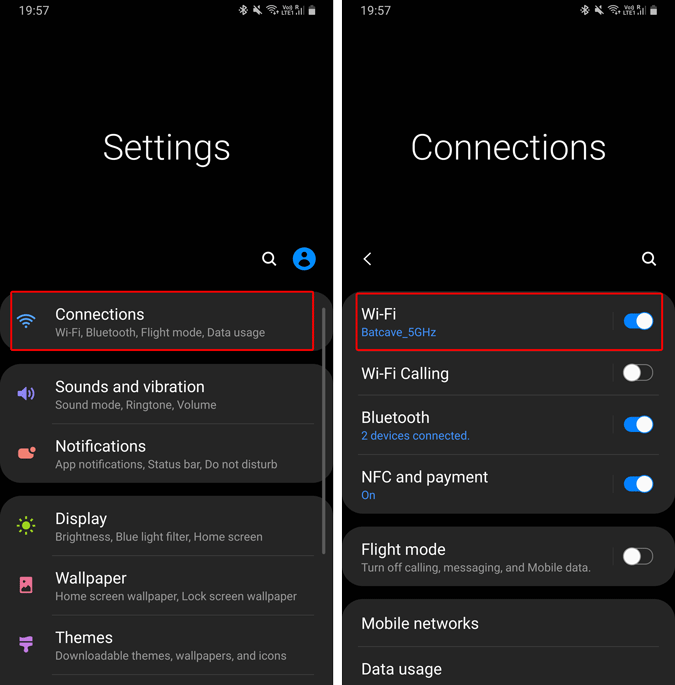
Starting Android 10, MAC Randomization is enabled by default, when you connect to a new network. However, if you have a saved network while upgrading from Android 9.0, Android might still prefer using original MAC Address. In that case, you might have to force Android to use a randomized MAC Address. In order to check if your device is using a randomized MAC Address for a particular Wi-Fi, head over to the Settings menu.
Under Settings, tap on “Connections“. Next, tap on “Wi-Fi“.
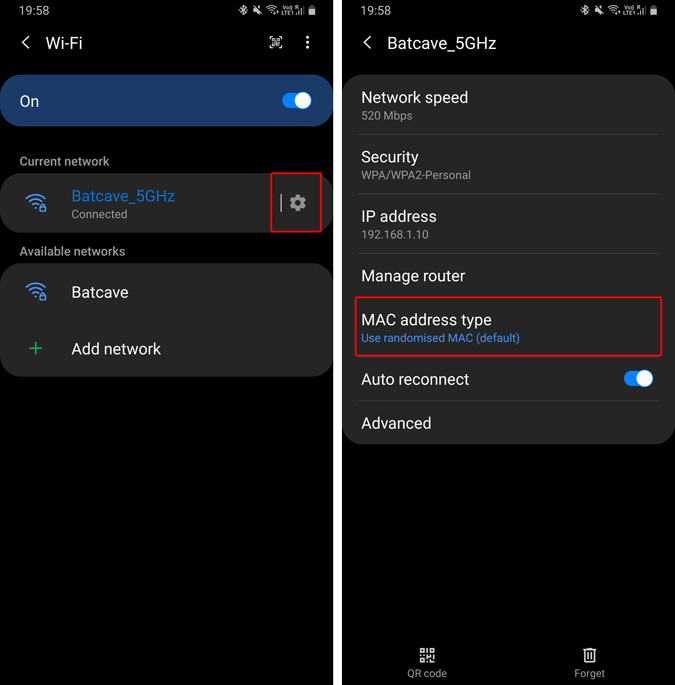
Under Wi-Fi, tap on the gear icon beside the Wi-Fi name. Under Wi-Fi settings, you would see an option called “MAC address type“. Make sure it is set to “Use randomised MAC“.
Third-Party App
In Android 10, you get a Random MAC address every time you connect to a new WiFi network. It stays the same for that particular Wi-Fi network unless you reset it. In case you want to set a custom MAC address for a particular Wi-Fi network, you will need a rooted device and a third-party app.
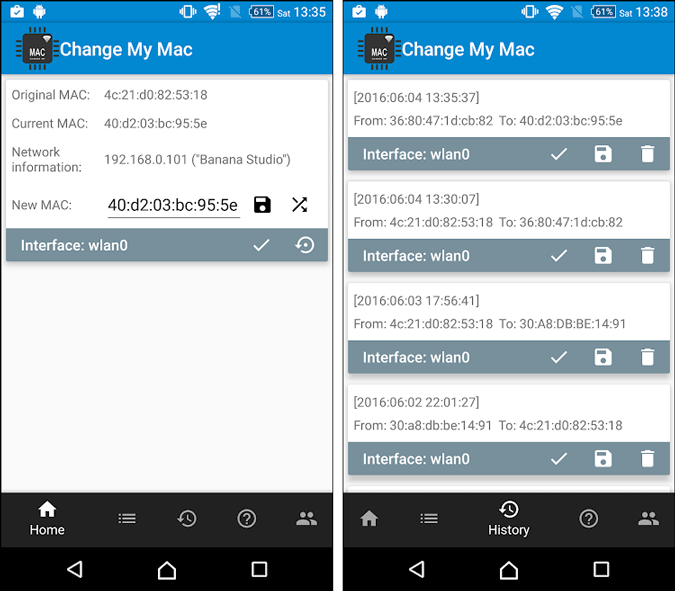
Out of the many applications I’ve tested, Change My MAC works quite well. Install the app and open it. Now in the app, you can generate a random MAC address with just one-tap. Although do keep in mind, when you restart your device, your phone will revert to the old MAC address.
iOS
In iOS 14, Apple announced the ability for iPhones to have a random MAC address known as “Private Address. In case you aren’t on iOS 14, you can follow this guide to upgrade to iOS 14. Private Address would be turned on by default whenever you connect to a new network. To check, head over to the Settings app, and tap Wi-Fi.

On the Wi-Fi page, tap on the “i” button beside the Wi-Fi name. Next, scroll down to find “Use Private Address”. Toggle the Switch on and that’s it. Your iPhone would now create a random MAC address and present it to the router.

Windows 10
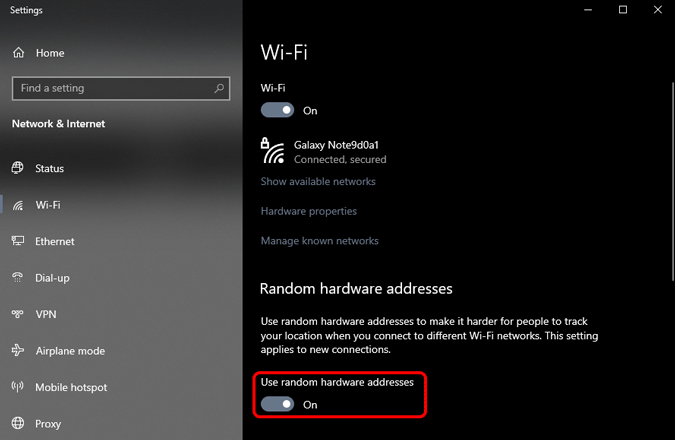
Windows 10 also supports random MAC addresses. However, it’s not turned on by default. In order to turn it on, head over to the Start Menu and type “use random hardware address” and hit Enter.

On the Wi-Fi page, turn on the toggle below the “Random hardware addresses” option. In case you don’t know, MAC Address is also known as hardware addresses or machine address. This would enable your Windows 10 PC to use a random MAC Address.
Do note that, if you do this on an office laptop, it might lead to access issues on a remote network. In case you face the same, revert the changes and run an “ipconfig /flushdns” on the command prompt.
macOS
iOS 14, iPad OS 14, and WatchOS 7 all support randomized MAC addresses, except the macOS. Now, there’s no way to get randomized MAC address on macOS per se. However, you can force your Wi-Fi to connect to a wireless network with a fake MAC address. This is known as “MAC Spoofing”.
To do that, we would first need your Wi-Fi adapter name. Mostly, it’s en0. But, you can quickly check it by opening the terminal and run the following command.
ifconfig
In the command output, check for the active network adapter. In my case, it’s en0 which is active.
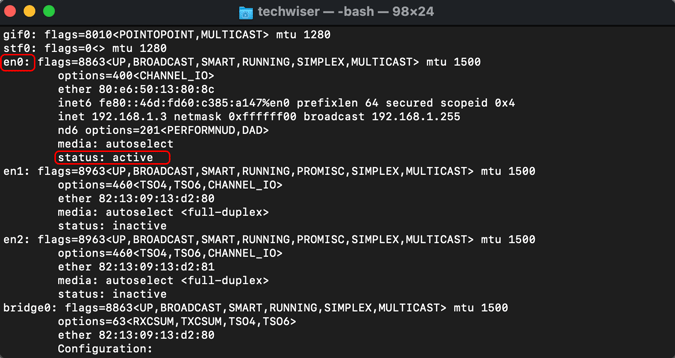
Next up, let’s check our original MAC address. Run the following command to do that.

Read: How to Disable Auto-Connect on Certain Wi-Fi Networks
Now, you can insert a random MAC address or use a web app called MAC Address Generator to do so. Use the following command to replace your original MAC Address. In my case, I am replacing my original MAC address with “19:e4:91:8f:bd:41“.
Do note that you would need the admin permissions in order to execute this command.
sudo ifconfig en0 ether 19:e4:91:8f:bd:41
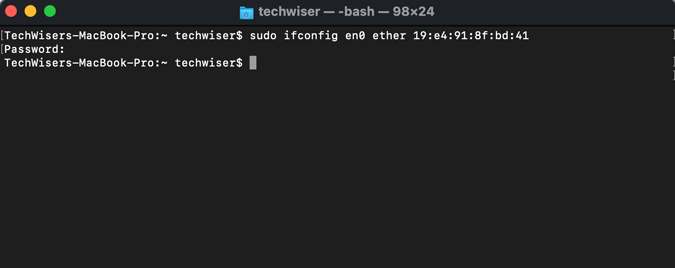
Now, that we have changed the MAC address, let’s verify the changes with the following commands.
ifconfig en0 | grep -i ether

This workaround only lasts until you do a reboot. Hence, if things don’t work as intended or you want to reset this setup, do a quick reboot.
Linux
On Linux, the process is somewhat similar to macOS. You can manually change your MAC address and it’ll get reset after a reboot.
Foremost, we need to figure out the Wi-Fi adapter name. To do that, use the following command.
ip -c a
Look out for adapter name which has the state as “UP”. In my case, the Wi-Fi adapter name is wlp3s0 which has the state UP.
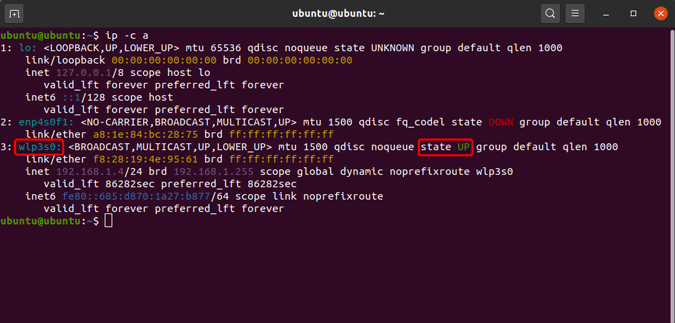
Next, we need to turn off our Wi-Fi adapter in order to change the name. Below is the command to turn off the Wi-Fi adapter.
sudo ip link set dev wlp3s0 down

Once the Wi-Fi adapter is turned off, we can change the MAC address. To do so below is the command. Do note that, you cannot access Wi-Fi when it is turned off.
sudo ip link set dev wlp3s0 address <random-mac-address>
You can put up any random 14-digit alphanumeric as the MAC address. I have used “70:5E:55:65:F4:10”.
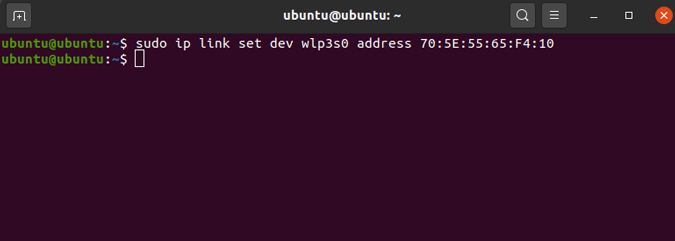
Now, that we have changed our MAC address, we can turn on our Wi-Fi adapter.
sudo ip link set dev wlp3s0 up

In order to verify that we are using the changed MAC address, use the following command.
ip a | grep ether
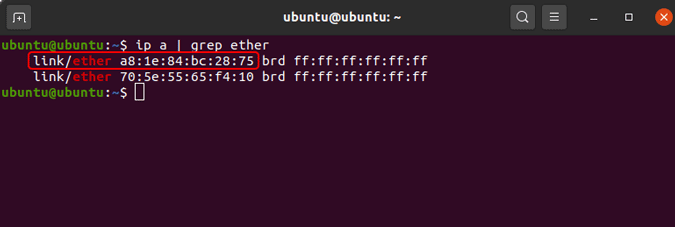
As you can see in the above screenshot, I am using the assigned MAC address.
Closing Words
So these were the ways to get randomized MAC addresses on various platforms. For more issues or queries, let me know in the comments below.
Also Read: How to Prioritize Wi-Fi Networks on Windows, macOS, iOS and Android