There can be many reasons for your keyboard to malfunction on your Windows 10 or 11 PC like hardware glitches and software conflicts. Before you consider replacing your keyboard or resorting to costly repairs, try these troubleshooting methods. Here are some fixes to try when your keyboard stops working on your Windows 10 or 11 computer.
Table of Contents
1. Perform Initial Inspections
Before we move on to technical solutions for fixing the keyboard, here are a few simple solutions you can try first:
- Have you tried restarting your computer? This often resolves the majority of issues, including problems with the keyboard.
- Ensure that your keyboard remains clean, as dust and debris have the potential to cause individual keys or even the entire keyboard to cease functioning.
- Look for physical damage. If a cable or keys are broken or damaged, that’s likely the reason your keyboard suddenly stopped working.
- Check whether your PC or laptop’s USB Port is functioning properly. You can test it by switching to another port.
- Try testing your keyboard on another computer. If it works, that means the problem is with your PC and if it doesn’t, your keyboard may be dead, leaving you with no alternative but to purchase a new one.
- If you using a wireless or Bluetooth keyboard, make sure to check its battery health. Sometimes, having low energy can cause your keyboard to stop working.
- Reconnect your Bluetooth or wireless keyboard with your PC.
2. Use On-Screen Keyboard
Before you can actually use any of the troubleshooting methods, you first have to log in to Windows. If you’re unable to use the keyboard on the Windows login screen, you can temporarily use the on-screen keyboard to sign in to your Windows device, and then you can try out any of the fixes mentioned below.
To use the on-screen keyboard on the Windows login screen, click on the human icon (Accessibility) in the bottom right corner and enable the On-screen keyboard toggle.
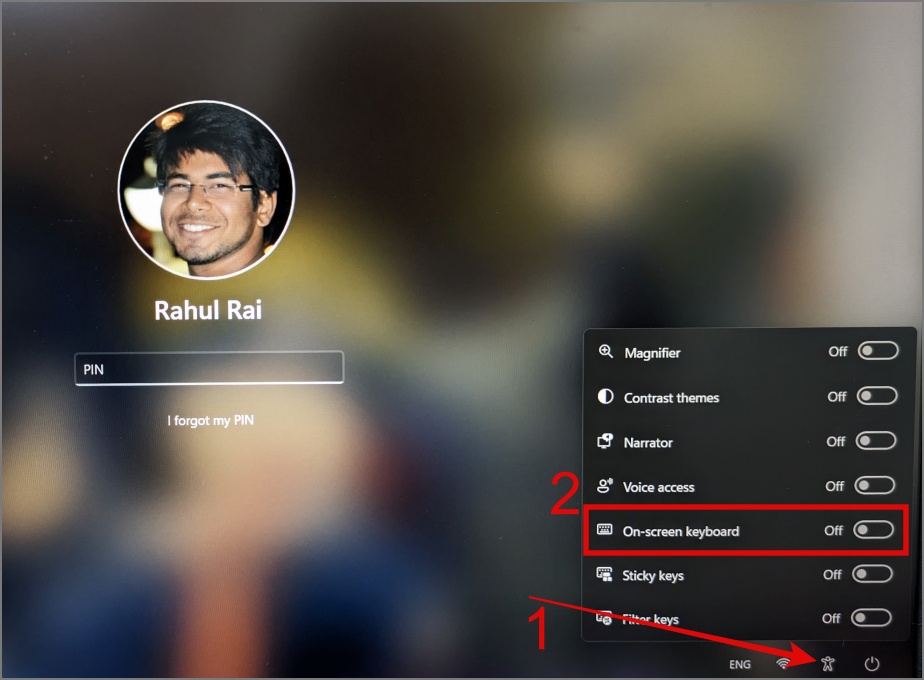
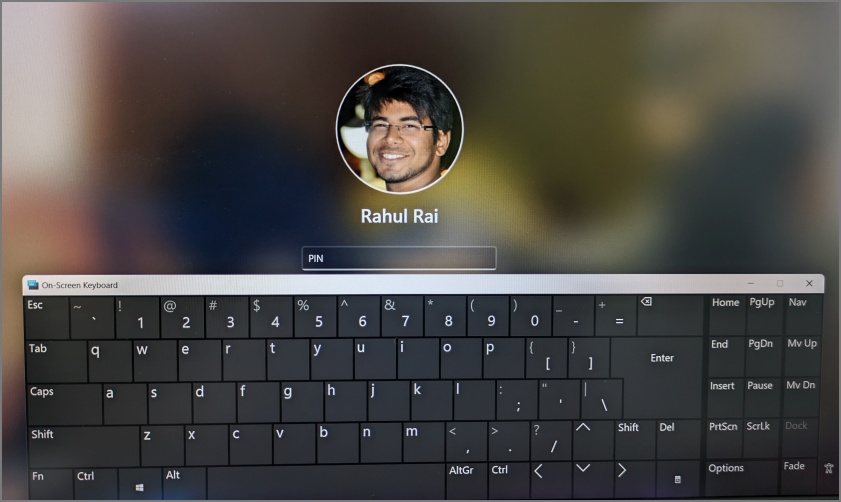
That’s it. You can now use your mouse to click on the keys to enter the password or PIN, and afterward, you can try the solutions below to resolve the keyboard problem.
Tip: Learn how to enable and customize the on-screen keyboard on Windows
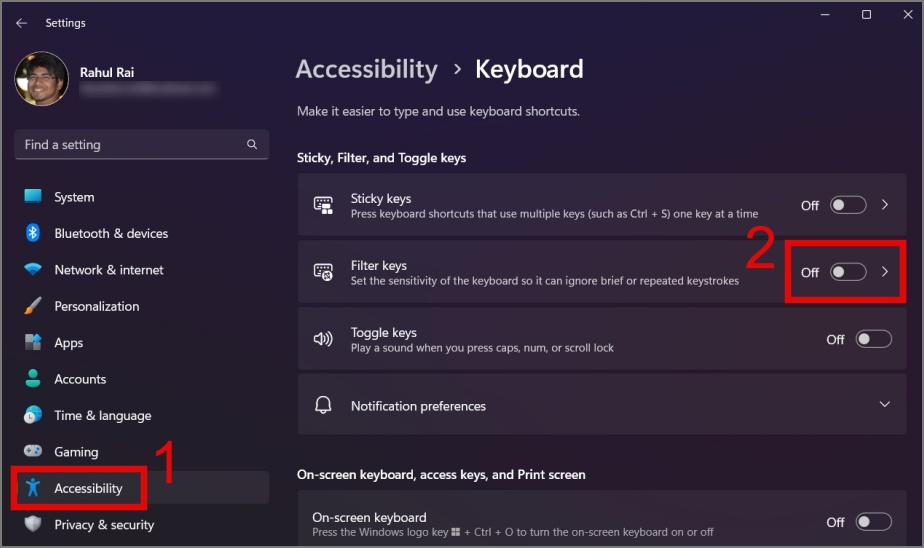
3. Disable Filter Keys
This solution has helped numerous users when their keyboards stopped working on their Windows computers. Perhaps you can give this trick a try. If you’re wondering what Filter Keys is, it’s a Windows accessibility feature that prevents accidental or repeated key presses by requiring longer key presses. This might give you a false impression that your keyboard is not working properly.
To disable Filter Keys on your Windows, navigate to Settings > Accessibility > Keyboard and then toggle off the button next to Filter keys.
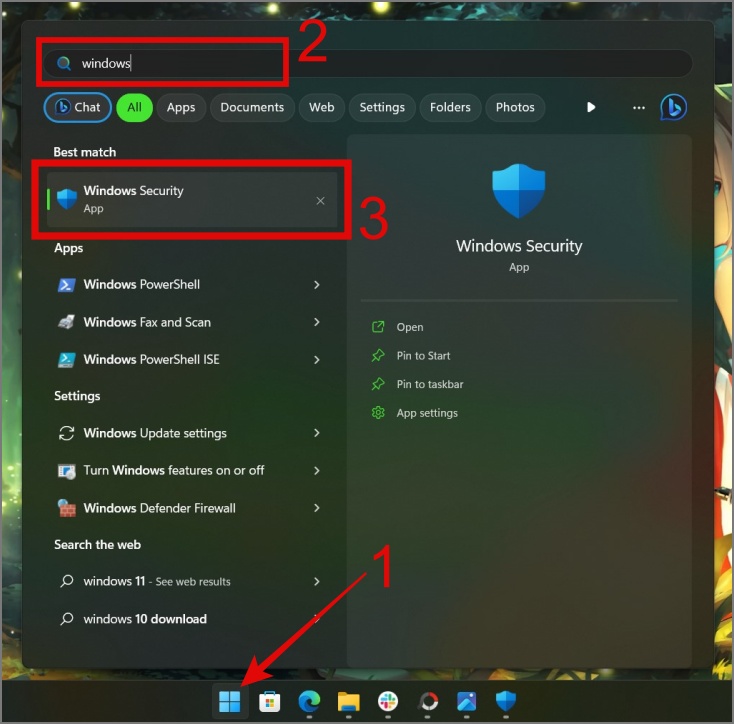
4. Scan for Malware
You may not be aware, but your PC could be affected by malware that might be interfering with both the software and hardware, including the keyboard. One user was able to resolve the keyboard issue by removing the virus. We recommend using reliable anti-malware software or Windows’ built-in antivirus for protection.
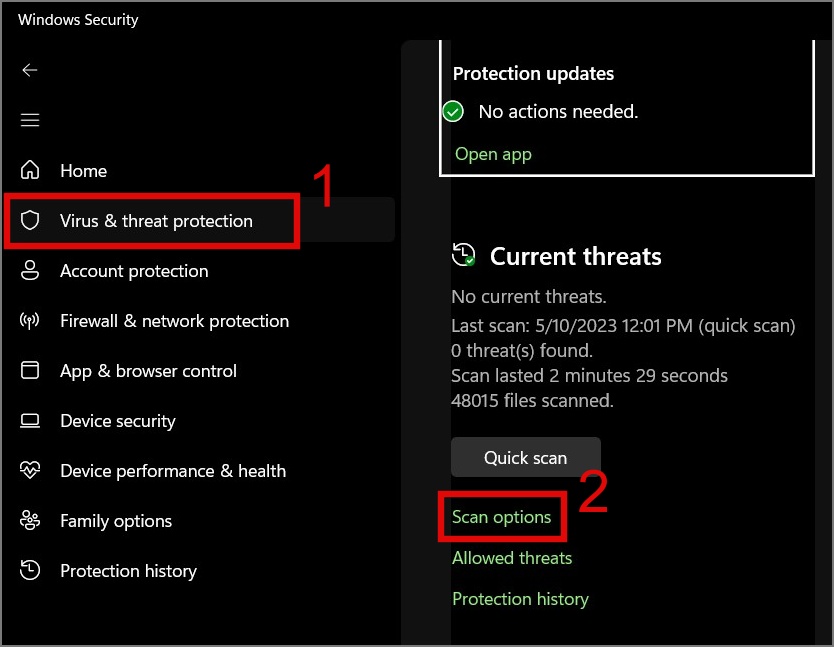
1. Launch Windows Search (Windows Key + S) and look for the Windows Security app.
2. Open the app, move to the Virus & threat protection section, and then click Scan options.
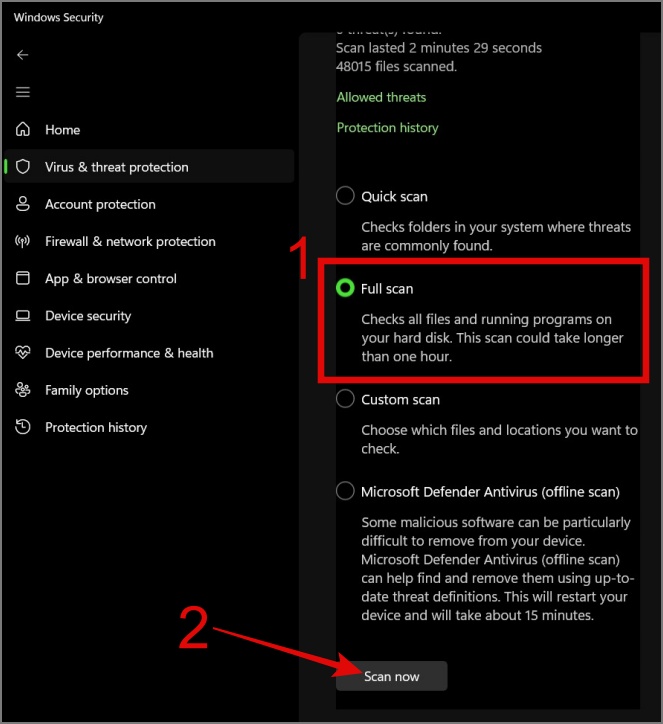
3. Select the Full scan option and then click the Scan now button.
5. Run Keyboard Troubleshooter
Another great way to fix the keyboard issue is by using the keyboard troubleshooting feature on Windows. In most cases, simply running this troubleshooter resolves common keyboard problems. Here’s how to run the troubleshooter:
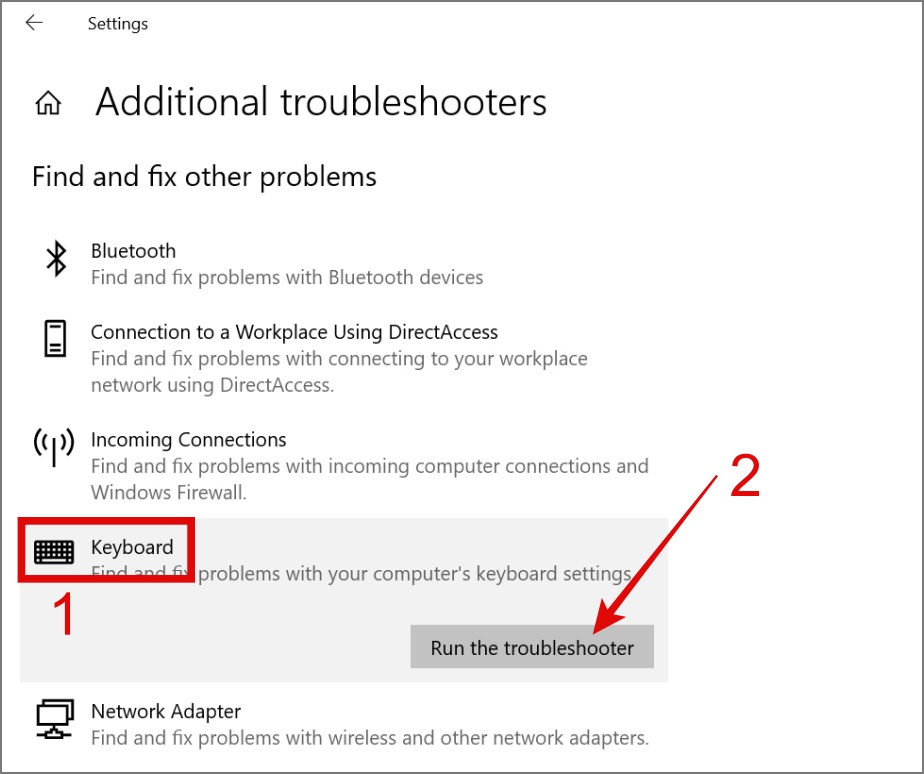
1. Navigate to Update & Security > Troubleshoot > Additional troubleshooter.

2. Select the Keyboard option and hit the Run the troubleshooter button.
Afterward, it will initiate the troubleshooting process. If Windows can identify any issues with your keyboard, it will fix them for you.
Note 1: In earlier versions of Windows 11, there used to be an option for troubleshooting the keyboard as well. However, it has been removed in the Windows 11 22H2 version. If you’re using an older version of Windows 11, navigate to Settings > System > Troubleshoot > Other troubleshooter.
Note 2: If the troubleshooter not working on your Windows, try these fixes.
6. Update or Reinstall the Keyboard Driver
If you’ve recently updated your Windows, it’s more likely that the issue lies with the keyboard driver. Therefore, try updating or downgrading your driver to resolve compatibility issues with the new system update.
To update the keyboard driver, follow the below steps:
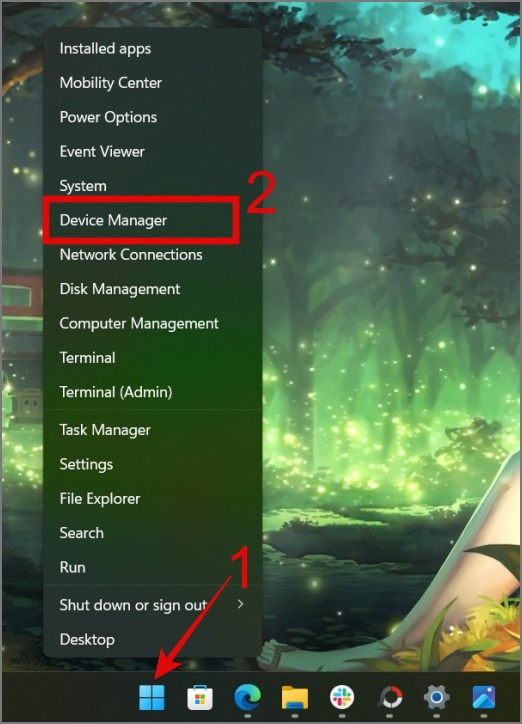
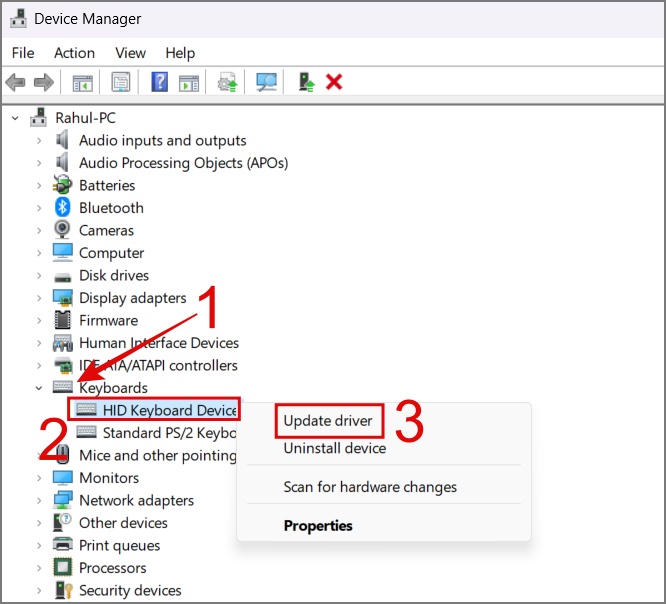
1. Right-click on the Start button and then select Device Manager.
2. Expand the Keyboards section and then right-click on the keyboard device that you want to update.
3. Select the Update driver option to check for updates.
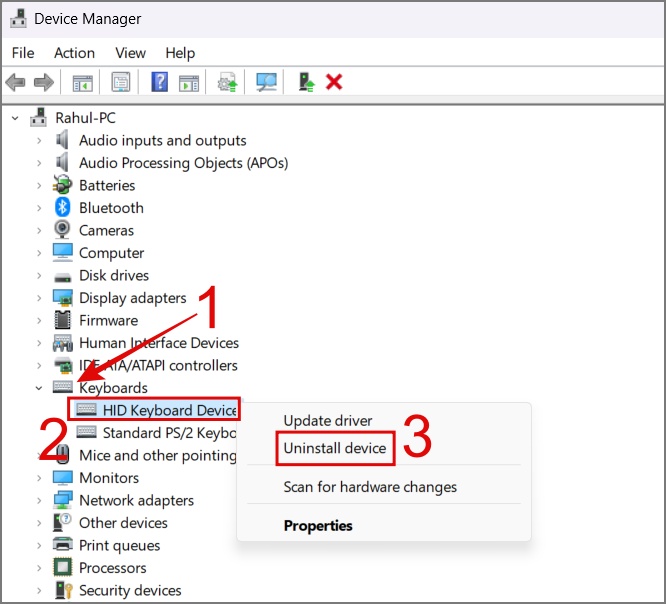
If Windows can’t find updates, just choose the Uninstall device option and then restart your PC. This will reinstall the keyboard driver when your PC restarts.
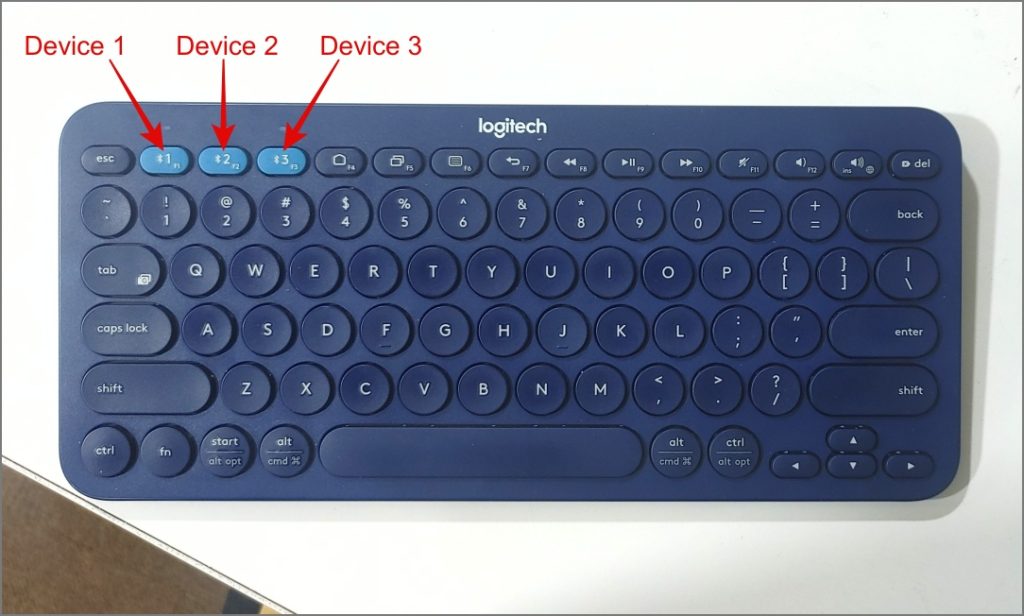
7. Check Your Bluetooth Keyboard Connection
At our office, we use the Logitech K380 keyboard, which can be paired with up to three devices. As you might have guessed, it sometimes gets connected to another computer without our knowledge, and we usually assume that our keyboard has stopped working. If you happen to own a similar Logitech keyboard, we recommend ensuring that the Bluetooth keyboard is connected to your Windows laptop or PC.
8. Disable Fast Startup
The Fast Startup feature in Windows can help your PC boot up quickly. However, sometimes during this process, power may fail to supply to accessories like the keyboard. So maybe you could try disabling Fast Startup to see if it makes your keyboard start working.
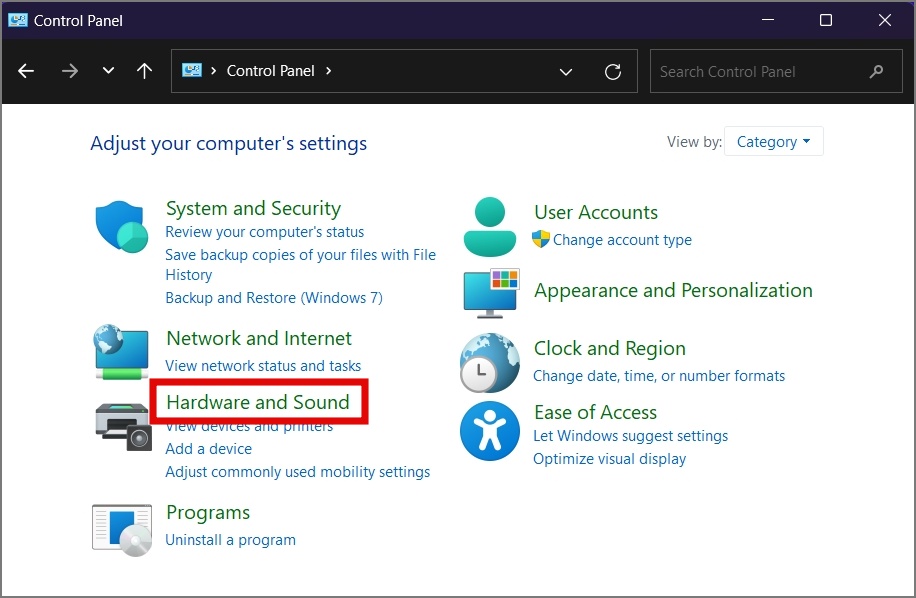
1. Open the Control Panel on your computer.
2. Click on Hardware and Sound settings.
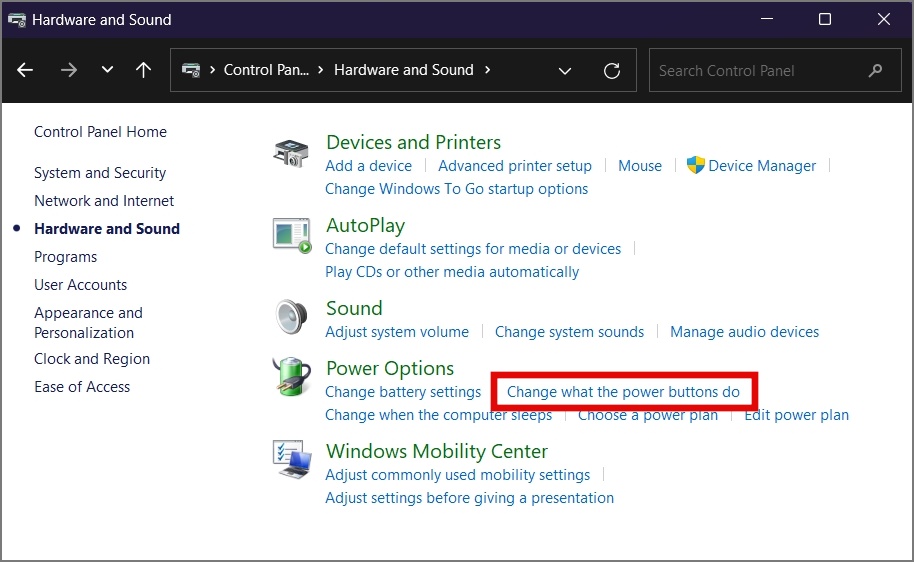
3. Under Power Options, select the Change what the power buttons do option.
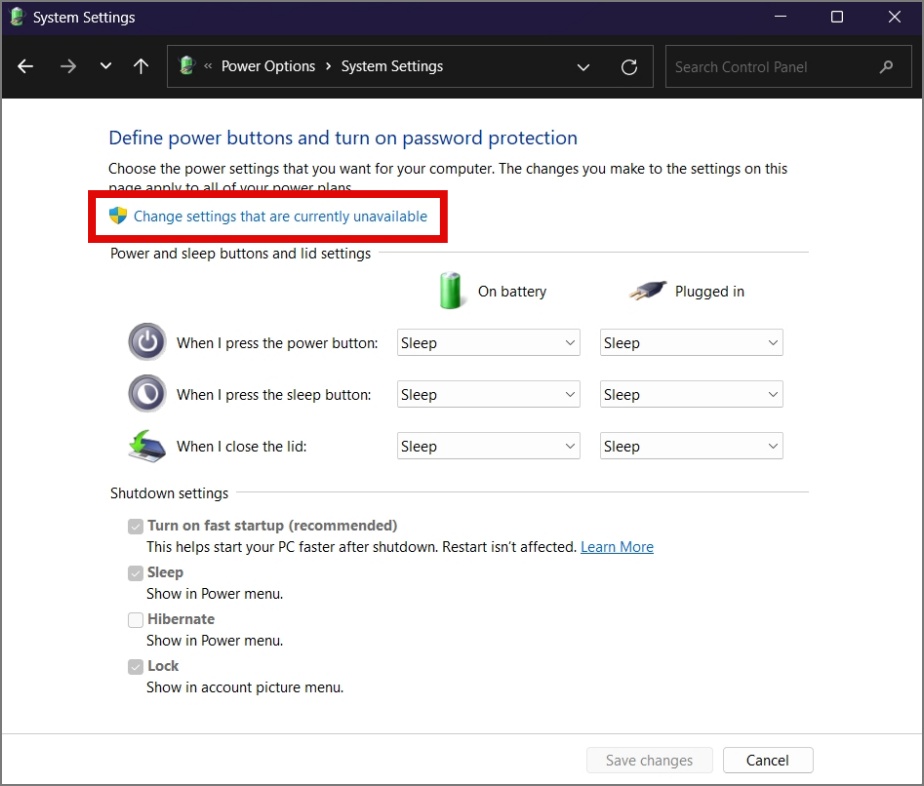
4. Now click on Change settings that are currently unavailable.
5. Finally, uncheck the box next to Turn on fast startup option and then hit Save changes.
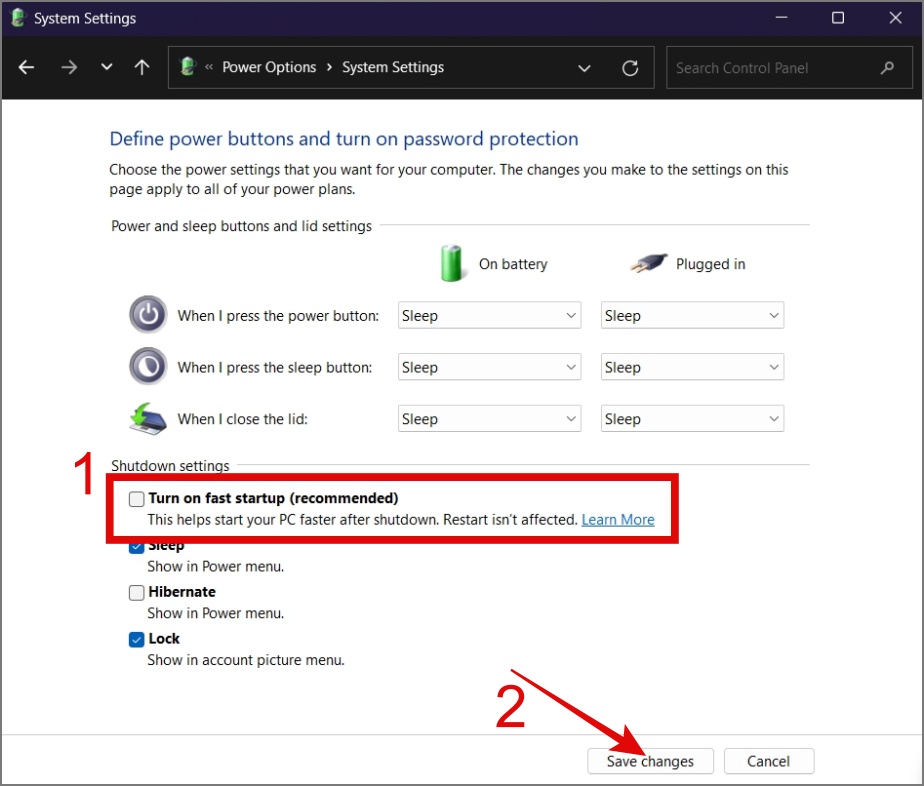
Hopefully, this fixes the keyboard not working issue on your Windows 11 or 10 device.
9. Disconnect Other Interfering Peripheral
If you have several wireless devices, like Bluetooth speakers, Wi-Fi routers, or cordless phones, they might interfere with your wireless keyboard. To identify the culprit, try turning off these devices one by one and see if your keyboard begins to function correctly. If the culprit is found, you can take appropriate action.
Tip: Learn how to use a Windows PC as a router.
10. Check Your Bluetooth Keyboard Connection
At our office, we use the Logitech K380 keyboard, which can be paired with up to three devices. As you might have guessed, it sometimes gets connected to another computer without our knowledge, and we usually assume that our keyboard has stopped working. If you happen to own a similar Logitech keyboard, we recommend ensuring that the Bluetooth keyboard is connected to your Windows laptop or PC.
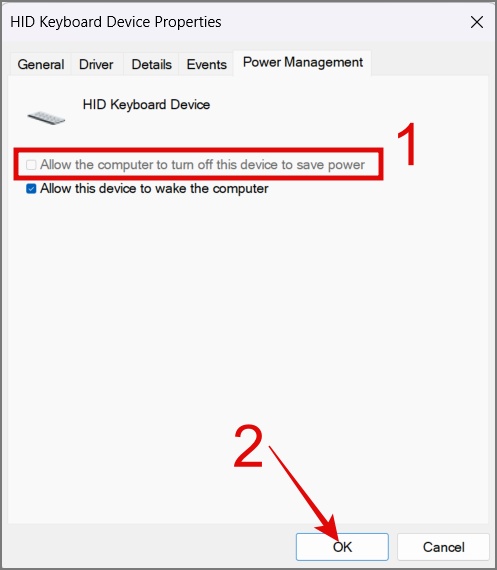
11. Check the Power Management Setting
In Windows, there’s an option that lets certain hardware devices automatically turn off when they’re not being used, which helps save power. To ensure that this option is not enabled for your keyboard, follow the below guide:
1. Right-click on the Start button and select Device Manager.
2. Go to the Keyboards section, right-click on the keyboard device, and choose Properties.

3. Make sure the box next to the “Allow the computer to turn off this device to save power” option is unchecked.
12. Run SFC Scan
If there are missing or corrupted files in your Windows operating system that are affecting your keyboard functionality, you can try running an SFC (System File Checker) scan. It can help you repair or replace these files to keep your computer running smoothly.
To do that, simply open the Command Prompt (Admin), then enter the command “sfc /scannow” and hit the Enter key.
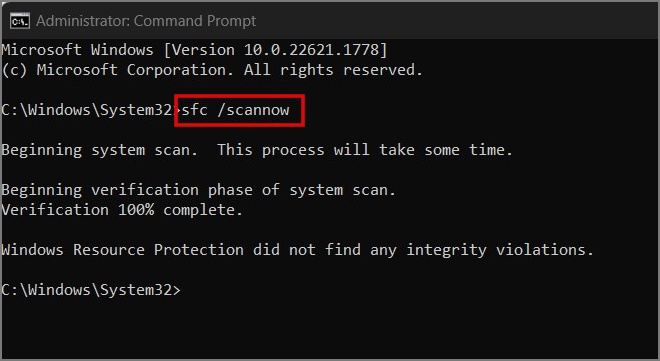
Tip: You can use the on-screen keyboard to type the command and Windows Search to find Command Prompt.
That’s it! It will start scanning your computer for errors and automatically fix them if any are detected.
13. Update or Roll Back Windows Updates
It’s possible that some system files may be corrupted or missing, or there might be some bugs that can’t be fixed using the SFC method. In that case, you can try updating Windows to see if this resolves the keyboard issue.
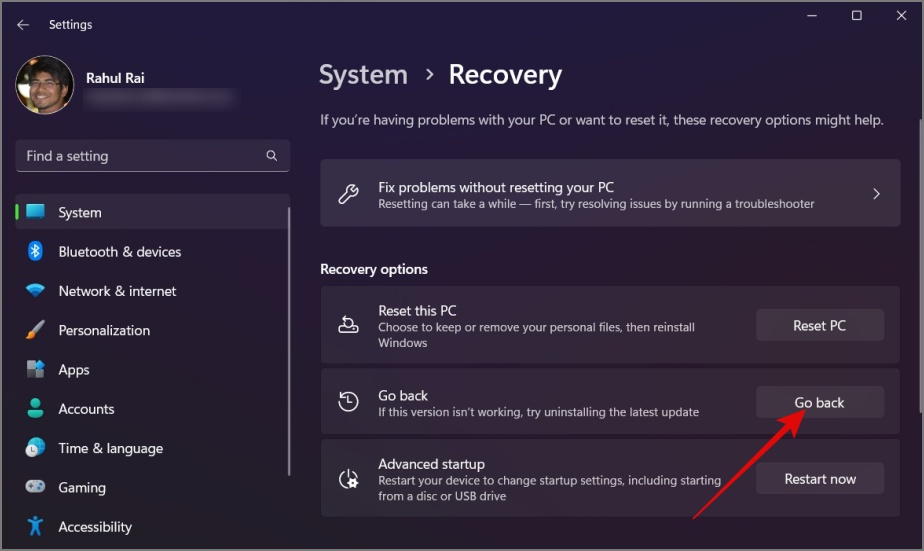
On the other hand, if your keyboard has stopped working after updating to the newer Windows build, you can roll back to the previous build. To do that, simply go to Settings (Windows Key + I) > System > Recovery and then click the Go back button. After that, you can follow the on-screen instructions.
Tip: Learn how to find out your Windows build and version
We also want to point out that if you’re on a Windows Insider program, it’s advisable to switch to the stable version of Windows. Insider programs often involve testing new and potentially unstable features, which may lead to unexpected issues, such as the keyboard not working.
14. Make Changes to Your Registry File
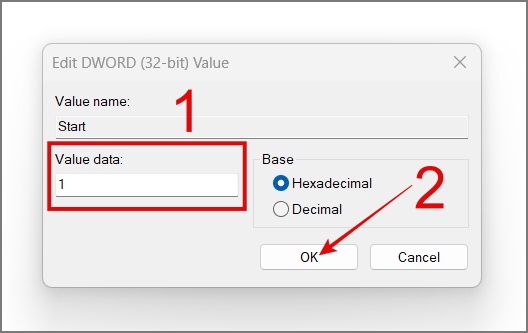
During research, we found that making changes to the PS/2 (i8042prt) registry file can resolve the keyboard issue on your Windows PC. In case you’re wondering what is PS/2 (i8042prt), it is a Windows Registry that contains settings and details about how the computer interacts with PS/2 keyboards and mice.
Here’s how things work:
1. Go to Settings > Accessibility > Keyboard and enable the On-screen keyboard.

2. Next, press the Windows Key + R to launch the Run dialog, then type “regedit” and click OK.

3. Navigate to the following path and then open the registry key named Start (Inside the i8042prt folder).
Computer\HKEY_LOCAL_MACHINE\SYSTEM\CurrentControlSet\Services\i8042prt
4. Change the Value data to 1 and click OK. After that, restart your computer and check if your keyboard has started working again.
Last Resort – Reinstall Windows
If your keyboard is functioning perfectly on other computers and none of the above solutions work, you get two options – get a new external keyboard or reinstall Windows. You can refer to this guide on how to reinstall Windows.
Bring the Keyboard Back From Vacation
It can truly become a nuisance when you want to use your computer but can’t because one fine morning, your keyboard decided to go on a long vacation. This not only tampers with your productivity but also leaves you feeling quite frustrated and helpless. We hope the above guide has provided some relief to you and possibly fixed the keyboard not working issue on your Windows PC.
By the way, did you know you can also use your phone as a keyboard for your Windows PC? This can temporarily provide you with some relief and help you perform basic tasks on your computer.