Skype was probably the first successful cross-platform video conferencing app in the world that really took off. It’s a pity that even after so many years, it continues to slow Windows computers down and cause all sorts of problems. Skype has always been plagued with some of the other issues. Case in point: the microphone. There are many users who have been facing the Skype microphone not working issue on Windows 10 PC.
To check if your microphone is working properly on Skype, you can make a test call to Echo, it’ll record your message and play it back to you. If you can’t hear your voice back, then there is a chance, your Mic is not working. In this post, we will take a look at some settings that you should enable in order for it to work and some troubleshooting steps that will help resolve the issue.
Let’s begin.
Also Read: How to Record Skype Video Calls – Complete Guide
Skype Microphone Not Working
1. Reinstall
Why? When you install Skype for the first time, you are asked to give some necessary permissions that help Skype function correctly. One of those permissions is access to the microphone.
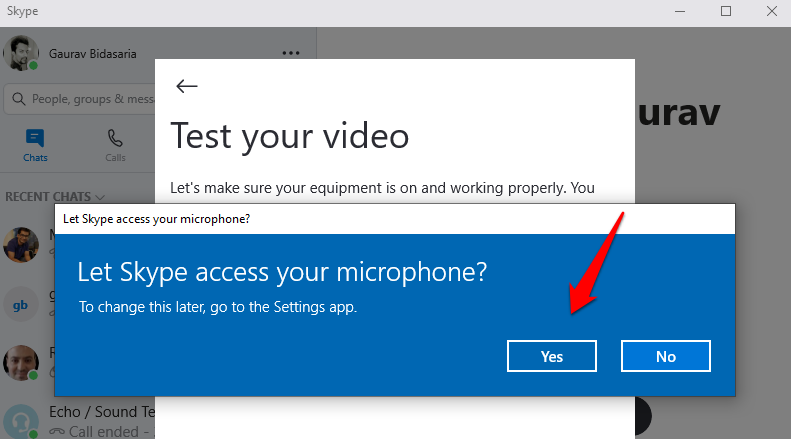
I know what you are thinking. There is no need to reinstall Skype to give necessary microphone permissions. True. But reinstalling an app can also remove bad and corrupted files from the system. A fresh install can solve quite a few software problems. This is why it is the first step.
Don’t worry about your contacts and other data as they will all appear once you log back in using your Microsoft account.
2. Install Directly
Microsoft got a lot of things right with the Windows 10 and Windows Store is one of them. All Microsoft owned and developed software are now available in a single place which is reliable and pre-installed on all licensed Windows PC. The thing is that many users have reported that installing software directly from the developer’s site solves the microphone issue. To do so, visit the Skype site using the link below and select Skype for Windows and not Skype for Windows 10 from the drop-down menu.

Install it and see if the microphone on Skype is working or not.
Also Read: How to Get Blur Mode on Skype
3. Microphone Permissions
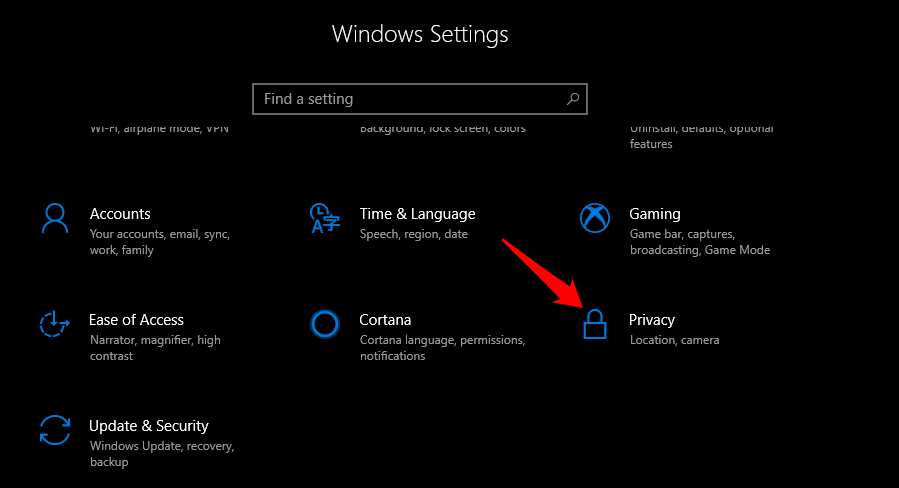
It is also possible that even after you gave the necessary permissions to Skype to use and communicate via the microphone, due to a bug or change in setting, it was toggled off in the Windows Settings itself. To check, press the Ctrl+I keys on the keyboard and select Privacy.
Select Microphone from the left window pane and scroll a little to find a list of all the apps that need to use the microphone. Find Skype in the list and make sure it is toggled on.
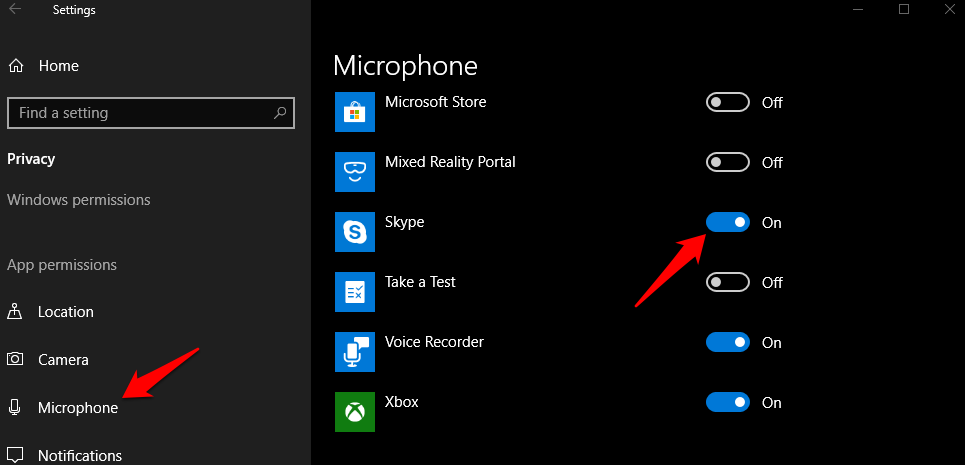
Check if Skype microphone is working on your laptop.
4. Skype Audio Settings
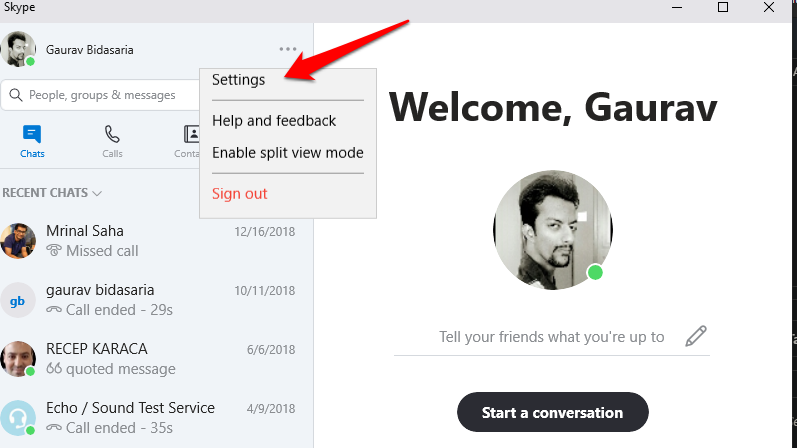
Just like Windows 10 settings, there are audio settings inside Skype that you need to check to make sure that volume, speakers, and the correct microphone are selected. To do that, open Skype on Windows 10 and click on the menu icon to go to Settings.
Select Audio and Video in the left-pane and you will see different options. Make sure that the correct Microphone device is selected. Sometimes, there are more than one. For example, in my laptop, there is Realtek High Definition Audio and Default communications device. Do not select the default one as it won’t work in most cases.
Noticed the line of blue dots? That line will move to the right whenever the microphone hears and registers a sound. To test, speak something from a normal distance from the laptop and see if the line moves. If it is moving then your Skype microphone is working correctly. If not, keep on reading.
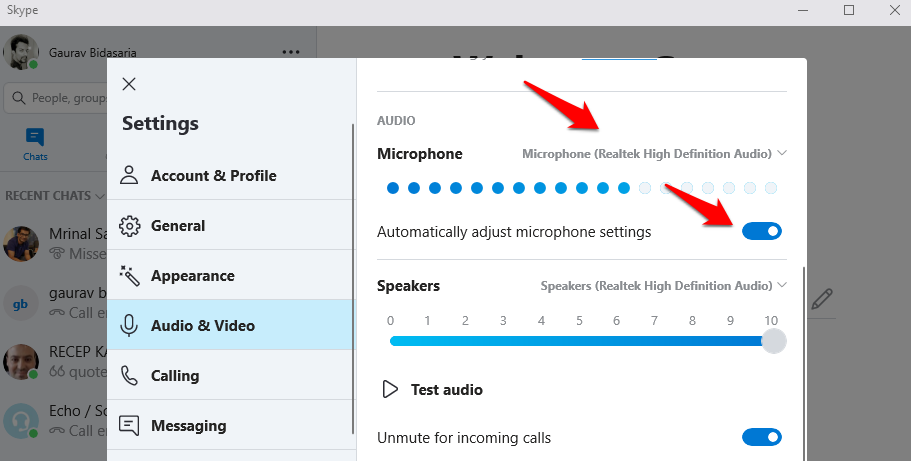
To be on the safer side, select Automatically adjust microphone settings option. This will tell Skype to manage settings to the optimum level. Alternatively, if it was already selected and the microphone was not working, you may try and deselect that option. Maybe Skype was not managing it the right way?
5. Sound Drivers
Drivers are a necessary component of every software that you install on a Windows computer. The job of a driver is to allow the software to connect and communicate with the hardware device, in our case, it is the sound card. If the drivers are out of date or the files are corrupted, it may lead to irregularities in the functioning of the microphone on Skype. Open Device Manager by searching for it in the Windows Start button menu. Find and double-click on Sound, video, and game controllers option.
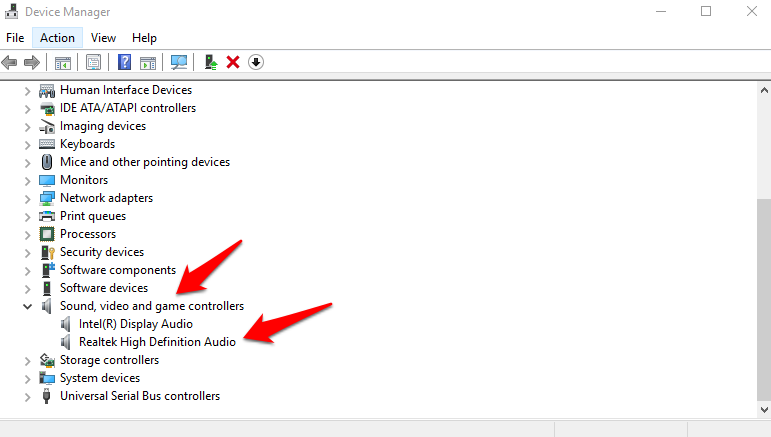
Your sound card should be listed here. Scroll down a little to find and select the same sound card that you had selected in the Skype settings above and right-click on it to select Update drivers option.
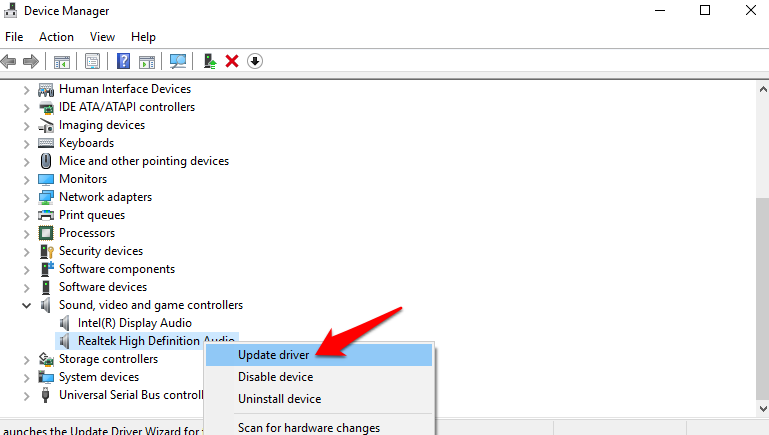
This will take some time and I recommend you to close Skype and reboot your computer once before testing if Skype microphone is working properly or not.
6. Restart Windows Audio Service
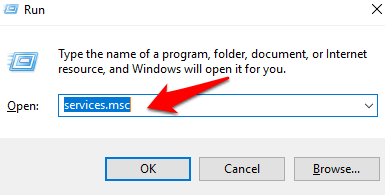
For every software or app installed on Windows, there is a respective service that runs in the background and does the heavy lifting. For the microphone and other audio services, it is the Windows Audio service. Make sure it is running and if not, start it. To do so, press the Windows key+R on your keyboard to open the Run command prompt. Type services.msc and hit Enter.
Search for Windows Audio in the list and right-click on it to Start it. If it is already running, the option would be grayed out. In that case, you should click on the Restart option. This should jump start things.
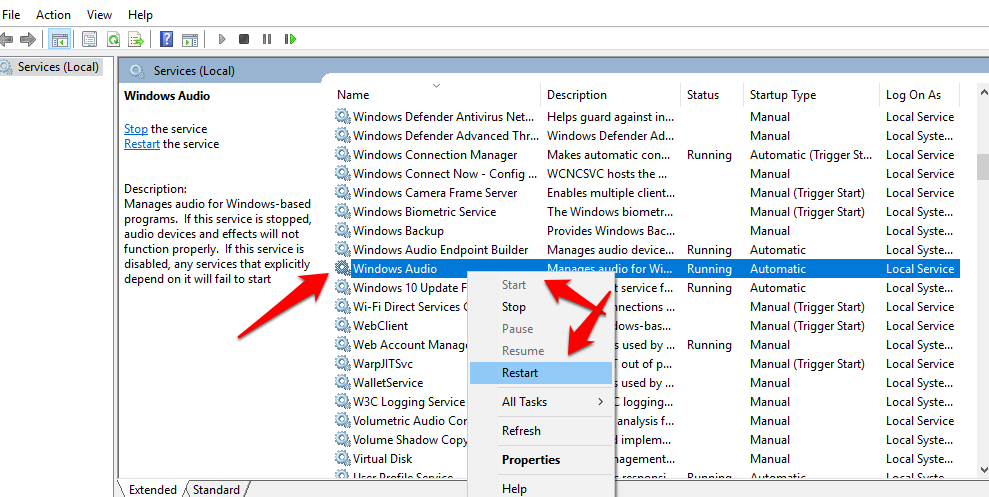
If the service was not running when you checked, it is possible that by default, it is set to not run when the computer reboots. We don’t want that because that would mean you going through all the steps all over again. So, click on Properties on the same menu. Under the General tab, Select Automatic in the Startup type drop-down menu.
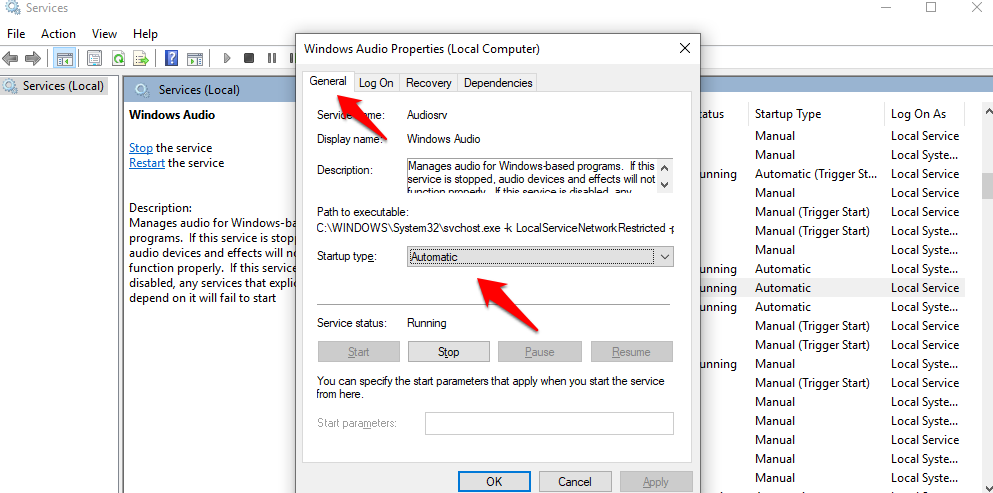
Click on Apply and OK when done. Check if Skype microphone is working on your Windows 10 computer.
Also Read: Looking for Alternatives to Skype? Here are 5 Programs You Should Try
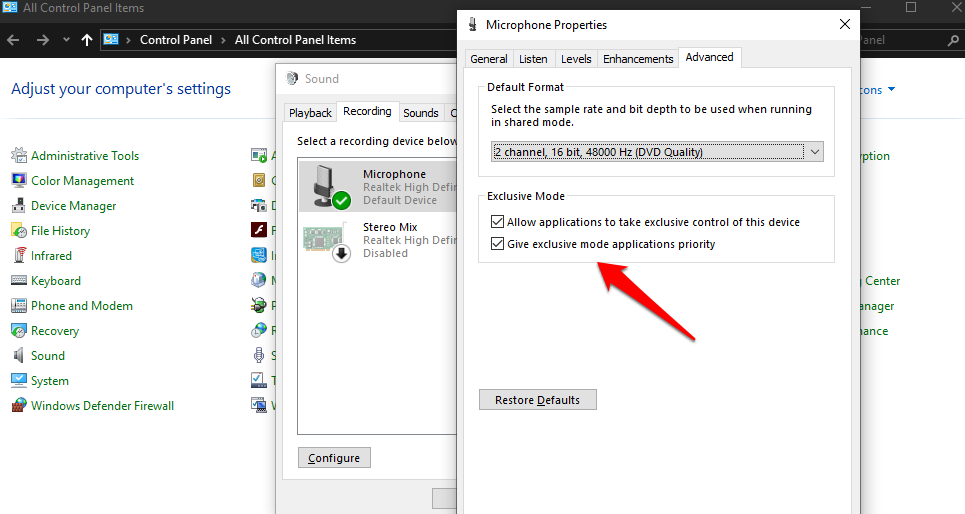
7. Exclusive Control
Skype is not the only software on your computer that needs to use the microphone. There can be a number of services other than Skype. Sometimes, some apps will go a step further and take exclusive control over the microphone, disallowing any other app to use it. Sad. In our world, it’s called a monopoly which is always bad for the end users.
To check, open Control Panel and navigate to the following settings screen.
Control Panel > Sound > Recording tab. There, double-click on the Microphone option to reveal a popup. Select the Advanced tab here and make sure that both the options under the Exclusive mode are unselected.
- Allow applications to take exclusive control of this device
- Give exclusive mode applications priority
8. Configure Bluetooth Devices
Are you using a Bluetooth device to communicate using Skype? This can also be a solution if the default microphone on your laptop is not working due to any other reason. In that case, try a headphone or an earphone with a Bluetooth. If that is not working either, search for Manage Audio Devices in the Windows Search. Under the Playback tab, you will see that your connected Bluetooth device is listed twice.
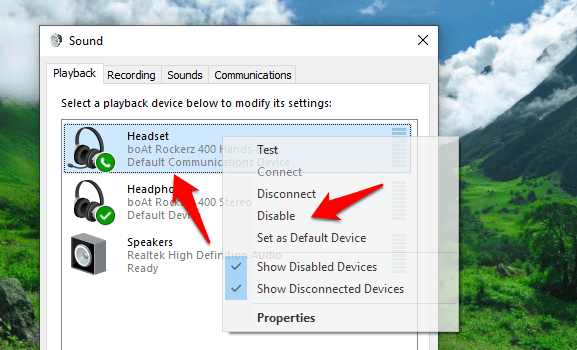
The first option is the hands-free option which should be disabled if you want to use the connected headphone’s microphone. If it is not disabled, to do so, right-click on the hands-free Bluetooth headphone option and select Disable to disable it. Note that the second listing should stay enabled.
There is also an option to make the connected Bluetooth device as your default device. That way, you won’t have to go through all the troubleshooting steps the next time you open Skype to chat with your friends and relatives. To do so, in the same menu, you will find Set as default device option. If it is available, click on it then enable it.
Skype Microphone Not Working Issue
Skype is a great software however not without its flaws. The microphone issue is not something new however some of the solutions mentioned in this guide are. So make sure to go through all the steps mentioned in the guide to resolve the issue. If you have found a solution that works but was not shared in this post, please do share it with us and we will list with due credit to you.