If you own a convertible Windows laptop or tablet, you can take advantage of the automatic screen rotation feature to switch between portrait and landscape modes quickly. However, as with all things on Windows, the rotation lock feature can occasionally stop working. So, if you’ve found yourself in a situation where the rotation lock option appears grayed out on your Windows computer, we’ve compiled a list of solutions that’ll help.
Table of Contents
Before You Begin
When troubleshooting things, you should never rule out classic tricks that apply to almost every problem. Hence, you should start by restarting your PC, if you haven’t already. This should help fix any minor glitches with the system and set things straight.
Next, ensure that your PC is running the most recent version of Windows. This will help rule out any system-level issues caused by known bugs.
If you’re unable to access the screen rotation lock from the Action Center, you can try changing the display orientation manually by navigating to Settings > System > Display to see if that works.

If the issue remains, then you can employ the following troubleshooting tips to fix the screen rotation lock grayed-out issue on Windows.
1. Disconnect Peripherals
If your convertible laptop or tablet is connected to a detachable keyboard, Windows may prevent you from accessing the screen rotation lock. Hence, you should start by disconnecting it.
Further, you should also unplug your laptop from any docking station or external monitor, as well as any other peripherals, to avoid interference from external devices.
After that, check to see if you can access the rotation lock on Windows.
2. Put Device in Tent Mode
Another solution is to put your laptop in Tent Mode and then access the rotation lock toggle. Surprisingly enough, this helped many users fix the issue almost immediately. You can also give it a go.

3. Re-Enable Sensors From Device Manager
Issues with the current sensor drivers on your PC can also cause such anomalies. If it’s just a temporary glitch, simply disabling and re-enabling the sensor driver should resolve the problem.
1. Press the Windows key + R to launch the Run dialog box. Type devmgmt.msc in the box and press Enter.
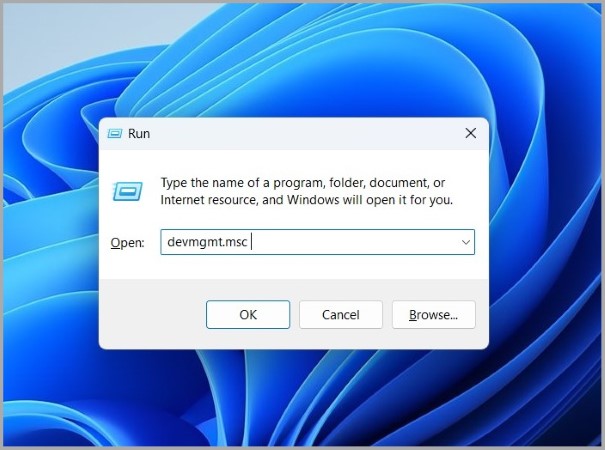
2. Expand Sensors, right-click on your driver and select Disable device. Then, right-click on the sensor driver again and select Enable device.

Check to see if you can access the rotation lock now.
4. Configure Sensor Monitoring Service
Sensor Monitoring Service is a crucial program that needs to run in the background for the screen rotation feature to work correctly. If the service isn’t starting automatically on boot, then you may encounter such issues. Here’s what you can do to fix it.
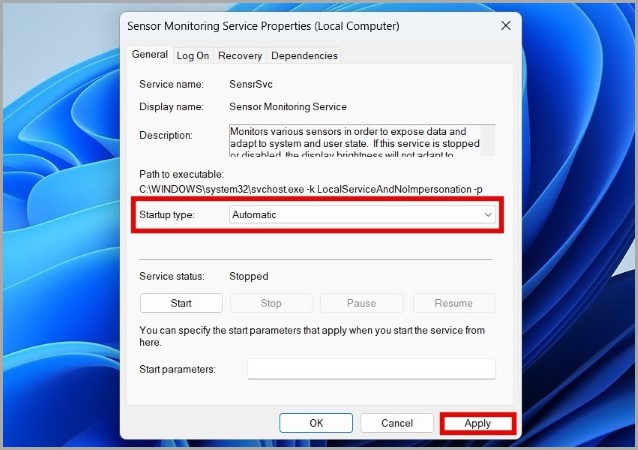
1. Press the Windows key + R to open Run utility, type in services.msc, and press Enter.

2. Locate and double-click on the Sensor Monitoring Service.

3. Change its Startup type to Automatic and hit Apply.
Reboot your PC after this and see if the issue is resolved.
5. Run Sensors Troubleshooter
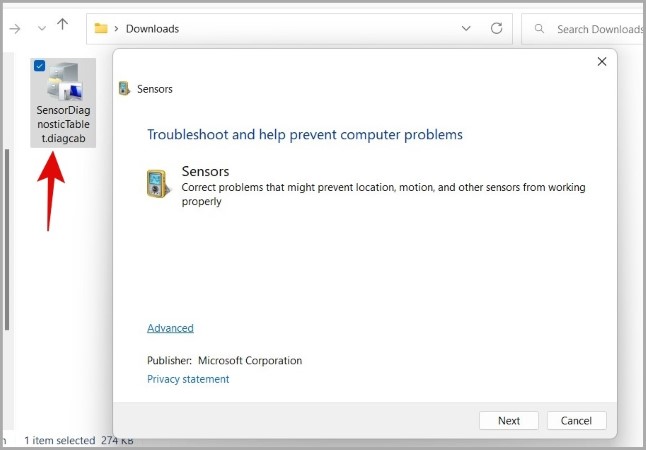
Microsoft offers a dedicated Sensors troubleshooter that can help you fix issues with the location, motion, and other sensors on your PC. However, the troubleshooter doesn’t come pre-installed on Windows, so you’ll have to download it first.
Once downloaded, double-click the SensorDiagnosticTablet.diagcab and follow the on-screen prompts to run the troubleshooter.
Following that, you should be able to access the screen rotation lock as before.
6. Update Display Drivers
If the display drivers on your PC are outdated or malfunctioning, you may experience such problems with Windows UI elements. To overrule this possibility, you can try updating your PC’s display drivers by following the steps below.
1. Press the Windows key + R to launch the Run dialog box. Type devmgmt.msc in the box and press Enter.
2. Expand Display adapters, right-click on your driver, and select Update driver.

From there, follow the on-screen instructions to finish updating the driver.
7. Tweak Registry Files
If none of the solutions have worked, you can use the following registry trick to force-enable auto rotation on Windows.
Since registry files carry important settings for Windows and its apps, make sure you follow the steps carefully and create a backup of your registry files.
1. Press the Windows key + R to open the Run dialog, type in regedit, and press Enter.

2. In the Registry Editor window, paste the following path in the address bar at the top and press Enter.
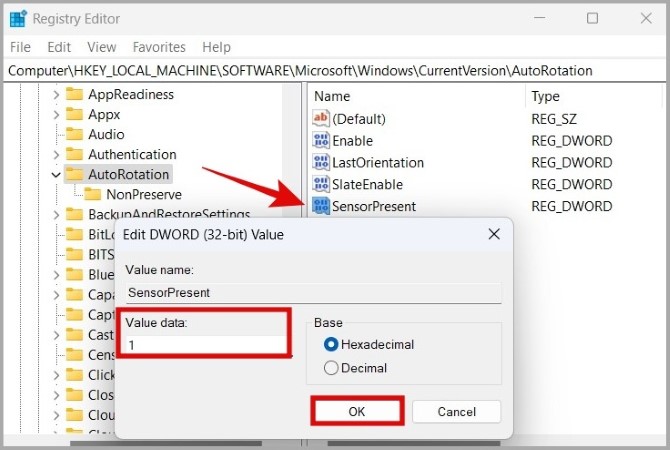
HKEY_LOCAL_MACHINE\SOFTWARE\Microsoft\Windows\CurrentVersion\AutoRotation
3. On your right, double-click the Enable DWORD, change its Value data to 1, and hit OK.

4. Next, double-click the LastOrientation DWORD, change its Value data to 0, and hit OK.

5. Lastly, double-click the SensorPresent DWORD and set its Value data to 1. Then, hit OK.
Restart your PC after this, and you should be able to access the rotation lock now.
Portrait or Landscape
Such issues with the auto-rotation feature shouldn’t keep you from using your convertible laptop or tablet to its full potential. Hopefully, one of the above solutions has helped you fix the underlying issue for good and the rotation lock is no longer grayed out on Windows.