Every computer guy you ever met asked you to safely remove the USB drive after ejecting it. They said you must not yank it out directly or you will lose precious data or worse, corrupt the USB drive rendering it unusable. But this is 2022. What really happens when you remove a USB drive without ejecting it first? Do you really need to safely remove external drives? Is there a workaround or solution to this?
Let’s begin.
Table of Contents
Why Not Remove USB Drive Directly – Consequences
The effects of removing a USB drive from Windows computer without ejecting it first can be one or more of what is listed below:
- Data fails to copy/transfer completely
- Loss of data or files
- Drive becomes corrupt and may be unusable
- App or software may stop working
- System may crash or become unresponsive requiring a force reboot
- When you reconnect USB drive, Windows may not recognize the USB drive and throw an error
Having said that, modern-day operating systems have come a long way. The instances of system crashes and corrupt and usable drives are far and few. It’s a disaster waiting to happen and you don’t want that, do you?
How Windows PC Connects With USB Drive
A lot is happening in the background when you plug a pen drive to your computer’s USB port. The pen drive doesn’t have a battery to operate on its own so it will draw power from your computer to work. Many pen drives have a led light to denote that it is on and functioning. Now you know their function.
The first time you connect a drive, it will install drivers on your computer that will allow the computer and USB drive to establish a connection. Essentially, drivers allow them to talk to each other and read and write data back and forth.
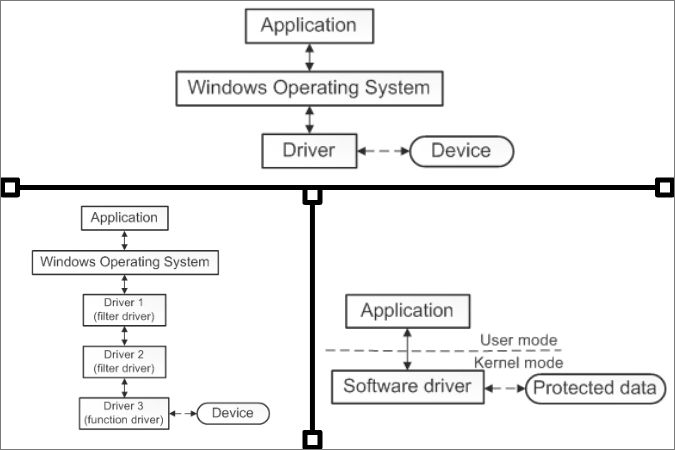
Every storage drive like pen drive, hard disk, etc. has either a Master Boot Record (MBR) or Partition Boot Record (PBR) which contains a record of all the data (files and folders) stored on the drive. The Windows OS uses this file to figure out what data you have on the drive.
The entire process we just discussed will be over within 2-3 seconds. This is why these USB devices are called plug-n-play these days.
How Windows Reads/Writes Data on USB Drive
The USB device is plugged in and is ready to read and write data to and fro. Now, what happens when you copy data from USB to your Windows computer’s internal drive or back? That will help us understand what happens when you remove USB drive directly without ejecting it first.
When you copy files from your Windows computer to the pen drive, you will see that the files are being moved in a pop-up and that the files are visible in the folder on your pen drive. But in reality, the files are saved in something called write caching. In layman’s terms, the files are stored in the cache memory and transferred in batches to the external drive. Now yanking out the storage drive without ejecting it first would result in loss of data that is lying in the cache memory and yet to be copied. Worse, the files are actually being transferred in the background but you don’t know it and it could corrupt both the data and the drive.
Apps Using USB Drive in the Background
When you connect a USB drive with computer, there are other apps that are also trying to communicate it. Some examples can be cloud storage apps like Google Drive, media players like Plex, antivirus, and so. Their interaction depends on whether or not you have given permission to them. Ideally, you would see a notification pop-up the first time you plug in a pen or hard disk drive.
If you have an external drive with an led light, it may blink to denote that data is being written or files are in use. But to be sure, do read the pamphlet that came with it.
Microsoft’s Dual Policy on Removing or Ejecting USB Drives
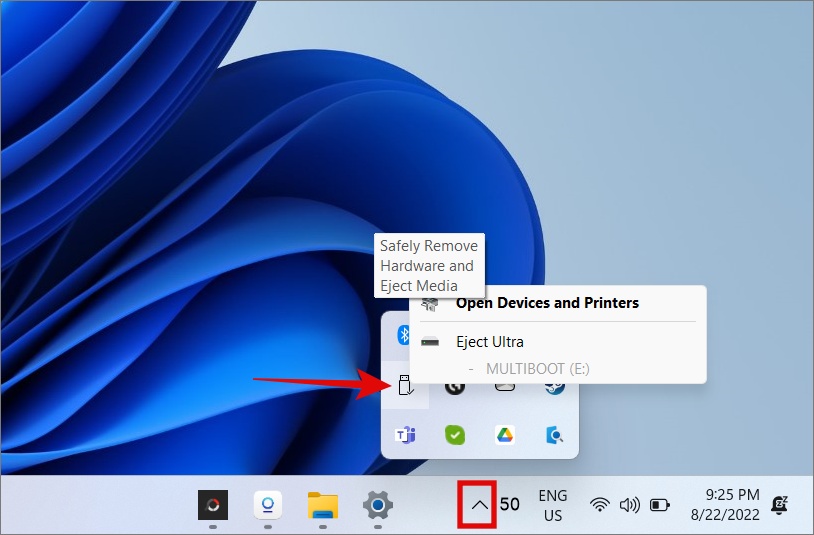
Microsoft wasn’t clear about the whole debate until recently. With the launch of Windows 10 and later 11, Microsoft released fresh guidelines where it recommends Safely Remove Hardware and Eject Media. You would find the icon in the Taskbar. Sometimes, you will find it in the Show hidden icons menu that you can access by clicking on the up arrow.
However, in update 1809 for Windows 10, Microsoft changed the default policy for removing external storage media. You see, Microsoft has two policies for removing storage drive from your computer’s USB port. Let’s take a look at them.
- Quick removal – As the name suggests Windows will keep the device in a state so you can remove it at any time. No need to Eject or use Safely Remove Hardware before snatching the drive from the USB port. Because Windows won’t be caching disk operations, this will impact performance.
- Better performance – This policy will manage storage operations on Windows with performance in mind. That means Windows will cache write processes on external storage drives. But choosing this policy means there might be data in the cache memory. So using the eject option before removing USB drive will protect the integrity of the data.
With the recent update, Microsoft has changed the default policy from Better performance to Quick removal. Windows users always had the flexibility of choosing one of the two policies but the option is buried deep into settings and most don’t even know what they are looking for or that it even exists. That’s where we come in.
How to Change USB Removal Policy on Windows 10 and 11
I will be using Windows 11 as an example here but the steps below will work on Windows 10 as well. Also, as noted above, update 1809 changes the default policy to Quick removal from Better performance.
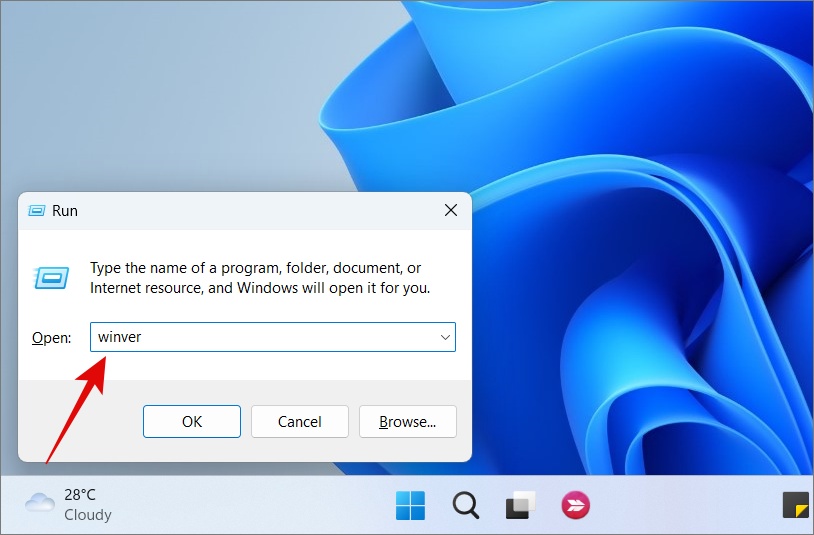
To check your Windows version:
1. Press Windows+R to open the Run Prompt. Type winver and press Enter.
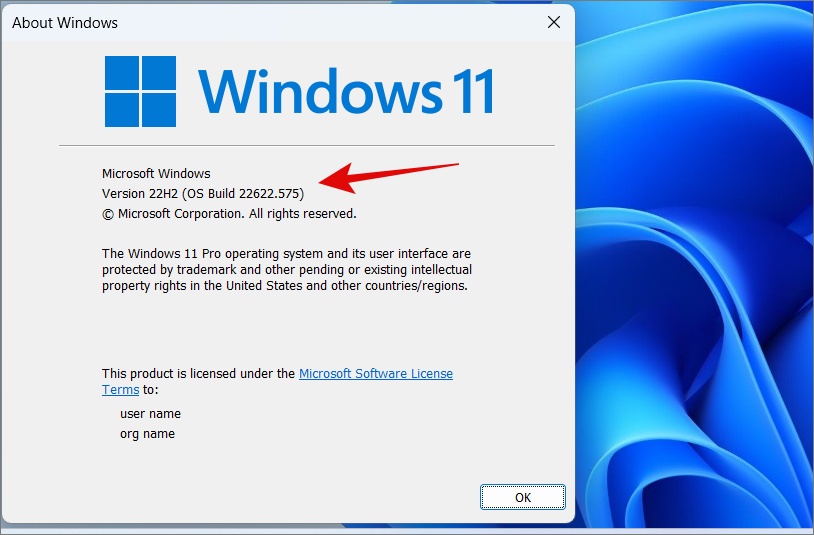
2. You will find the Windows OS and build version in the little pop-up that opens next.
Now, let’s check how to change the USB removal policy so you can choose what works for you when ejecting USB drives from your computer.
1. First, connect the USB drive that you want to set the removal policy for. You can set different removal policies for different drives.
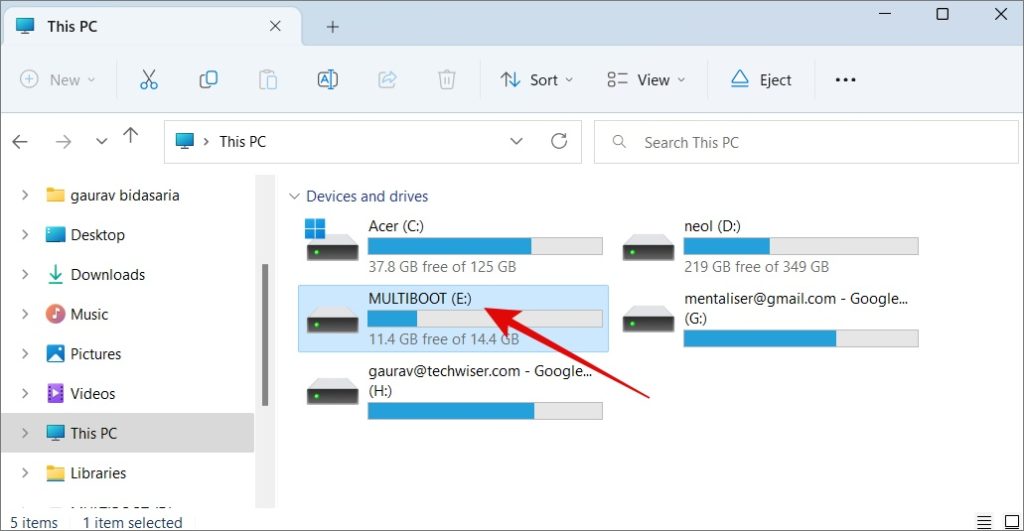
2. Now press Windows+E to open File Explorer. Find the drive letter that represents the USB drive you just inserted. For me, that’s E drive.
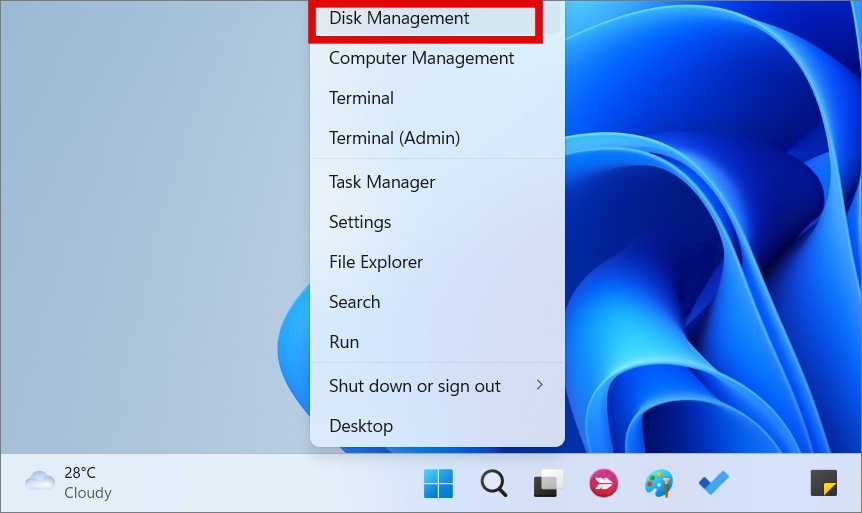
3. Right-click on the Start button and select Disk Management.
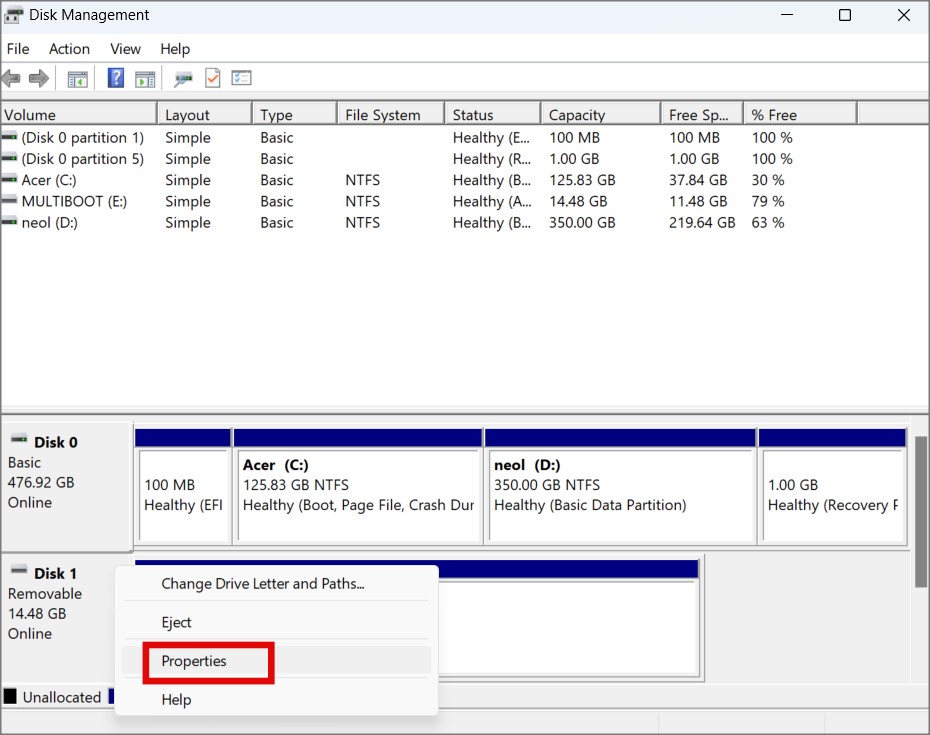
4. At the bottom of the screen, right-click on the removable drive that you inserted and select Properties.
5. In the pop-up that follows, under the Policies tab, you can select Quick removal or Better performance. You will notice that the former is the default even in Windows 11 though the update only mentions Windows 10.
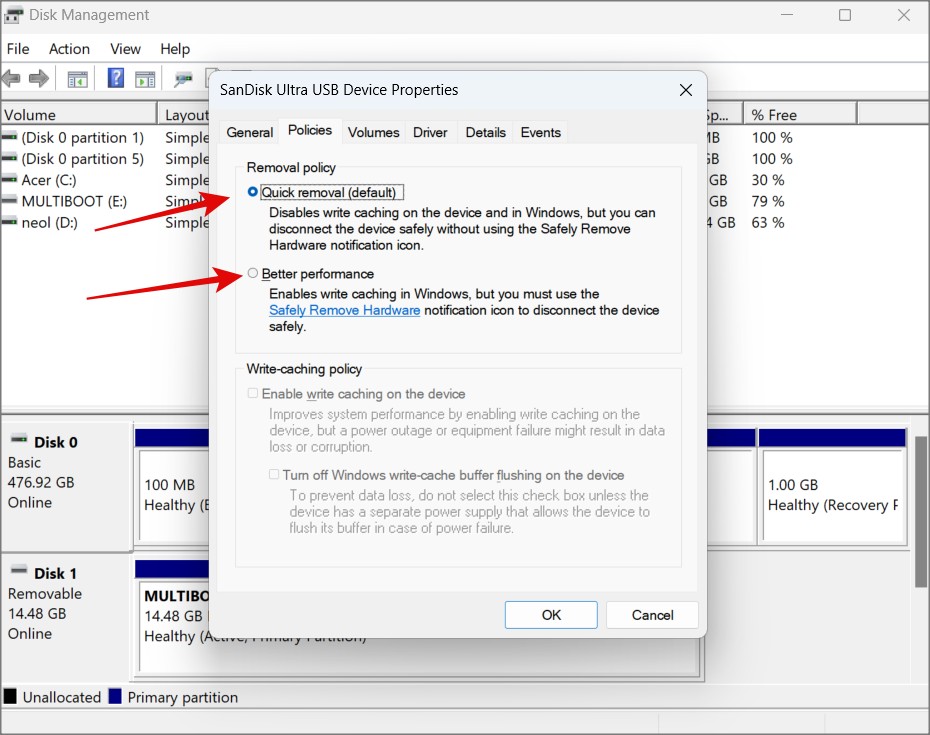
Note: If you select Better performance above, you can also edit Write-caching policy. We discuss how Windows will save data in cache memory and transfer them in batches to improve system performance.
Honesty Is the Policy
So, what should you do? And, why? Here’s my argument for choosing Quick removal policy which is the default set by Microsoft post recent update. The argument in favor of Better Performance is well, performance. But modern computers are powerful beasts and savvy users often upgrade their computers with additional RAM. How much of performance difference will it make? I am thinking not much. On the flip side, losing data is a much serious issue. Quick Removal removes the headache once and for all. Yank that stick all you want without having to worry about removing or ejecting USB drive.