Any Windows computer running at its maximum capacity, whether it’s the CPU, RAM, or disk, is likely to deliver sluggish performance. This can result in longer boot times, game stuttering, slow file transfers, reduced SSD lifespan, and more. If you’re also encountering 100% disk usage on your Windows 11 or 10 PC, we have got you. In this guide, we will show you how to reduce disk usage on your computer bringing it under acceptable levels.
Table of Contents
1. Basic Solutions
Before diving into advanced solutions, it’s a good idea to start with basic troubleshooting steps. If you’ve already tried any of these basic solutions, feel free to skip them.
- Restart Windows – An easy and quick fix for high disk usage is restarting your PC. Here is why restarting Windows or other devices can fix the majority of problems on your PC.
- Update Windows – A bug or a software vulnerability may be causing the high disk usage which can be fixed with an OS update.
- Disable or Remove Anti-virus Software – Maybe your antivirus (AV) software isn’t compatible with the current version of Windows or running a full PC scan or updating its database in the background. Try temporarily disabling or uninstalling your AV software to see if this resolves the issue.
- Check for Background Process – If a background process such as software or Windows update, video rendering, or file transfer is ongoing, you may notice a temporary spike in your disk usage, so there’s no need to be concerned. Wait it out.
- Upgrade Storage – We recommend upgrading to an SSD (solid-state drive) from HDD as it offers superior speed and performance, resulting in faster boot times, quicker application loading, and lower disk usage.
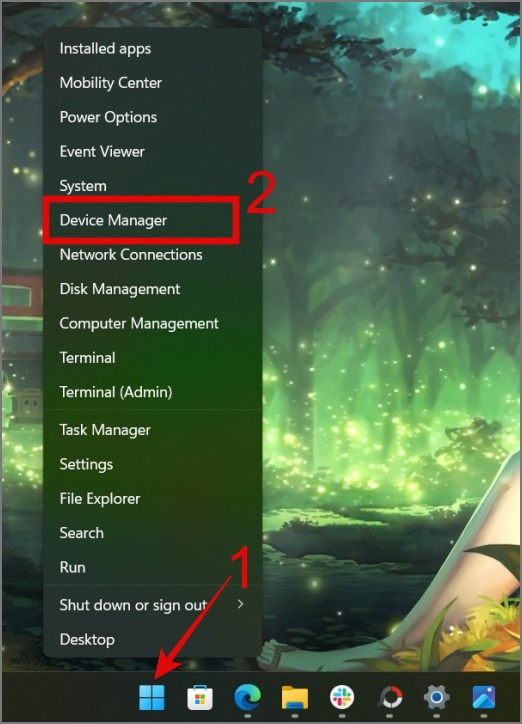
- Ensure Your Disk Driver Is up to Date – Ensure all drivers are up to date. Sometimes, outdated drivers cause disk usage to skyrocket. So here’s how to update your Windows drivers:
1. Open the Device Manager by right-clicking on the Start button or pressing Windows Key + X.
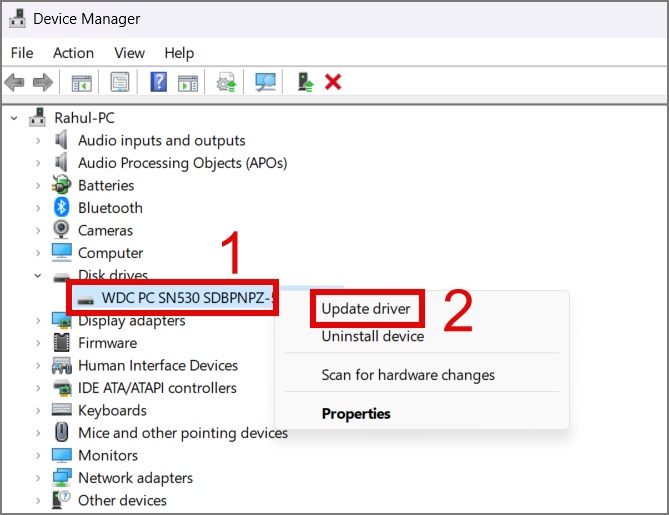
2. Expand the disk drives section, then right-click on the drive that you want to update and select the Update driver option.
3. From here, you can let Windows search for the driver, or you can manually search your computer for the driver. We would recommend you go with the first option (Search automatically for drivers).
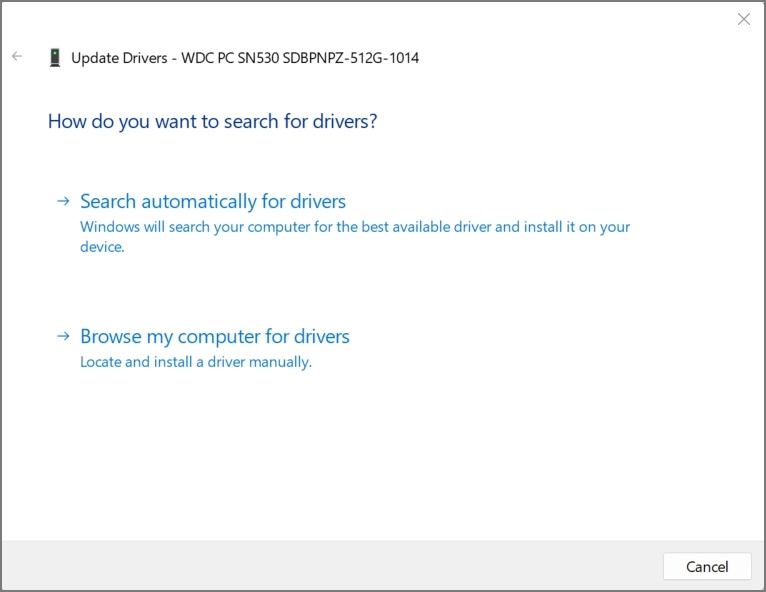
Repeat the same steps for each disk drive. Once done, restart the computer and see if this reduces the disk usage.
2. Disable Background Running Apps
If you’re noticing high disk usage as soon as you boot your computer, then the problem likely lies with the startup apps. Many applications on Windows automatically run in the background when your PC boots up. If you want to disable such apps, follow the below instructions:
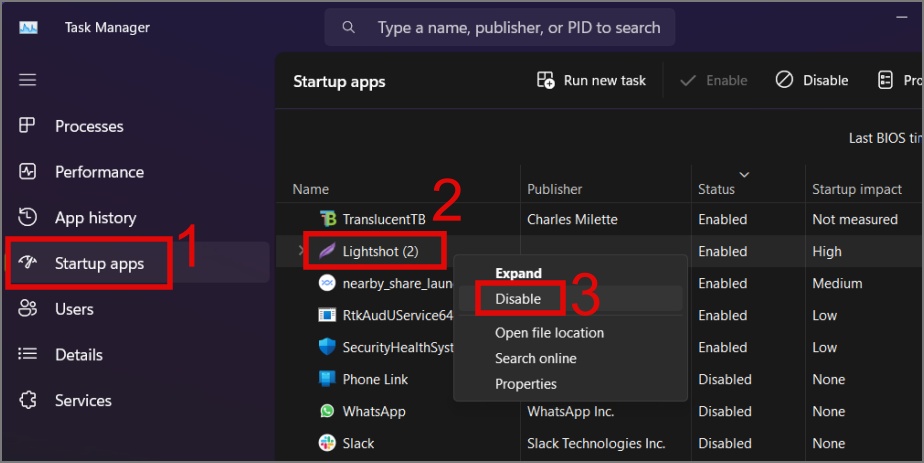
1. Open the Task Manager (Ctrl + Shift + Esc) and jump to Startup apps tab.
2. Right-click on the app that you think is the cause of the high disk usage or you no longer need and then choose the Disable option.
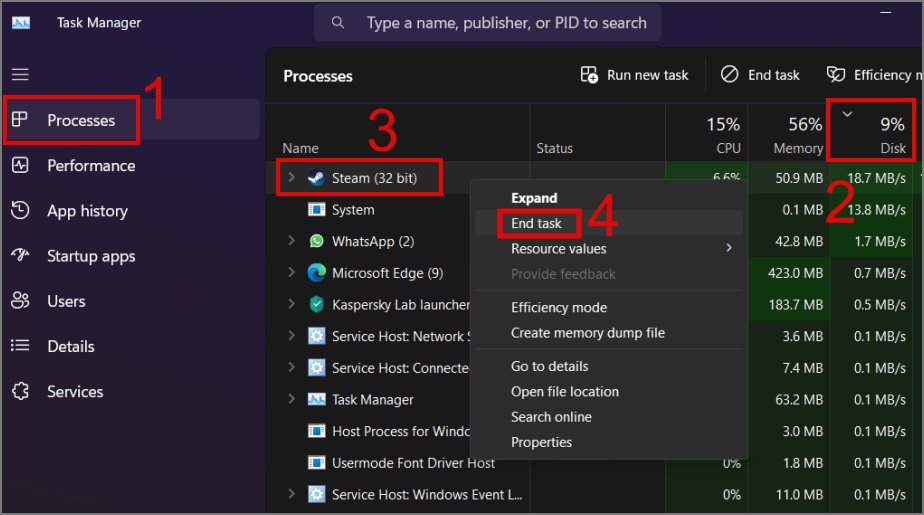
Additionally, you can also close the applications or programs that are causing your disk to go berserk. To do that, simply go to the Processes section, click Disk to sort by usage, right-click the app with high disk usage, and select End task.
That’s it. This should bring down the disk usage on your PC.
3. Turn off Fast Startup
The Fast Startup feature in Windows can help your PC boot up quickly. But did you know it doesn’t fully turn off your computer? Instead, it saves the state of the Windows kernel to the hard drive or SSD to reduce the boot times. So maybe try turning off this feature and see if this fixes the disk issue.
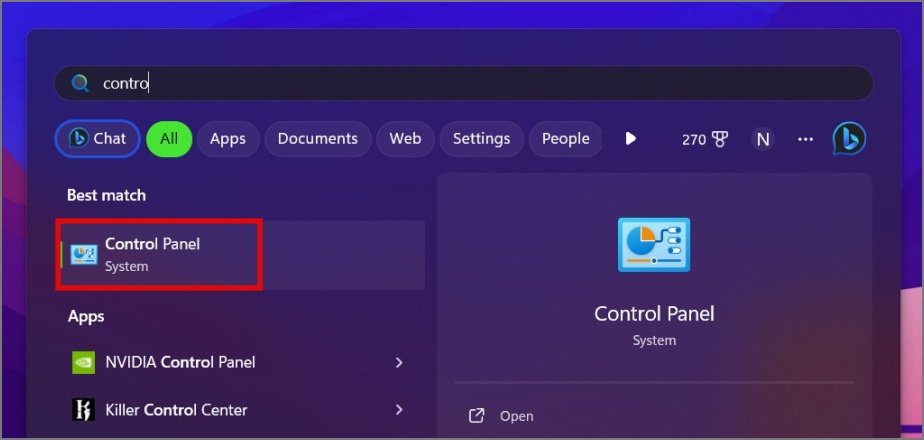
1. Open the Control Panel on your computer.
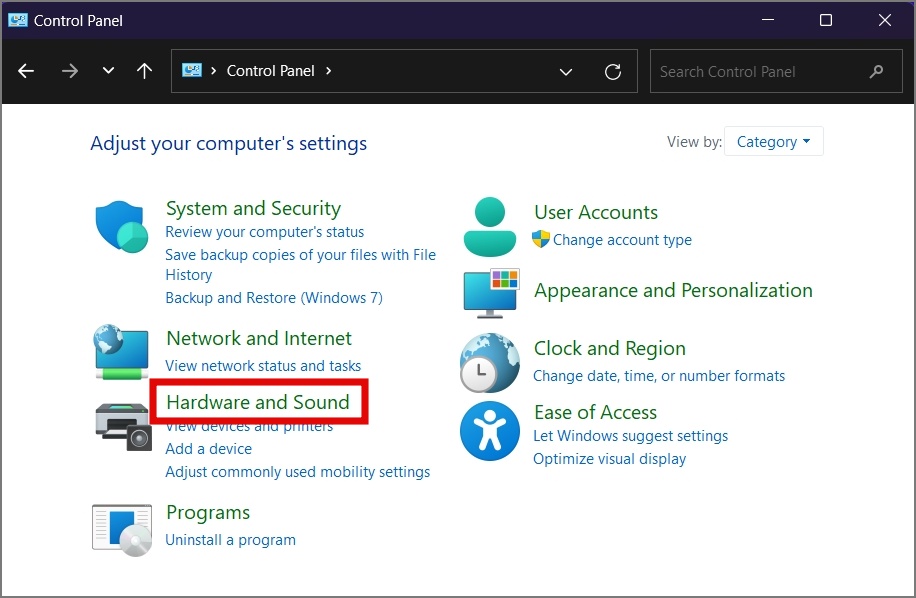
2. Click on Hardware and Sound settings.
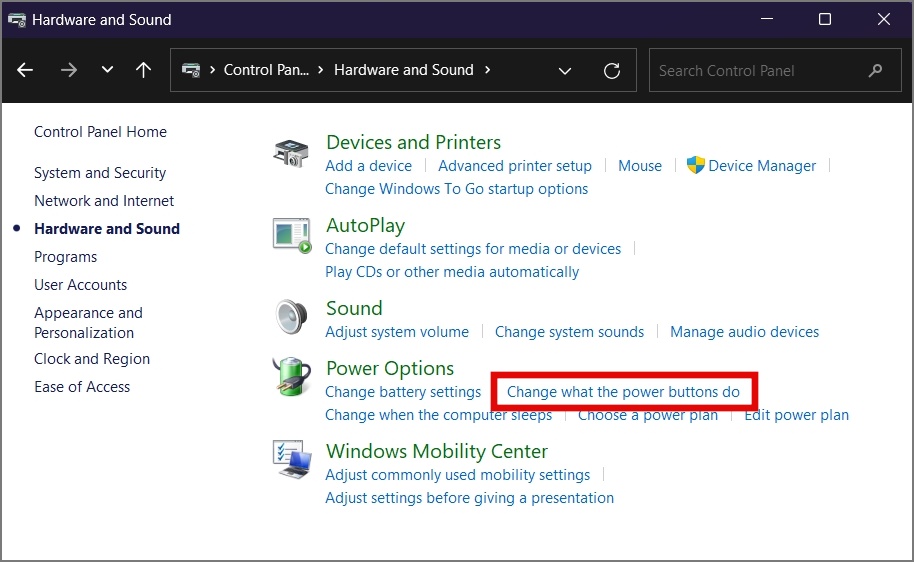
3. Under Power Options, select the Change what the power buttons do option.
4. Now click on Change settings that are currently unavailable.
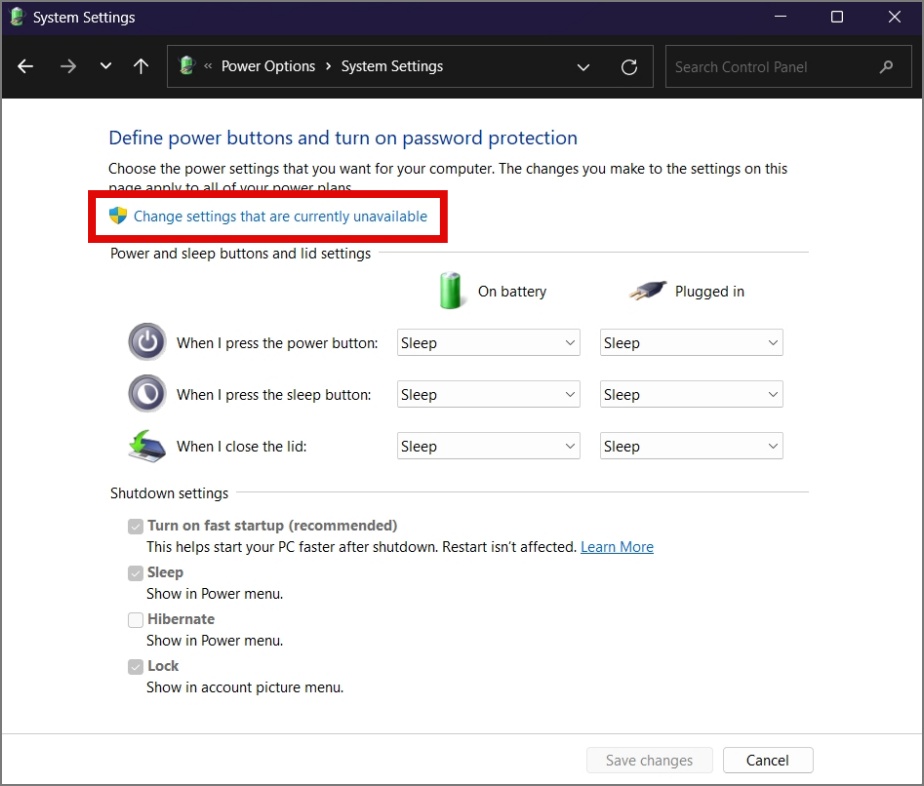
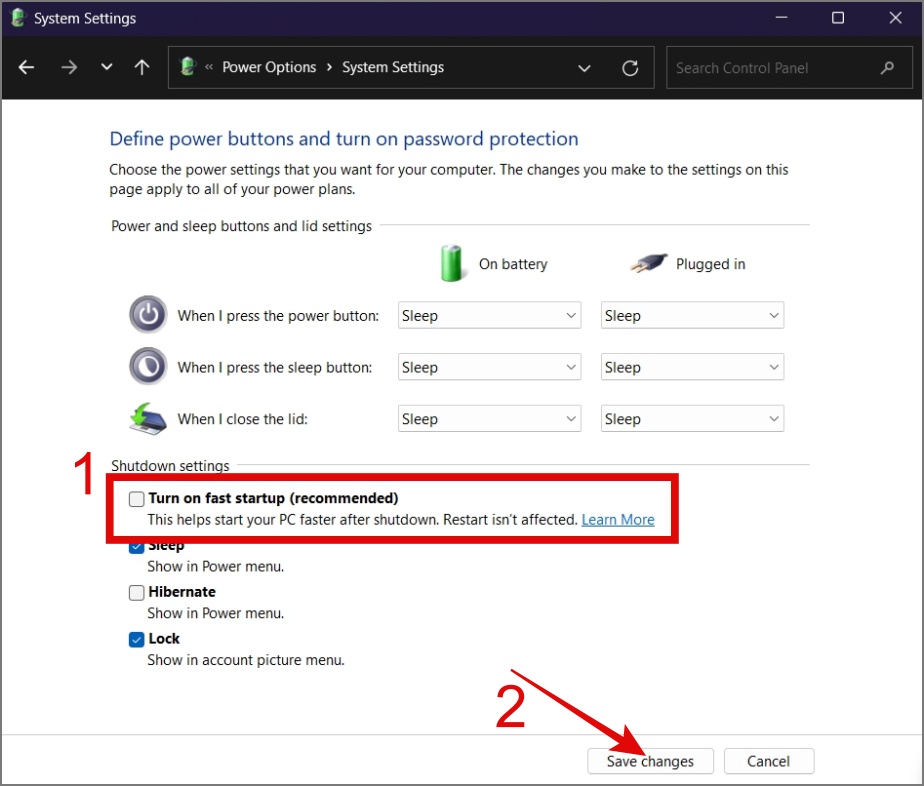
5. Finally, uncheck the box next to Turn on fast startup option and then hit Save changes.
4. Disable SysMain
SysMain, formerly known as Superfetch, is a Windows service that learns the user’s app usage patterns and aims to preload them quickly. This process generally has a minimal impact on your system resources. However, in some instances, SysMain can lead to high disk usage, particularly if you’re using a hard drive (HDD) instead of a solid-state drive (SSD).
To address this issue, you can try disabling SysMain service on your Windows 10 or 11 computer. Here’s how:
1. Launch the Windows Search (Windows Key + S) and search for Services, then click to open it.

2. Scroll down until you find SysMain service. Once found, right-click on it and select Properties from the context menu.

3. Next, click on the drop-down menu next to the Startup type and select the Disabled option.
4. Then, hit the Stop button under Service status and click OK.

Now restart your computer and check whether this solution fixes the high disk usage problem.
5. Check for Malware
Another common reason for experiencing 100% disk usage on your computers is because of malware. These malicious programs run silently in the background, resulting in constant high disk usage. To remove malware from your computer you can use a good antivirus software to perform a full system scan.
In case you don’t have antivirus software, you can use Defender which comes preinstalled in Windows.
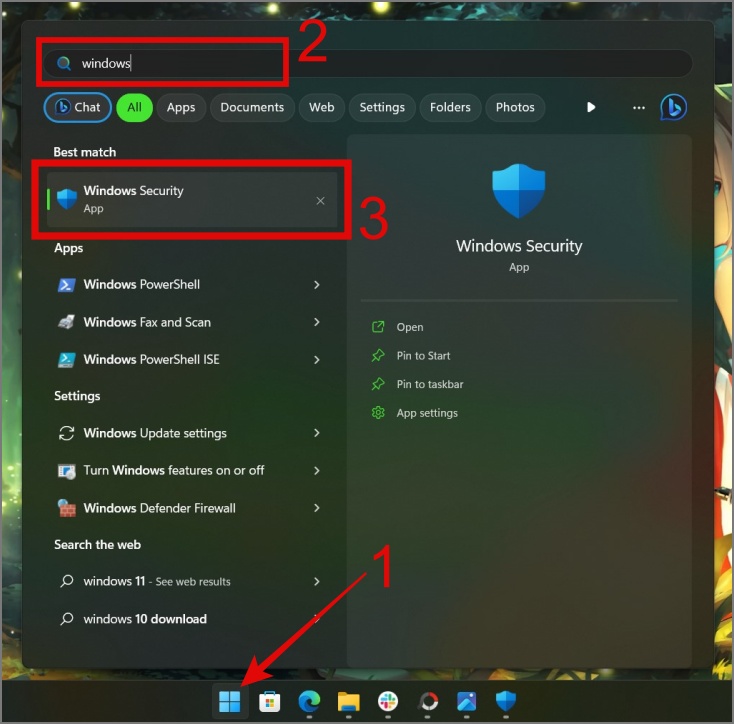
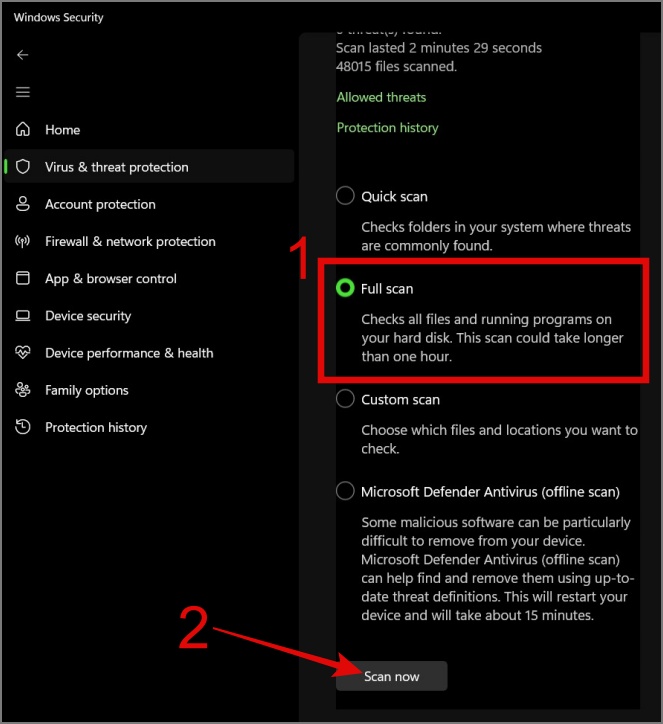
1. Search and open the Windows Security app using Windows Search (Windows Key + S).
2. Go to the Virus & threat protection section and click on Scan options.
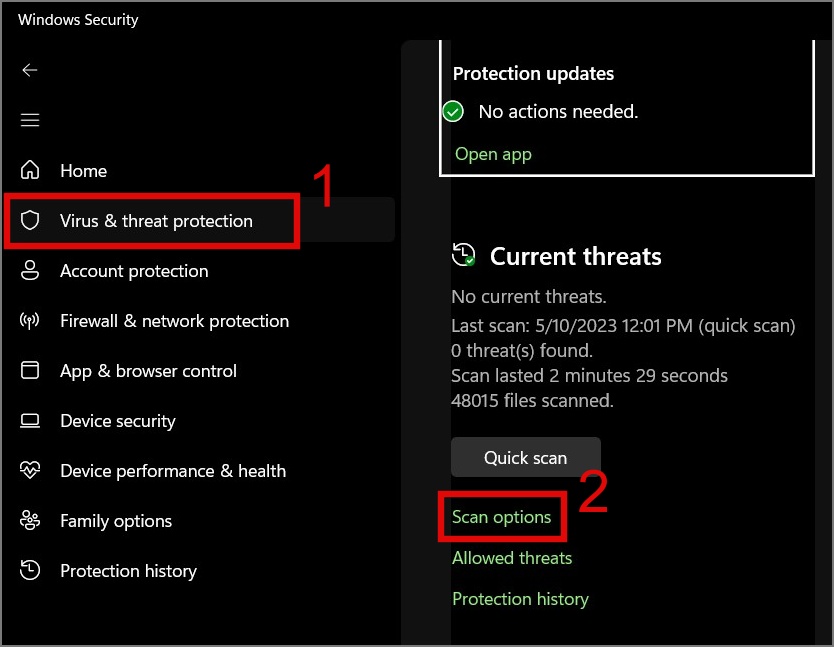
3. Lastly, select the Full scan option and hit the Scan now button.
6. Check for Corrupted System Files
Occasionally, your Windows device may experience high disk usage due to missing or corrupted system files. To address this issue, you can use the SFC (System File Checker) command to locate and repair any corrupted or missing Windows system files.
To perform an SFC scan, open the Command Prompt (Admin), enter the command “sfc /scannow” (without quote), and hit the Enter key.
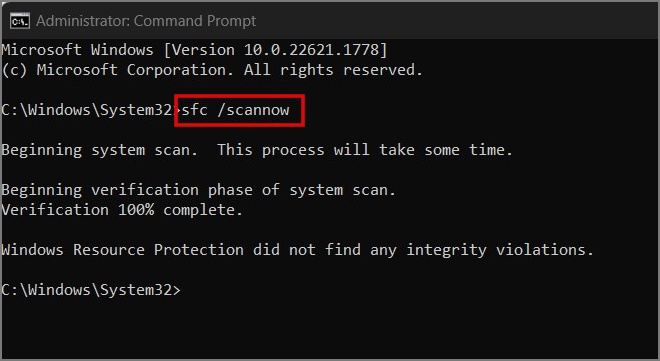
That’s all. It will begin scanning your computer for errors and fix them if any are found.
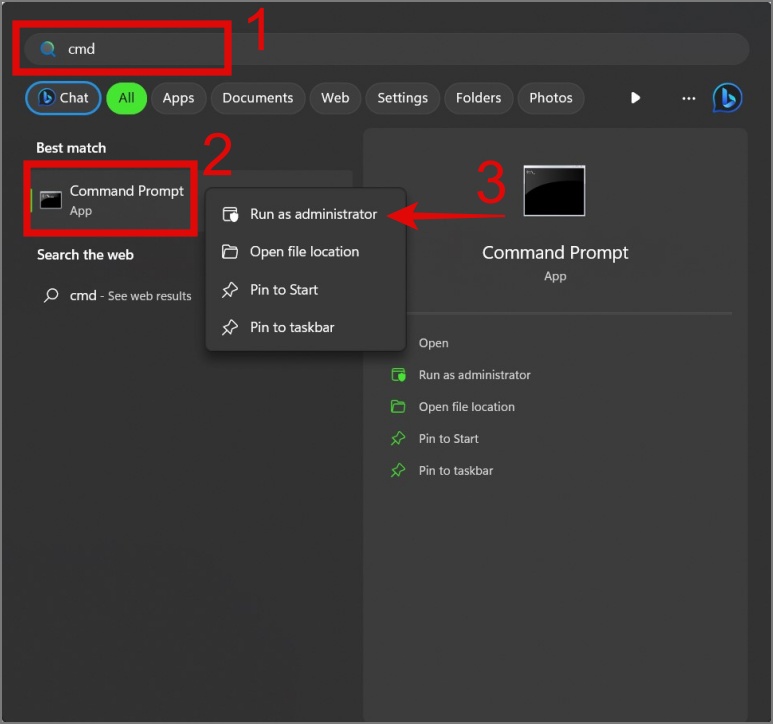
Note: If you don’t know how to open Command Prompt on your PC, simply use the Windows Search and search for Command Prompt. Once found, right-click on it and select Run as administrator.
7. Perform a Disk Check
If corrupted Windows system files are not the root cause of the high disk usage, there may be an issue with your drives. You can use CHKDSK (Check Disk) to scan your hard drive or SSD for file system errors. Here’s how it works:
Open the Command Prompt (Run as administrator) and type the following command based on your need:
- chkdsk [drive letter]: – It only identifies errors in the file system of your hard disk and does not fix any of them.
- chkdsk [drive letter]: /f – It scans your drive and fixes any error it finds in the system file.
- chkdsk [drive letter]: /r – It tries to fix errors on both the software and hardware part of the drives.
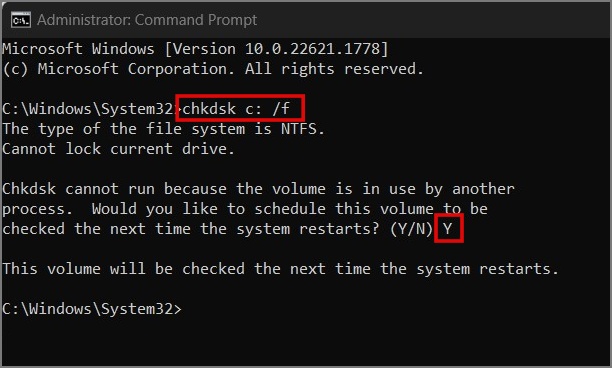
Note: If it shows the “chkdsk cannot run” message, you can type “Y” (without quote) and press the Enter key to run the scan after the computer restarts.
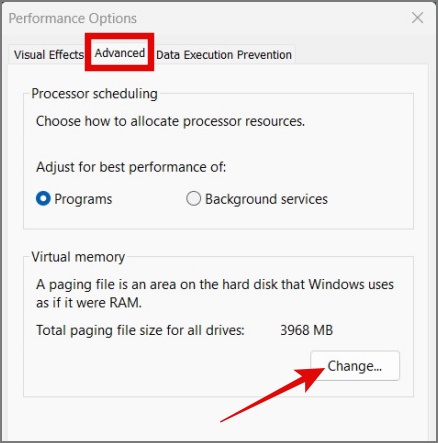
8. Adjust Virtual Memory
Whenever your PC runs out of memory, it temporarily stores the data on your hard disk, and when needed, the data is moved back to the RAM. By default, Windows automatically manages virtual memory allocation, which can also lead to 100% disk usage. To deal with the issue, you can follow the below instructions:
1. Use Windows Search to find and open “Adjust the appearance and performance of Windows”.

2. Move to the Advanced tab and hit the Change button under the Virtual memory section.
3. After that, clear the checkbox that says “Automatically manage paging file size for all drives”.
4. Next, select the Windows Drive (usually C:), then select the Custom size option and set the initial and maximum size.
If you’re confused about what number to enter, let me explain with an example. Suppose your PC has 8 GB of RAM; in that case, the maximum recommended size should not exceed 1.5 times your system RAM, which would be 12 GB (12,288 MB). If you feel that’s excessive, you can reduce it accordingly.
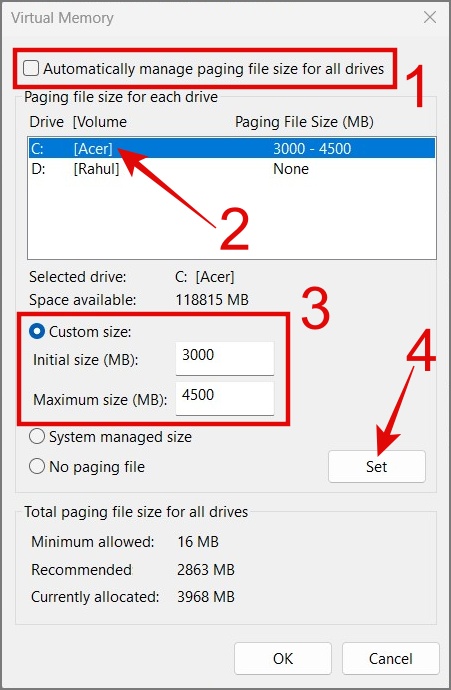
Note: Assigning an excessive amount of virtual memory can lead to a slowdown in your computer’s performance.
5. When prompted, hit the OK button and restart your computer.

We hope this resolves the disk issue. If not, please proceed to the next solution.
9. Clear Windows Temporary Files
If the previous method doesn’t fix the problem, you can try deleting temporary files on your Windows PC. This can help reduce disk usage and potentially solve the 100% usage issue.
Here’s how to clean Windows temporary files:
1. Open the Run command (Windows Key + R), then type “temp” (without quote) and hit Enter.

2. Now select all the files and folders using the Ctrl + A shortcut, then hit the Delete icon or key and click Yes to confirm your decision.

Afterward, reopen the Run command, and this time, type “%temp%” (without quotes), then repeat step 2.

10. Disable the Windows Search Service
Windows Search is a service that indexes all the files and folders in its database so that you can search for them quickly. However, this may also lead to higher disk usage on some Windows 11 or 10 devices. So maybe you can try disabling it to reduce disk usage.
1. Launch the Windows Search (Windows Key + S), then find and open the Services app.
2. Scroll down until you find the Windows Search service and then double-click to open it.

3. Now click on the drop-down menu next to the Startup type and select the Disabled option.
4. Next, hit the Stop button and click OK.

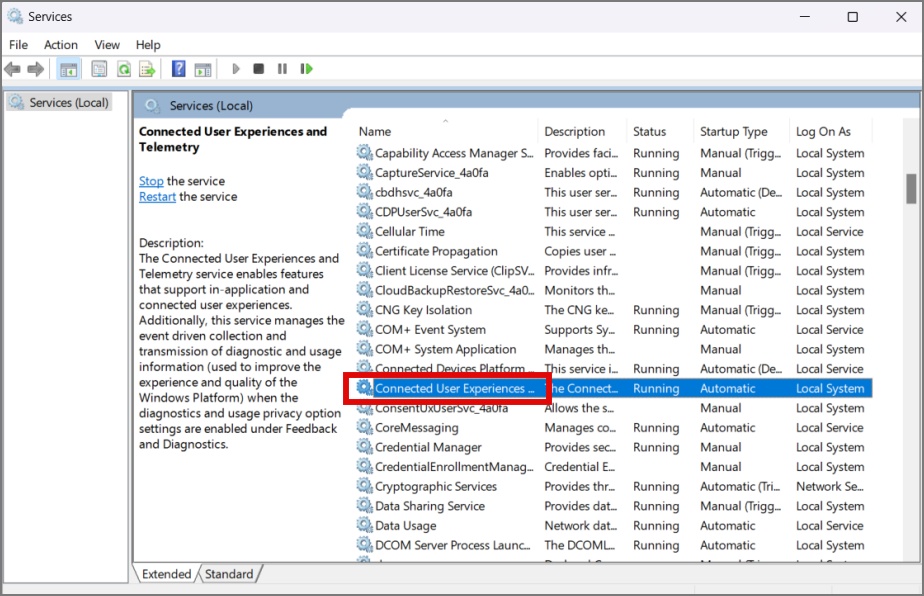
11. Disable Connected User Experiences and Telemetry Service
Connected User Experiences and Telemetry is one of the Windows services used by Microsoft to collect user data and diagnostics about your computer usage and performance. While this service is essential in improving the overall Windows experience, in some cases, it may contribute to high disk usage. If you encounter this issue, you can try disabling the service to see if it resolves the disk usage problem.
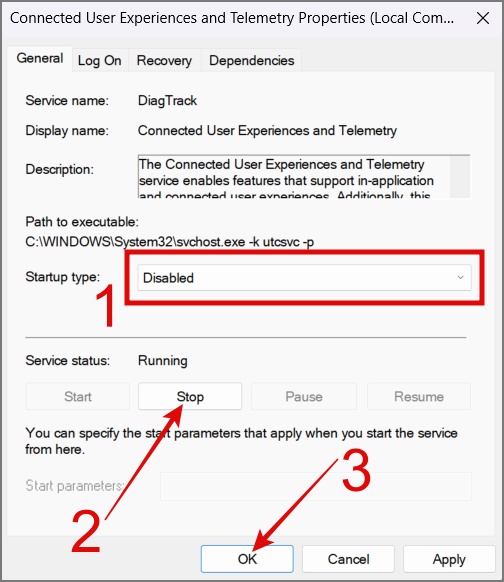
1. Open the Services program and look for Connected User Experiences and Telemetry Service. Once found, double-click to open it.
2. Click on the dropdown menu next to the Startup type and select the Disabled option.
3. Next, hit the Stop button and click OK.
Tip: Learn how to disable ads on Windows 11
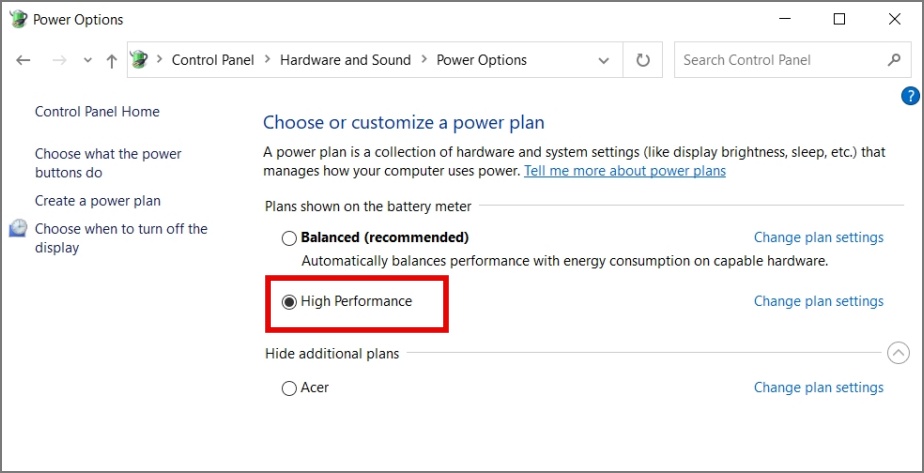
12. Change Power Settings
By default, Windows uses ‘Balanced’ power mode for your PC or laptop, but some users opt to manually switch it to ‘Power Efficiency’ mode. In these two configurations, your PC is more likely to prioritize energy-saving features, which can result in reduced disk activity. So what you can do is switch the power mode to the ‘Best performance’ mode.
Windows 10:
1. Go to Settings (Windows Key + I) > System > Power & Sleep > Additional Power Settings.
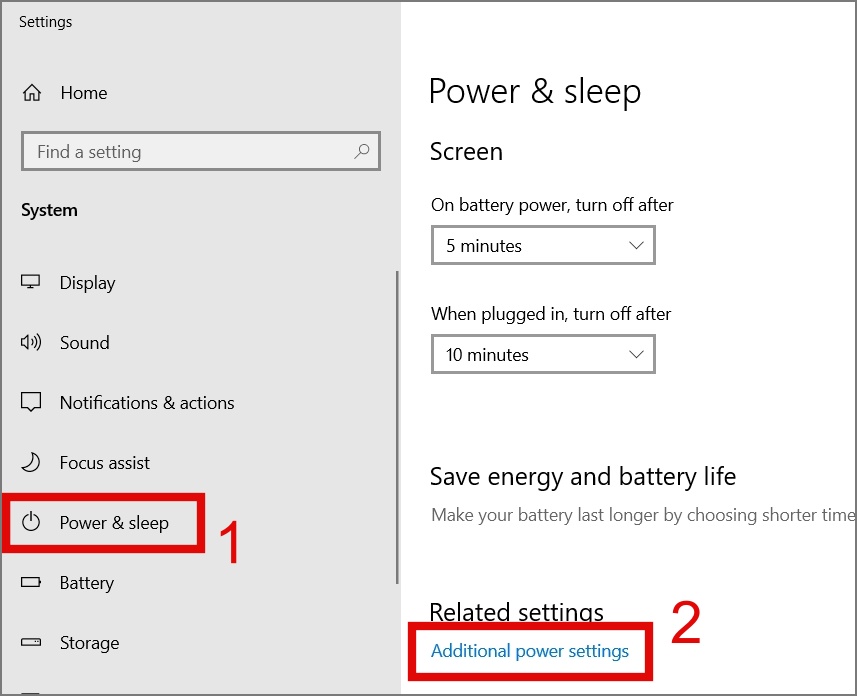
2. If you don’t see the option to choose High-Performance mode in Windows, click on Create a power plan.

3. Select the High performance mode, give it a name, and click Next.

4. Adjust the sleep and display settings, then click Create.
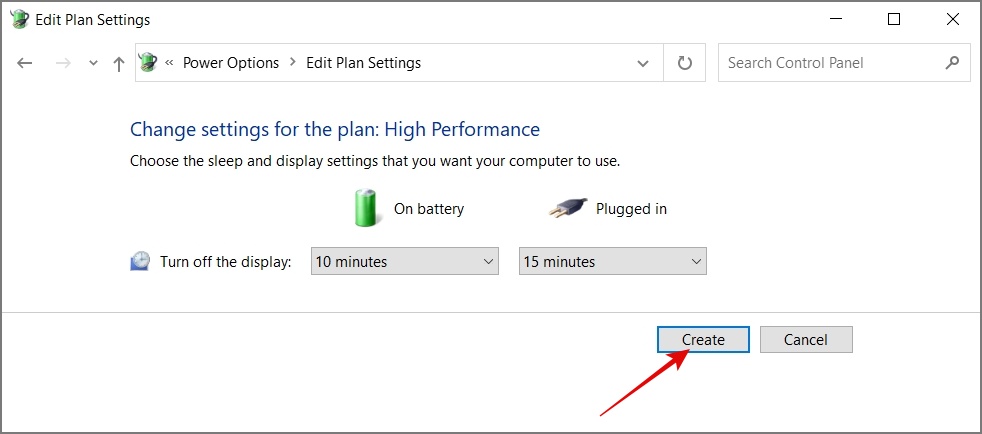
That’s it. You can now select the High-Performance mode on your computer.
Windows 11:
Navigate to Settings > System > Power & battery and then change Power mode to ‘Best performance’.

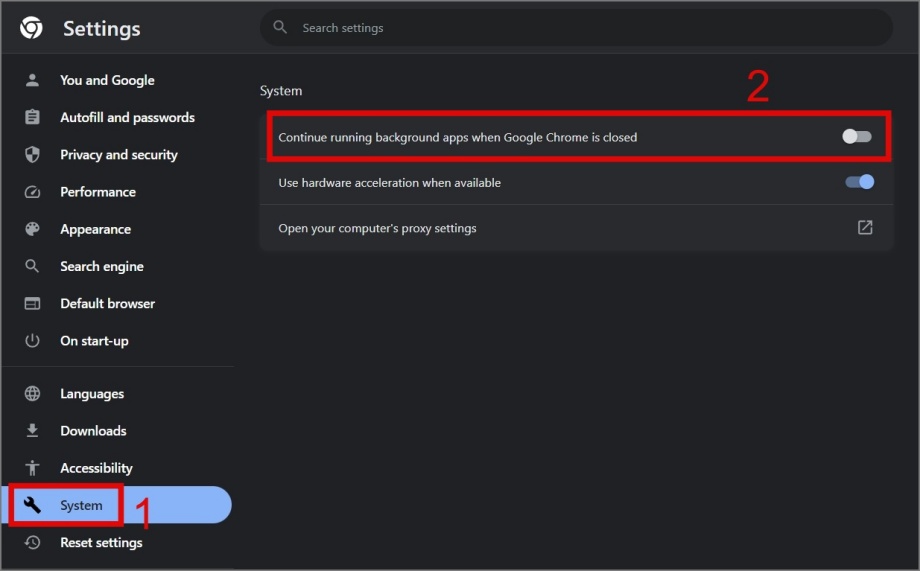
13. Stop Browsers From Running in the Background
If you’re using browsers like Chrome and Edge, you may have noticed that even after closing the browser, it still runs in the background along with extensions or add-ons you have installed. So we would highly recommend you disable the option that allows browsers to run in the background.
Chrome:
Go to Chrome Settings > System and toggle off the “Continue running in the background apps when Google Chrome is closed” option.
Tip: Learn how to fix high CPU usage on Chrome
Edge:
Go to Edge Settings > System and performance and toggle off both the “Startup boost” and “Continue running background extensions and apps when Microsoft Edge is closed” options.

14. Reset Windows
If all the above solutions fail to restore your disk usage to its normal state, then you’re left with no other option than reinstalling Windows on your laptop or PC. A fresh installation should fix the disk usage problem that couldn’t be resolved through troubleshooting. You can check out our comprehensive guide on how to reset Windows.
Getting Your Disk Usage Under Control
Experiencing choppy performance due to high disk usage can be annoying, especially during gameplay or office work. We hope the above guide has helped reduce disk usage, and your Windows computer is now working buttery smooth.
Is your CPU also consistently running at 100% usage in Windows? Here’s how to fix the issue.