Needless to say, Discord servers are getting bigger with so many channels and roles. While it might be easier for you to understand as an admin, it can be complicated for a new member who just joined your server. To simplify boarding to your server for new community members, Discord introduced a new feature called Onboarding. With it, users can easily join the channels and roles they prefer. Here’s what is Onboarding, what it does, and how you can set up Onboarding on your Discord server.
Table of Contents
What Is Onboarding on Discord
The issue is that most Discord servers have too many channels and roles for various actions. Understanding what each channel and role is meant for can be hard for new users making it harder to join the preferred channel according to their needs. But with the help of the onboarding feature, you can help them.
Onboarding is an automated process where you ask a few questions to the user about their preferences and add them to the channels and roles automatically. Users simply mention their requirements and get started and it also keeps the server more organized than ever before.
But before enabling Onboarding on your Discord server, you need to enable the Community feature on your Discord server that unlocks even more features to handle a large group of people on the server. If you have already enabled the community feature on your Discord server, you can skip it.
How to Enable Community Feature on Discord Server
1. Open the Discord server on the official app or the website on your favorite browser.
2. On the server page, click on the server name at the top left corner and then select the Server Settings option in the drop-down menu.
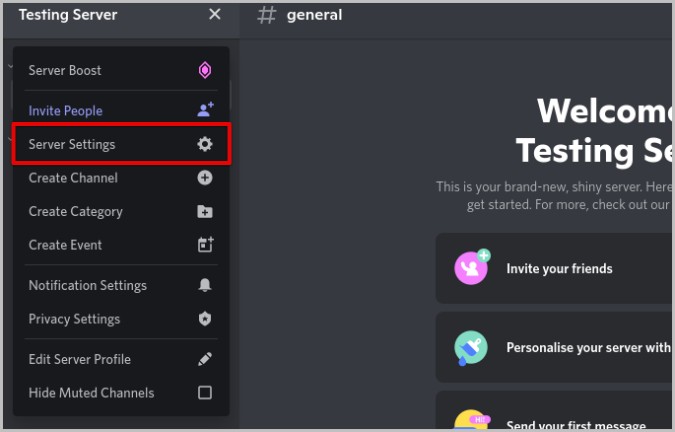
3. In the Server Settings, choose the Enable Community option in the left sidebar.
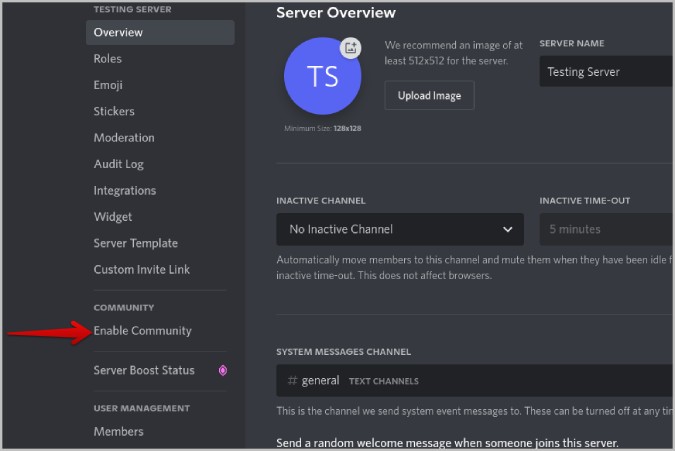
4. On the Community page, click on the Get Started button.

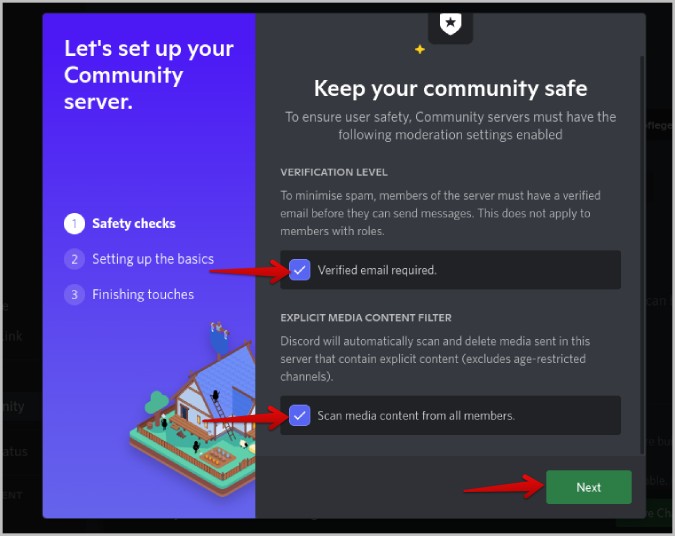
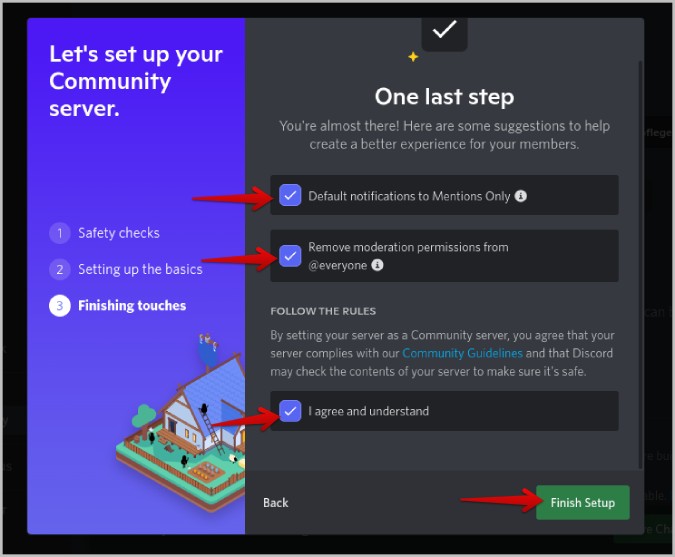
5. Now toggle on the checkbox beside Verified email required and Scan media content from all members. Then click on Next.
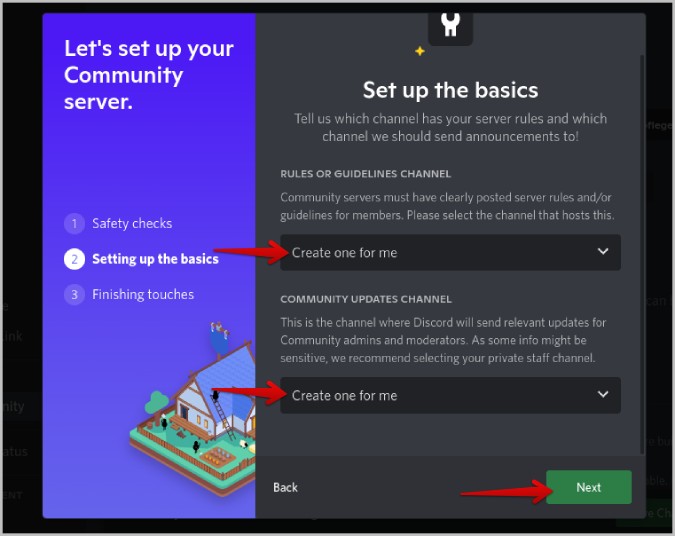
6. Here, select the channels that Discord should send rules and guidelines, and community updates. If you don’t have any channels for them but want one, select Create one for me and click Next.
7. Now enable the checkbox beside Default notifications to Members only and Remove moderation permissions from @everyone. You don’t have to manually do them. By enabling the checkbox, Discord will automatically change the settings for you.
8. Then select I agree and understand checkbox and click on the Finish Setup option.
Once done, community options will be enabled on your Discord server instantly. You will get access to many features such as a welcome screen, server insights, a partner program, the ability to show your server on the Discord Discover page along with access to the forum channel. And of course, the Community Onboarding feature.
Setup Community Onboarding on Discord Server
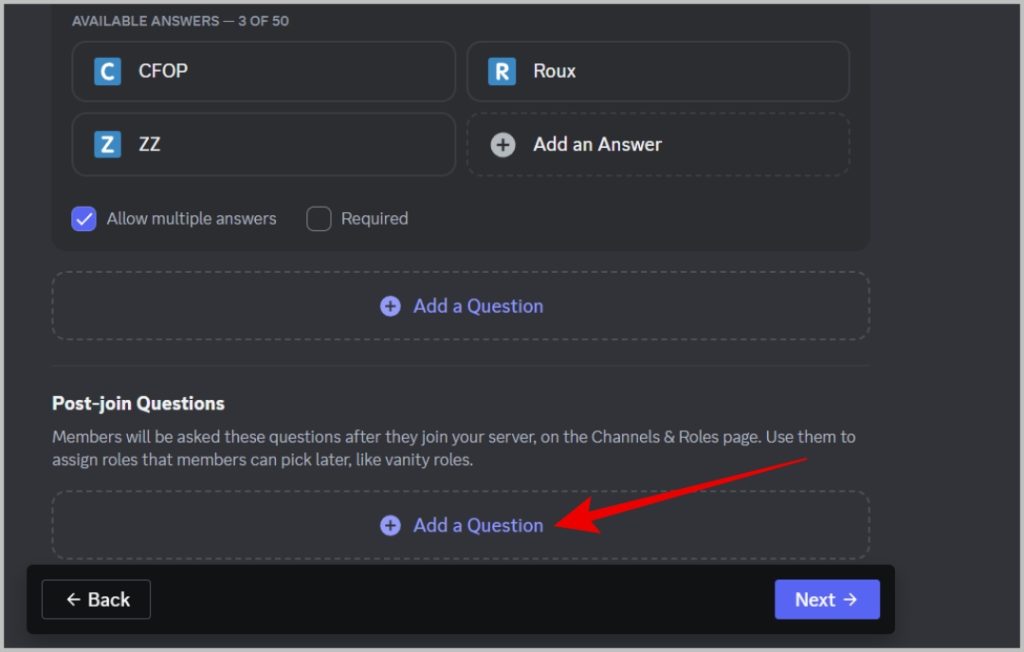
Let us show the setup process with an example. Here, we have a server for Rubik Cube solvers. There are many methods to solve the cube like CFOP, Roux, and ZZ. We have specific channels for each method. A person who solves the cube with the CFOP method doesn’t need channels for other methods. Here’s how we can set up onboarding so that users can select the method they use and join the related channels automatically.
1. Open the server settings by clicking on the server name at the top left corner and then selecting the Server Settings option.
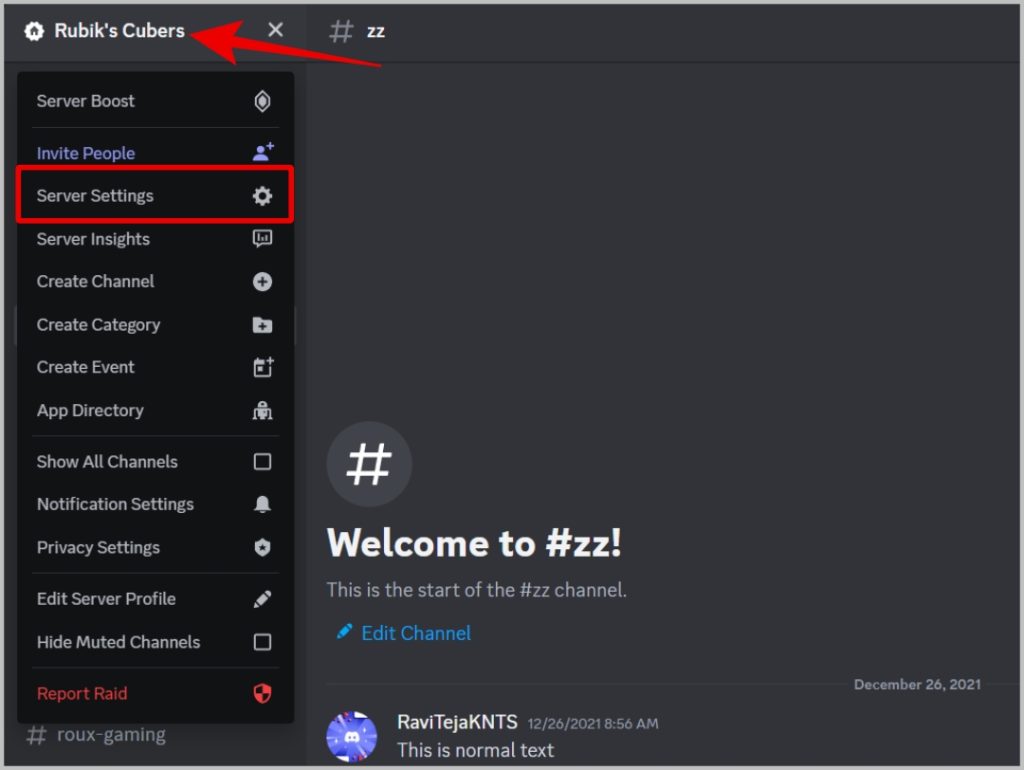
2. On the Settings page, click on the Onboarding option in the sidebar. Then click on the Check it out button to start customizing the onboarding process.

3. On the first page, you get Safety check features like Raid protection, Spam protection, AutoMod, Server permissions, etc. These are not part of the Onboarding feature, but still important enough to configure before onboarding users. Click on the Next button at the bottom.

4. On the next page, select the default channels that everyone can access. For example, channels like general, rules, announcements, chat groups, etc. channels that everyone who joins your server should access. You need to select 7 channels with at least 5 channels where users can send messages. Once done, click on the Next button below.

5. Once you have selected your default channels, now you can select personalized channels. Just click on Add a Question option under the Pre-join Questions option.

6. Now enter the question that you want to ask the new users. In my case, the question is “Which method do you use to solve the cube?”.
7. Now under the Available answers option, click on Add an Answer.

8. On the pop-up, enter one Answer that the user can select from the multiple choice. Also, enter the description to it if needed.
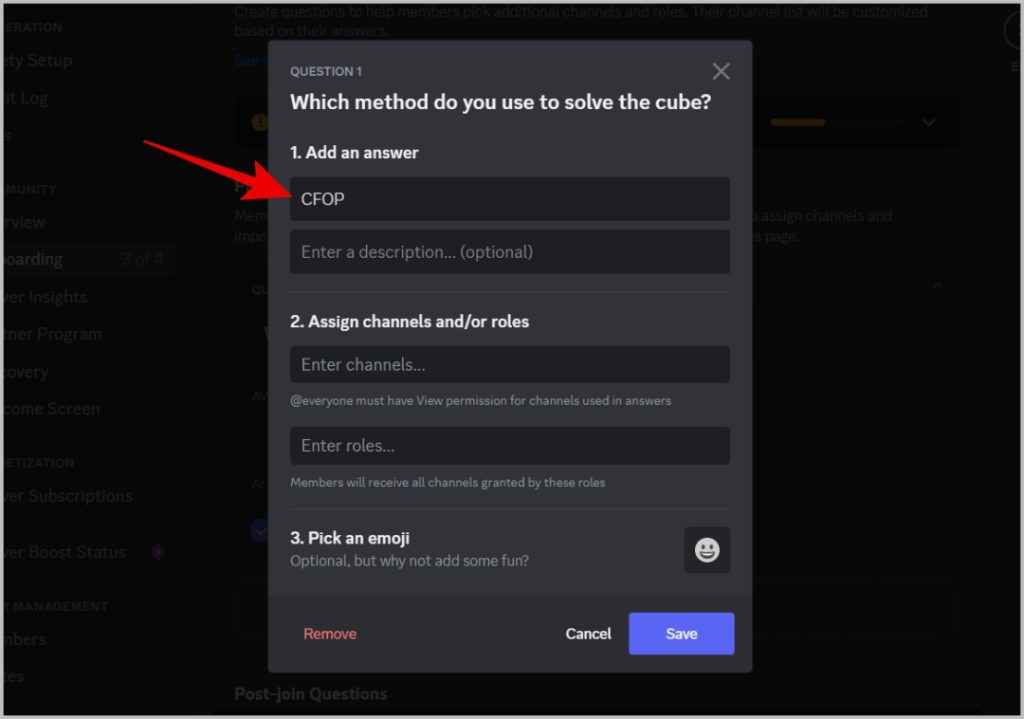
9. Then select all the channels and roles to assign to that user if he/she selected that option. In my example, as the answer is CFOP, I have to select all the channels and roles related to CFOP.

10. You can also add an emoji to make it interesting. Once done, click on Save.

11. Now again select Add an Answer option and continue the process to add other answers. You can add as many answers as you need and assign channels and roles to them. When you add more than 12 answers, it will show it as a drop-down and will not include the description.
12. At the bottom of the question box, enable the checkbox beside Allow multiple answers if you want users to select multiple answers.
13. By default, users can skip the questions and get into the server, but if the question is important, then you can enable the checkbox beside Required.
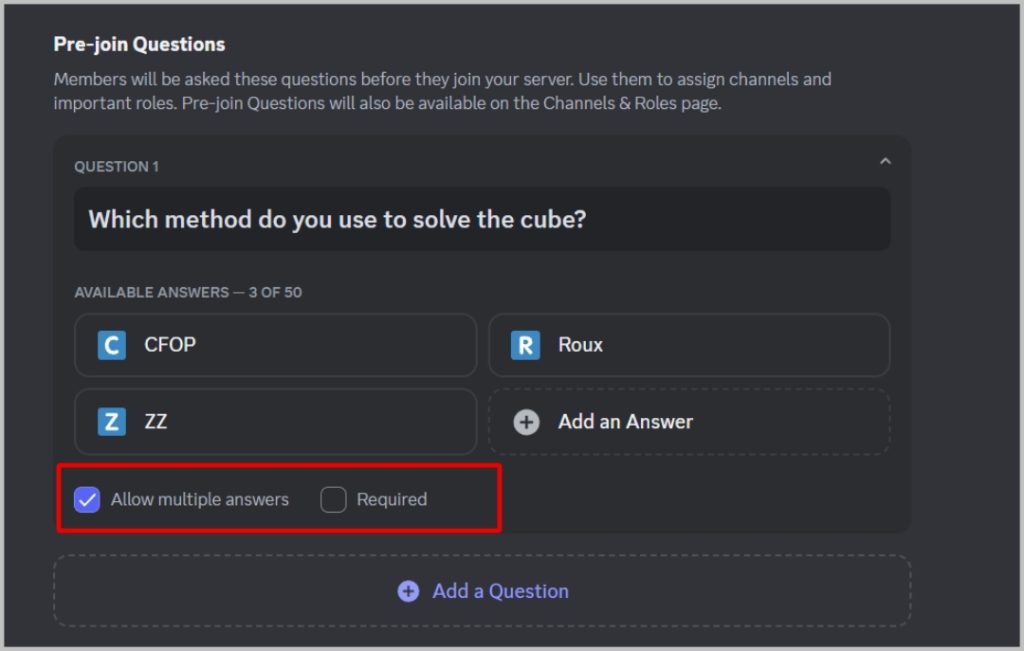
14. Similarly, you can again click on Add a Question option to ask up to 4 questions if needed.

15. In the onboarding, Discord also provides the option to ask questions post-joining. If these channels or roles aren’t that important, you can add such questions here. Users can manually open the Channels and Roles page to answer them. Upon answering, they can start accessing the channels and roles related to them. Adding the question and answer is similar. Just click on Add a Question option below the Post-join Questions option to get started.
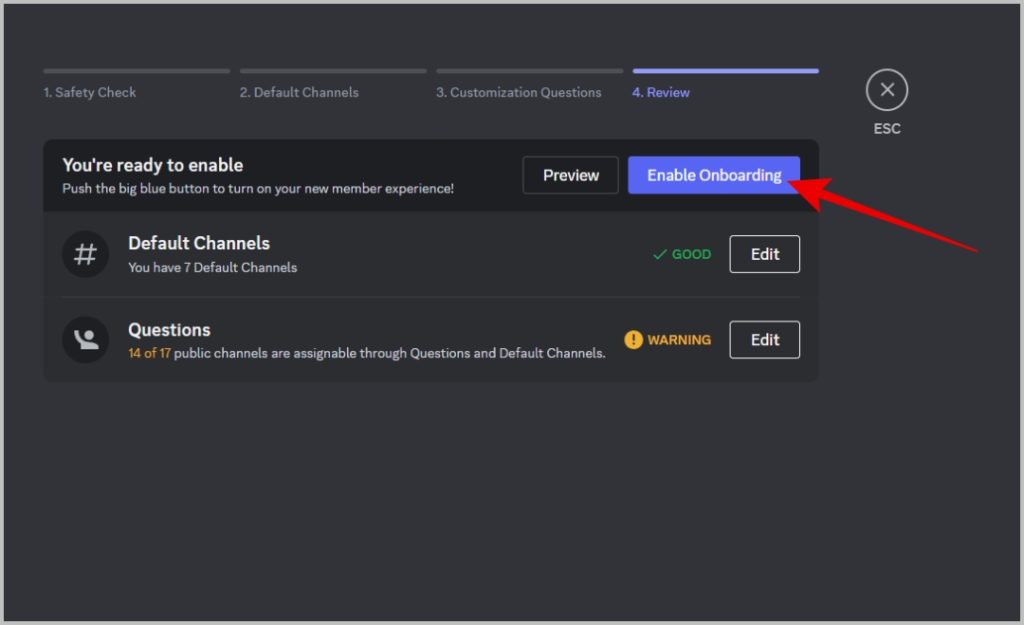
16. Once done, click on Next.
17. On this final page, you can review your settings. Once done, click on the Enable Onboarding button to complete the process.
Now any new user who joins the server will see an onboarding page where he/she can answer the question and join the related channels and roles automatically. Also, all the users will access the default channels you have selected.
Onboarding Process for New Users
Here’s a sneak peek from the user’s perspective if you want to see what the onboarding process looks like for the new user.
1. Once users join your server from the link or through the Discord Discover server library, they will see an onboarding screen directly.

2. In a couple of seconds, the questions you have added will pop up. Users can select the answer or even select multiple answers according to the question and click on Next.
3. Once done with all the questions, they can click on the Finish button.

4. After the onboarding process, they can access the default channels and channels added to them according to the questions. They will also get assigned to the roles you have selected.

5. If you have added any post-join questions, users can open the Channels and Roles option in the sidebar to access those questions and join in more channels and roles if wanted. They will also find the pre-join questions too, so they have the option to customize the answers even after the onboarding.

6. With onboarding, users can only access the channels assigned to their answers. The remaining channels will be hidden. If they want to access all the channels, then click on the server name at the top right corner and then enable the check box beside Show All Channels option.

Moreover, apart from using your onboarding process to customize the channels, users can also hide channels on Discord on their own.
Onboarding the Community
This new onboarding process will make any Discord server simpler for people to get started with your server. Though it hides the remaining channels for the users, they always have the option to see all channels wherever they wanted. Once you set up onboarding, users also have the option to skip the onboarding or change their answers to join different channels and groups if wanted.