
 Published: September 24, 2026

Zoe completely changes the perspective in Silent Hill: Townfall, as you leave Simon behind and take control of Zoe instead. Her journey through Shorefront brings a fresh set of puzzles, locked doors, cryptic clues, and a few new tools to work with. If you’re stuck anywhere in Zoe’s section, this guide covers all the Silent Hill: Townfall Part 2 puzzle solutions, including the clues, codes, key items, and steps you need to progress.
Part 2 – Zoe
Part 2 shifts the spotlight from Simon to Zoe. You’ll explore Shorefront from her perspective, uncover new clues, and solve a fresh set of puzzles while trying to figure out what’s happening around her. Here’s everything you need to know to get through Zoe’s section in Silent Hill: Townfall without getting stuck.
Haven’t finished Simon’s section yet? Check out our Part 1 - Arrival guide for all the puzzles, clues, codes, and key items from the beginning of the game.
Chapter 5: Zoe: Rounds
Shorefront District – South
After reaching Part 2, head toward the Community Gardens. There are a couple of things to take care of here before you can continue to the northern part of Shorefront.
Puzzle: Community Garden Shed
Inside the Community Gardens, interact with the lock on the shed. The clue for the code is on the flower bed with Jane Chalmers’ name on it.


The year shown is 1993, which is also the shed's code.
Solution: 1993
Key Item: Community Garden Key
Inside the shed, check the shelf on the right to find the Community Garden Key.


Use the key on the gate inside the gardens to move forward in the game.
Locked Door: Community Gardens
Interact with the gate and use the Community Garden Key to unlock it.


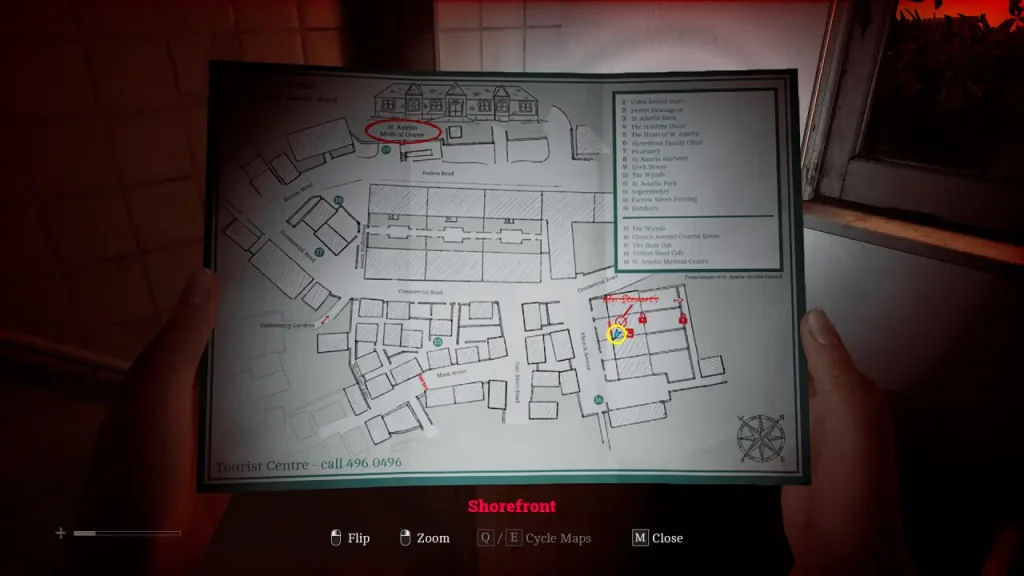
Next, head to Mr. Stewart’s House in the northern part of Shorefront.
Key Item: Mr. Stewart’s Key
After encountering the monster for the first time inside the house, head back to the bathroom. You’ll find Mr. Stewart’s Key to the right of the bathtub.


Use the key on the back door you entered through to exit the house.
Locked Door – Mr. Stewart’s House
Interact with the back door and use Mr. Stewart’s Key to leave the house.

Clue: Medical Security Note
Head toward the Medical Center and check the security booth outside. There’s a paper attached to the window containing an important phone number.


The note gives you the number 496 0556, which you’ll need for the next puzzle.
Puzzle: Medical Center Phone
Head back down the street to the phone booth and call 496 0556.


When prompted, enter the following sequence:
3 > 2 > 2 > 1
Follow the instructions correctly to progress toward the Medical Center.
Locked Door: Medical Center
Head to the back parking lot of the Medical Center and interact with the garage door to enter.


Inside, go to the office and interact with the button beside the phone. This opens the gates next to the building and gives you access to the next area.
Chapter 6: Journey to Medical
Equipment: Pistol
Head back to the Town Square and look for the box containing the Pistol.


When prompted, choose “Yes” to take the pistol. This triggers the Otherworld shift in the town and allows you to progress.
Shorefront District – North
Locked Door – Flemington Street
Once you reach Flemington Street, interact with the locked door and choose to use the Scalpel.


This opens the way forward and allows you to continue your journey toward the Medical Center.
After reaching Flemington Street, go to the location marked below in the image to save your game, enter the next Chapter, and continue the journey to the Medical Center.

And that wraps up Part 2 – Zoe, well, mostly. The game eventually switches you back to Simon, bringing his journey back into the picture as the story moves forward. From Zoe’s investigation around Shorefront to Simon picking things back up, this part has plenty of cryptic clues, locked doors, and puzzles to keep you busy. If you made it this far without getting completely lost, you’re ready for the next chapter.
Part 3 is coming soon.


