One fine morning, you turned on your laptop and suddenly noticed your trackpad was no longer responding. This can be frustrating as your entire work is disrupted because of this problem. What’s more, you don’t even have a spare mouse to temporarily deal with a malfunctioning touchpad. But before you freak out and rush to the nearest laptop repair shop, here’s a list of solutions you can try first to fix the laptop touchpad on Windows.
Note: While it may go without saying, please ensure that you have a mouse available to try out the solutions below. Otherwise, how else would you be able to navigate through the settings?
Table of Contents
1. Laptop Frozen
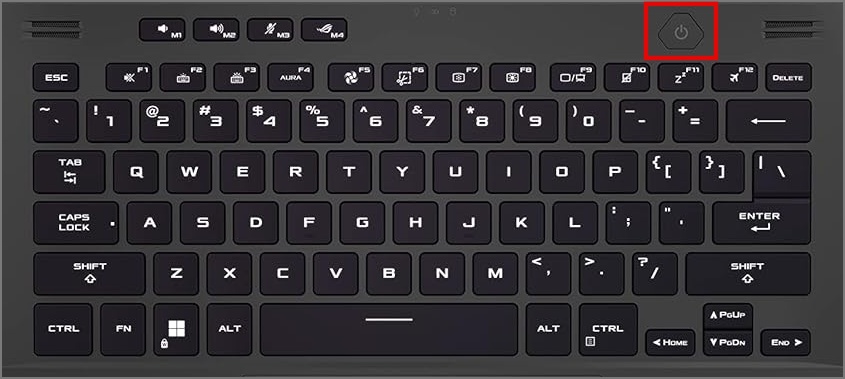
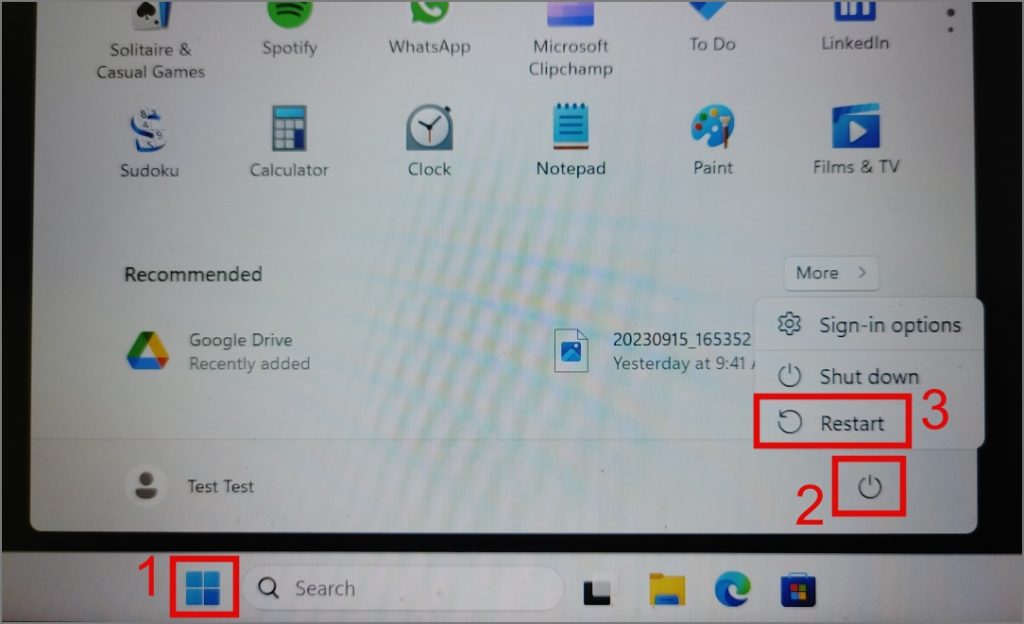
It is likely that your Windows OS or an open application is frozen, and that’s probably the reason why the trackpad has suddenly stopped responding. In that case, you can try closing the application or restarting your laptop.
If you’re unable to restart, you can hold down your Power button for a few seconds to restart your laptop, and it should likely resolve the trackpad issue.
2. Ensure Trackpad Is Not Disabled
Windows has the option to turn off your laptop’s trackpad, a step many people take when using an external mouse to prevent accidental cursor movement while typing. So maybe you could check your Windows Settings to see if this option is not enabled. Here’s how:
1. Go to Windows Settings (Windows Key + I) and navigate to Bluetooth & devices > Touchpad.
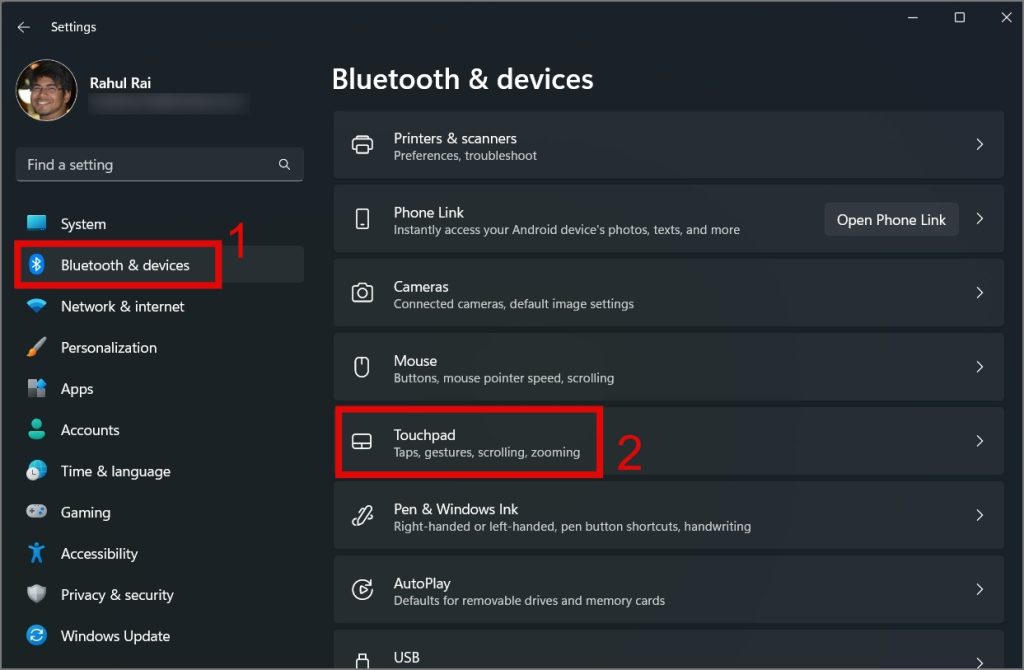
2. After that, enable the Touchpad toggle.
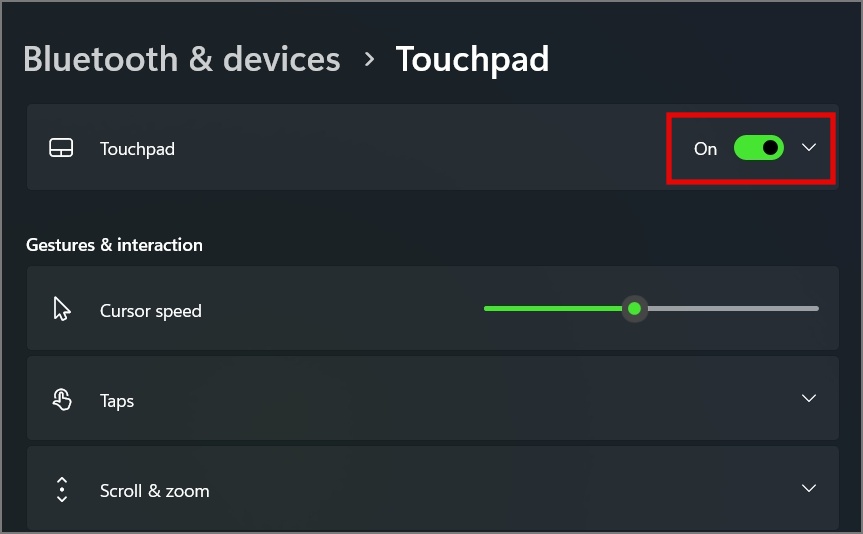
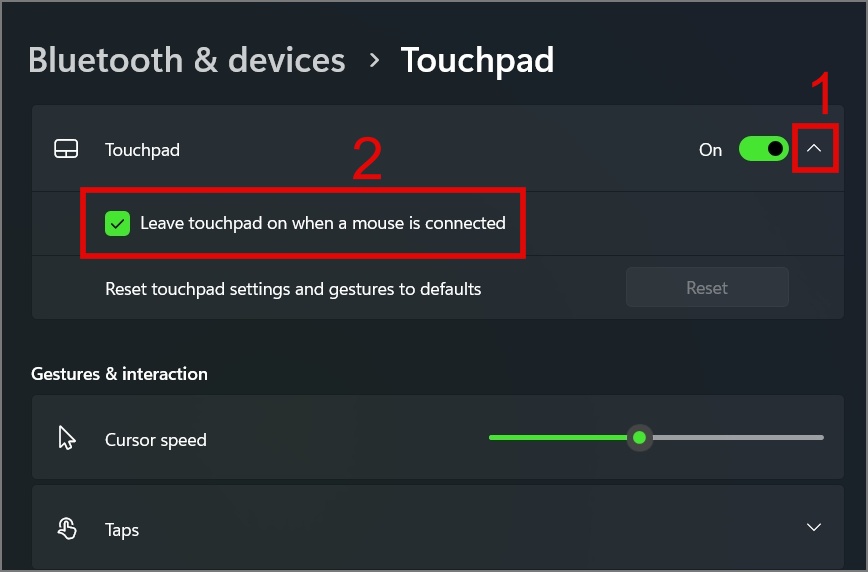
If it’s already enabled, then click on the drop-down menu and ensure that the ‘Leave touchpad on when a mouse is connected’ option is enabled.
Some laptops or mouse drivers have a feature that automatically disables the trackpad when you connect an external mouse. Perhaps you can try disconnecting the external mouse to see if this resolves the issue.
3. Disable, Update, or Reinstall the Touchpad Driver
If you’ve recently updated your Windows to a newer build or version, there’s a possibility that your touchpad might not be compatible or have gotten corrupted during the update process. To address this issue, you can try updating, reinstalling, or disabling the touchpad driver to see if any of these tricks work for you.
Update Touchpad Driver:
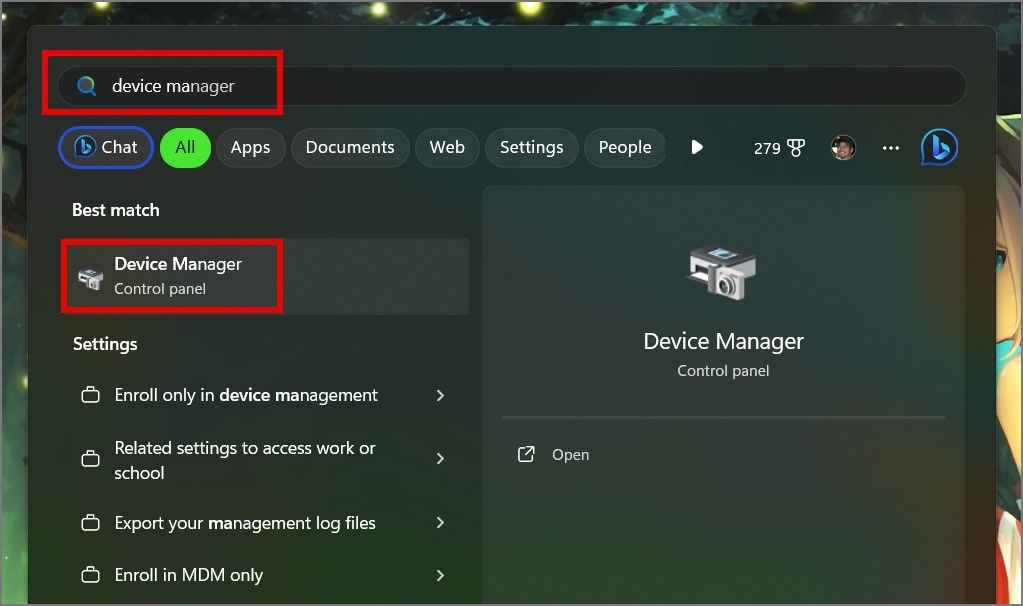
1. Use the Windows Search (Windows Key + S) to find the Device Manager. Once found, open it.
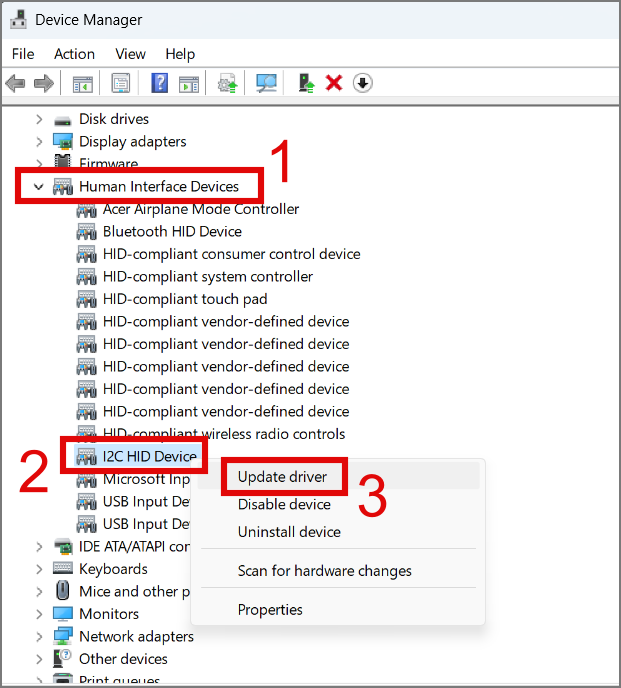
2. Next, expand the Human Interface Devices, then right-click on the I2C HID Device and select Update driver.
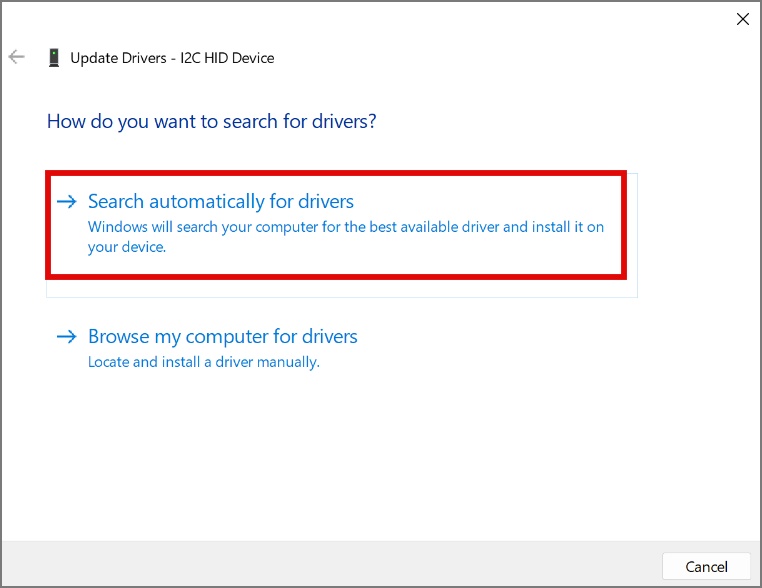
3. On the next screen, you will be given two options – Search automatically for drivers and Browse my computer for drivers. You can go with the automatic option if you don’t have a touchpad driver.
Disable Touchpad Driver:
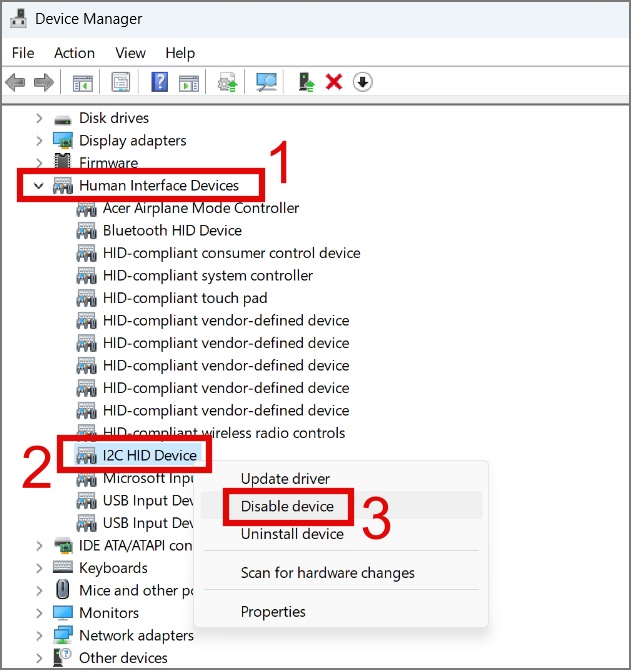
You can also try disabling the touchpad driver on your Windows laptop and then re-enabling it later to see if this resolves the issue. Here’s a step-by-step process:
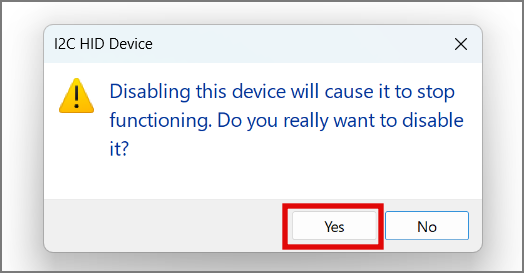
1. Right-click on the I2C HID Device and select the Disable device option.
2. Confirm your decision by clicking Yes.
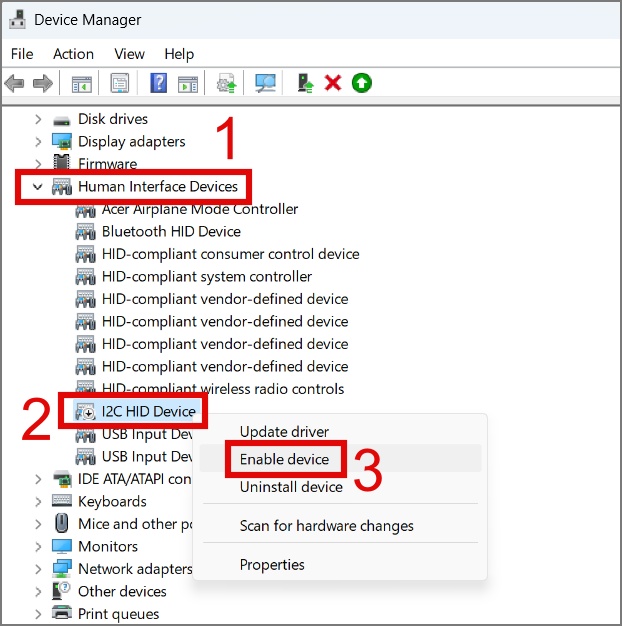
3. After that, restart your laptop and again go to the Device Manager.
4. Then, right-click I2C HID Device and this time select the Enable device option
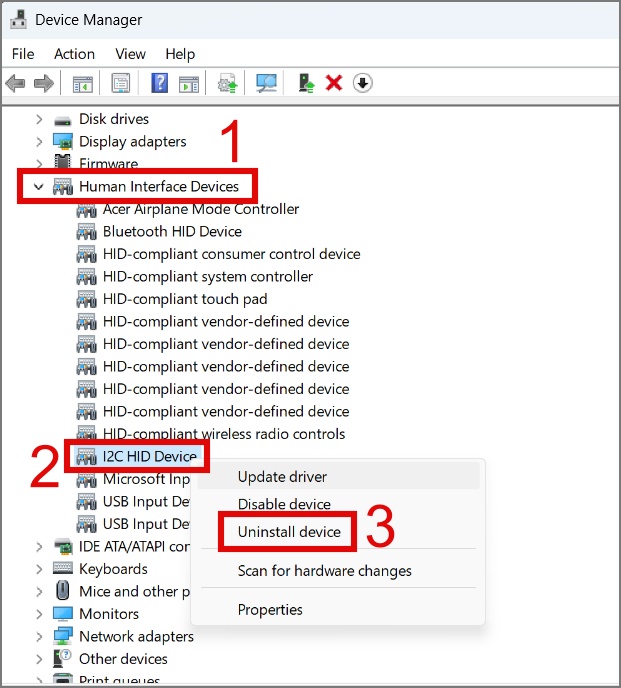
Uninstall Touchpad Driver:
If the above two solutions don’t work for you, try uninstalling the laptop’s touchpad driver. All you need to do is select the Uninstall device option.
And then click the Uninstall button.
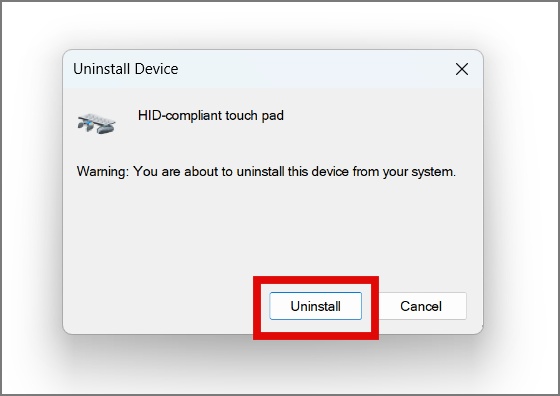
After that, restart your laptop and Windows will automatically reinstall the touchpad driver upon startup.
4. Look For Touchpad Settings in the BIOS/UEFI
During our research, we came across some interesting findings. One user pointed out that he was able to fix his unresponsive touchpad by disabling and then re-enabling the “Internal Pointing Device” from the BIOS. Although making changes in the BIOS can potentially lead to unforeseen circumstances, we highly recommend that you proceed with caution while trying this method.
1. To enter the BIOS settings, the first thing you need to do is shut down your laptop, press the Power button, and then continue pressing the F2 key until the BIOS screen appears.
Please note that every laptop manufacturer or model uses different Function keys to access the BIOS. You can simply Google it to know which Function key might work for your laptop. Also, the BIOS/UEFI settings can vary significantly among different laptop manufacturers.
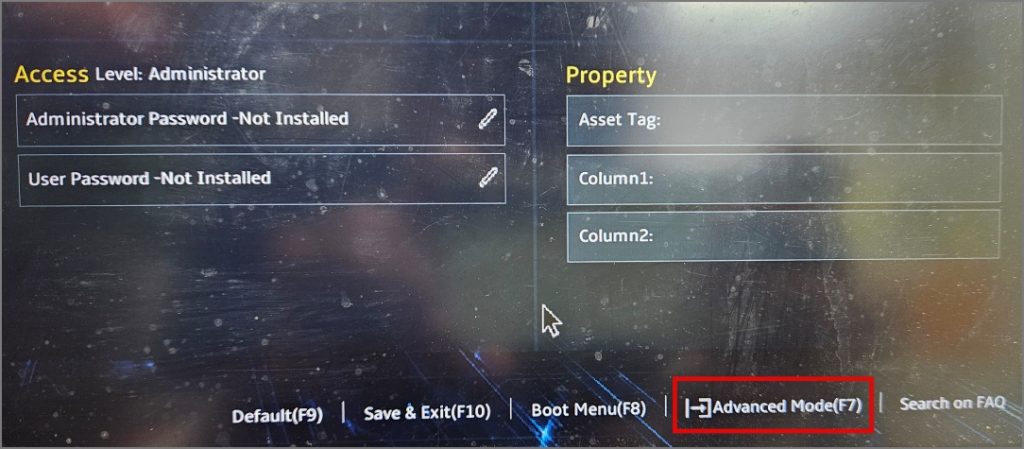
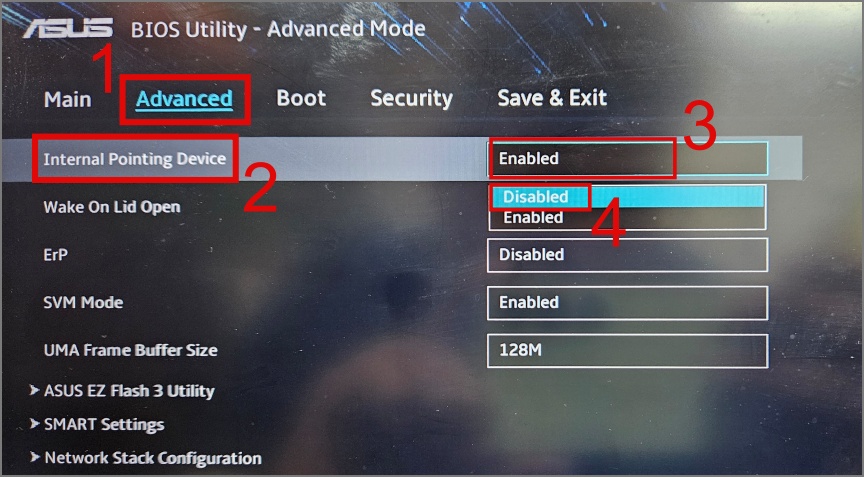
2. Press the F7 key to visit Advanced Mode.
3. Next, jump to the Advanced tab and select the Disabled option next to the Internal Pointing Device setting.
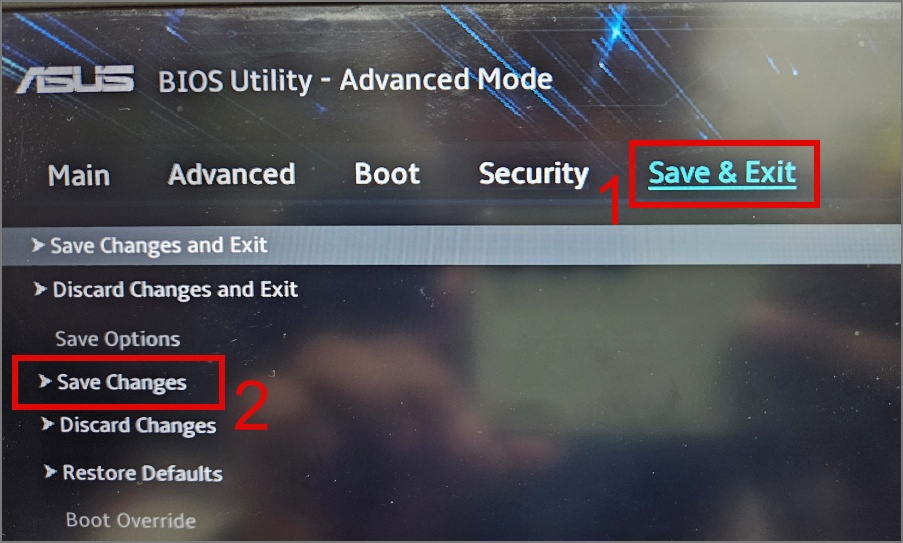
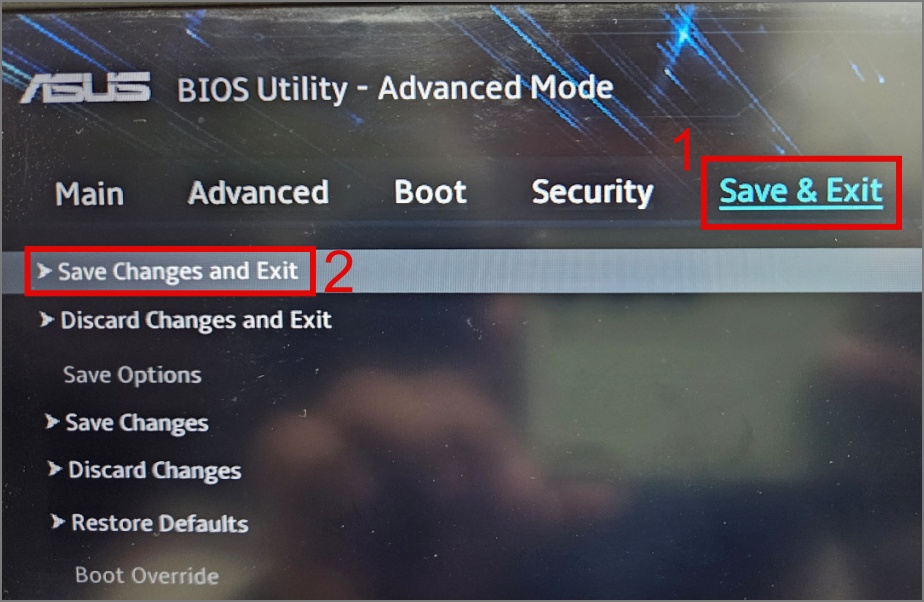
4. After that, go to the Save & Exit tab, then select the Save Changes option and press the Enter key.
5. Now again go to the Advanced tab and this time select the Enabled option for the Internal Pointing Device setting.
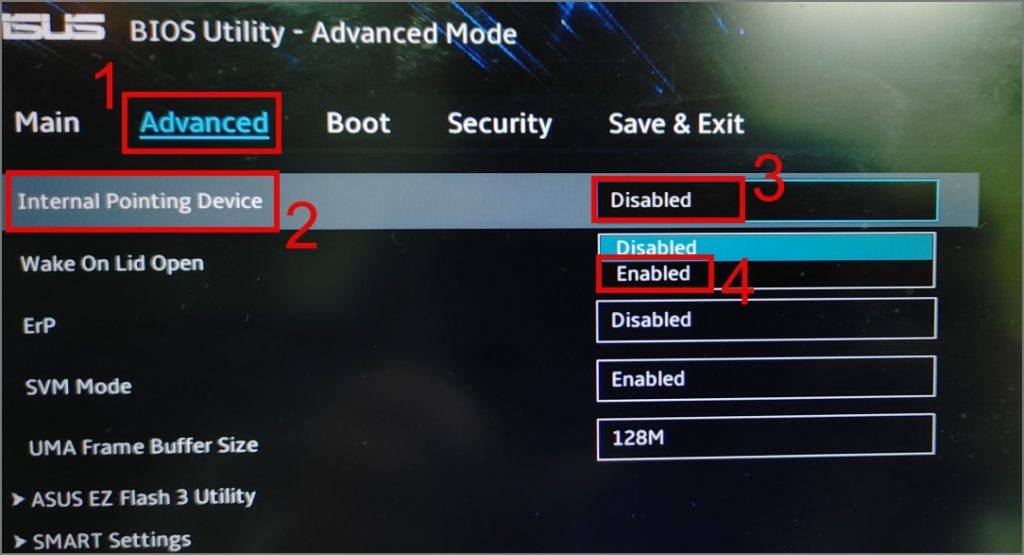
6. Once done, navigate to the Save & Exit tab, select the Save Changes and Exit option, and hit Enter.
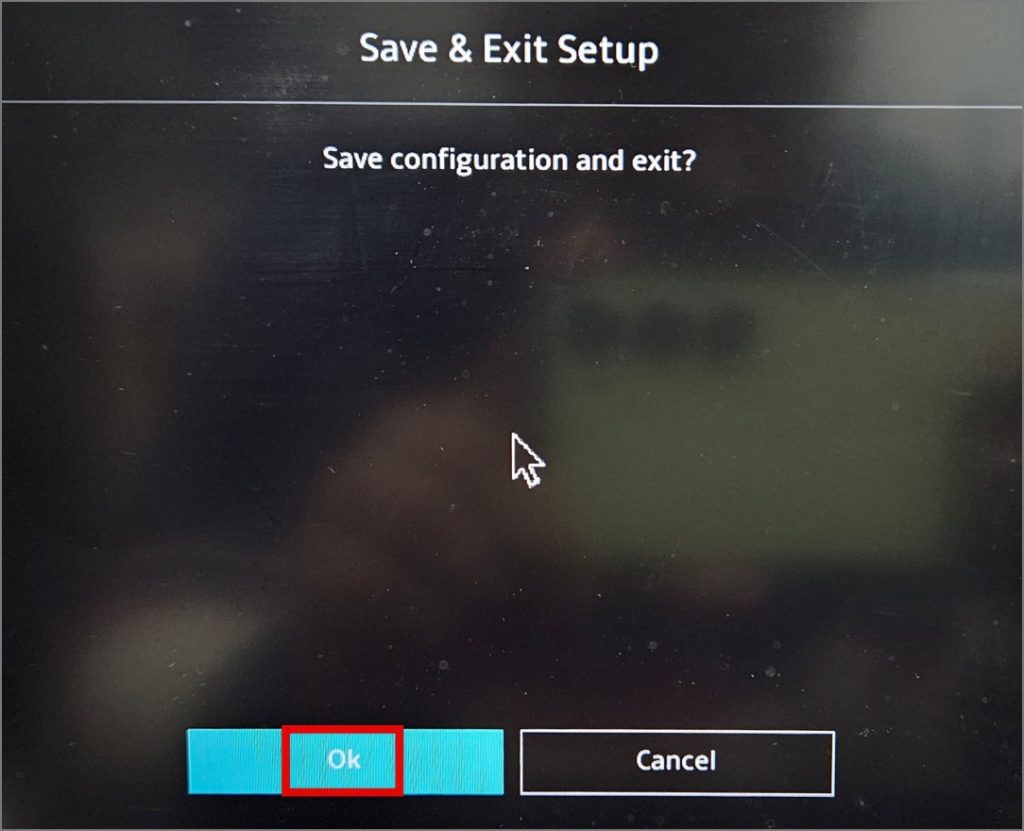
7. Confirm your decision by selecting OK.
Once your laptop boots up, verify whether this method has helped to get your laptop’s touchpad working again. If not, move to the next solution.
Tip: Learn how to fix a slow booting on Windows 10/11.
5. Reset Touchpad Settings
If you’re uncertain about the recent changes you made to the touchpad settings that may have caused your laptop’s touchpad to become unresponsive, you can try resetting the touchpad. This will revert all settings to their original state and restore proper functionality. Here’s how it works:
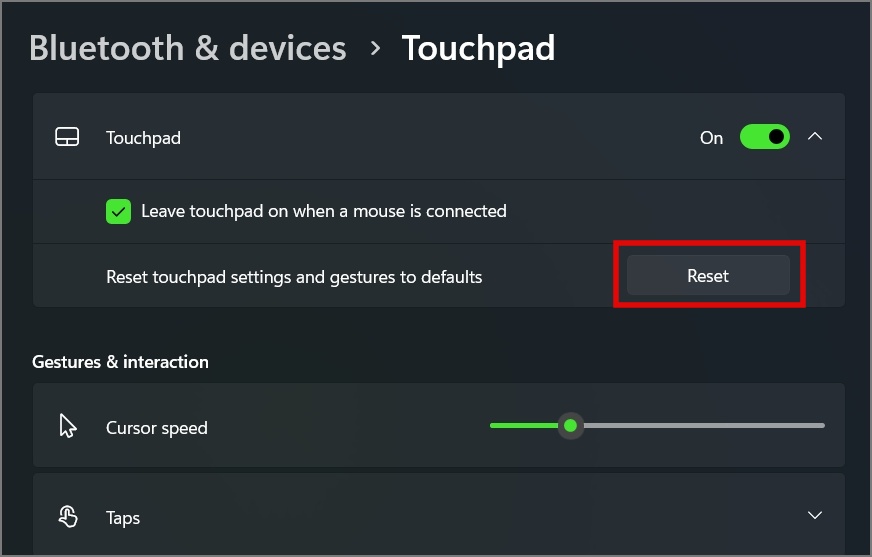
1. Navigate to Settings > Bluetooth & devices > Touchpad.
2. Next, click the Down Arrow icon next to the Touchpad toggle switch.
3. Lastly, hit the Reset button next to ‘Reset touchpad settings and gestures to defaults’.
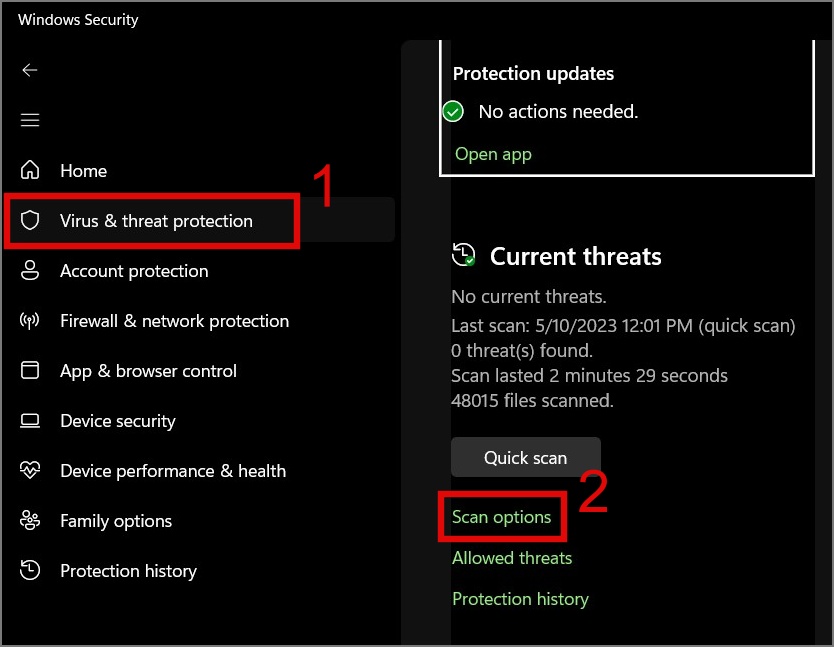
6. Check for Malware
Often, malware can cause your laptop to behave abnormally and this could also be the reason why your Windows laptop’s trackpad has suddenly stopped working. So try using a good antivirus software to scan your entire system. If you don’t have such software at the moment, you can also try the built-in Windows antivirus tool.
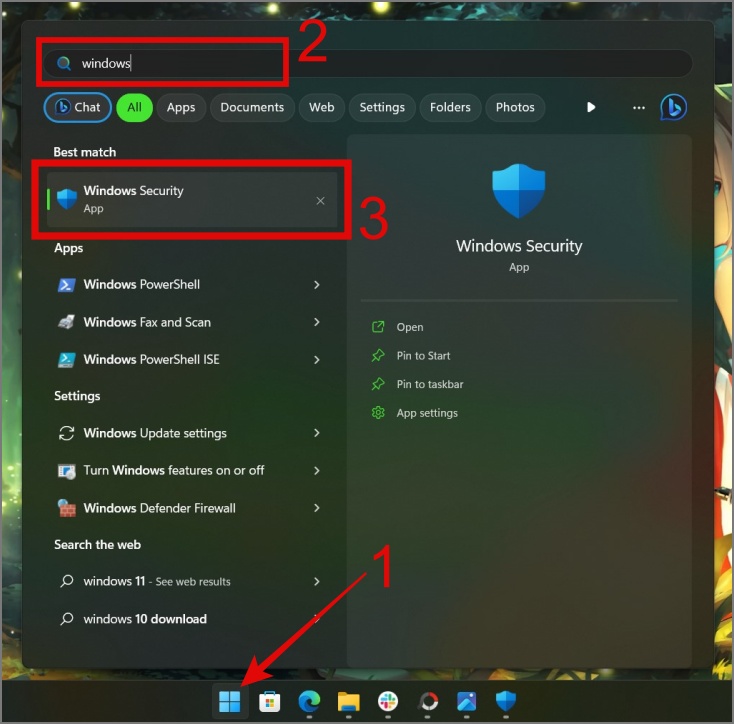
1. Search and open the Windows Security app on your laptop using Windows Search (Windows Key + S).
2. Jump to the Virus & threat protection section, and then click Scan options.
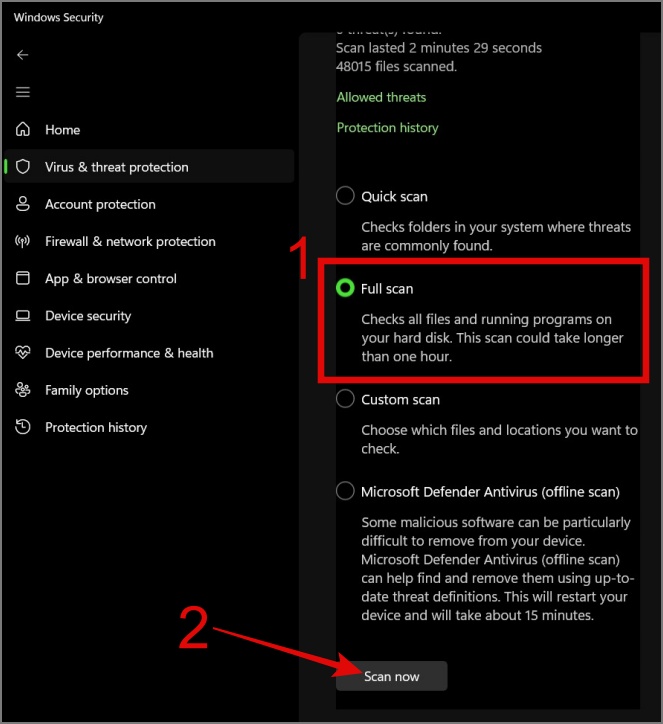
3. Select the Full scan option and then click the Scan now button.
7. Boot Windows in Safe Mode
Another step to address the trackpad issue is booting your Windows into Safe Mode. If your laptop’s trackpad starts working in Safe Mode, it’s possible that some of the apps or programs on your laptop are interfering with your touchpad. So take some time to recall which applications you recently installed and, once identified, uninstall those apps to see if this resolves the touchpad issue on your Windows laptop.
Here’s how to boot Windows in Safe Mode:
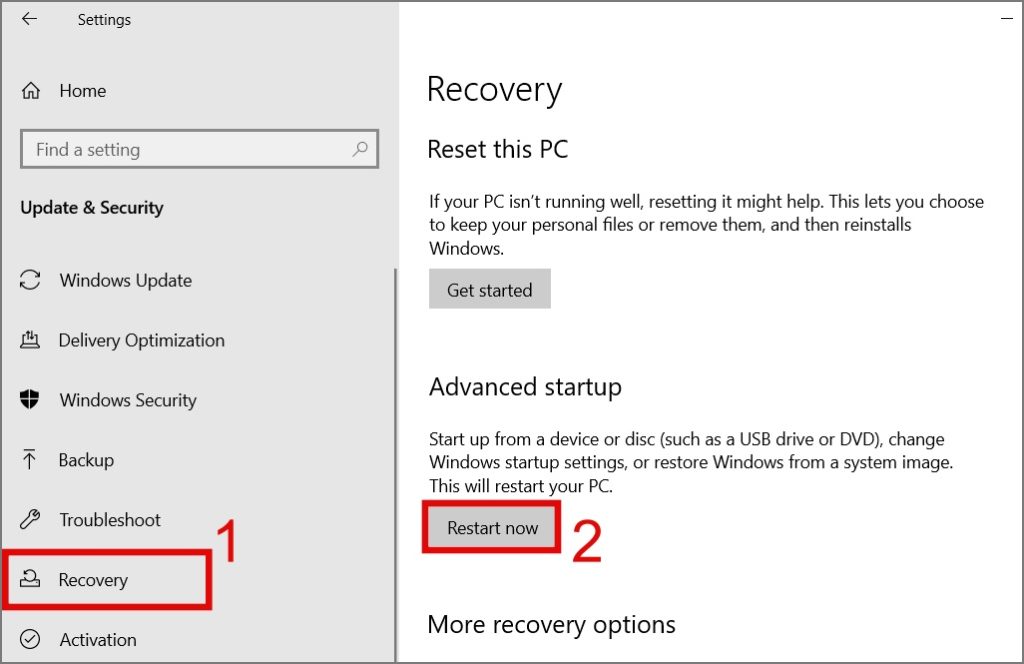
1. Windows 10 users should navigate to Settings > Update & Security > Recovery, and then click the Restart now button located below the ‘Advanced Startup’ option.
On the other hand, Windows 11 users should go to Windows Settings (Windows Key + I) > Windows Update > Advanced options > Recovery (under additional options) and then click on the Restart button next to Advanced startup.
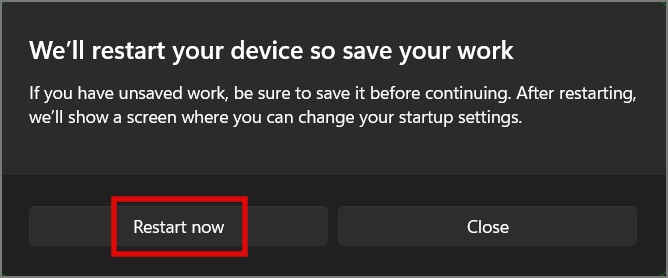
After that, hit the Restart now button to confirm your decision.
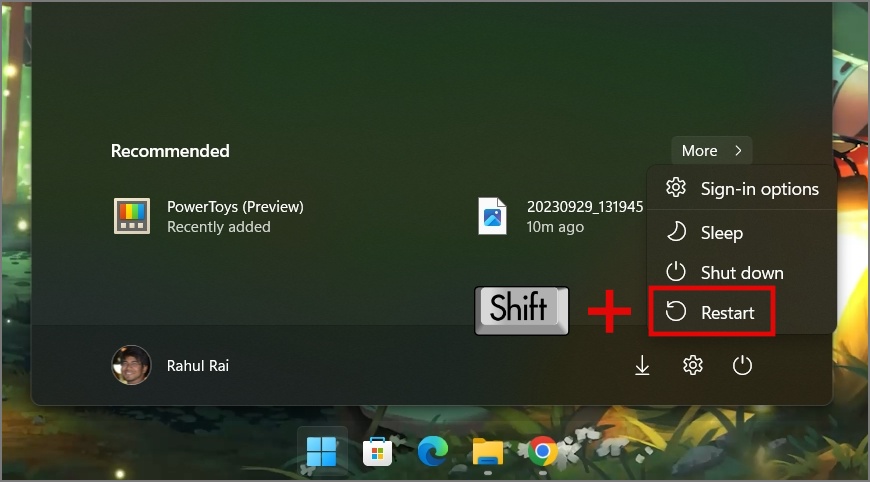
Alternatively, you can press and hold the Shift key, click the Start Menu, select the Power button, and then choose Restart. In short, it’s Shift key + Restart.
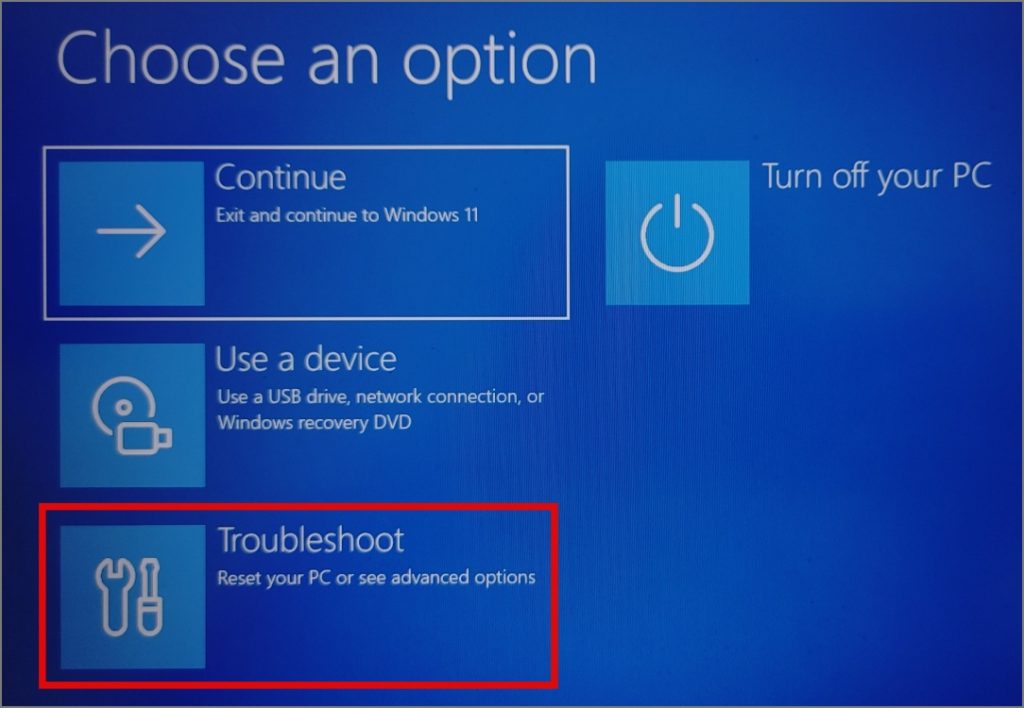
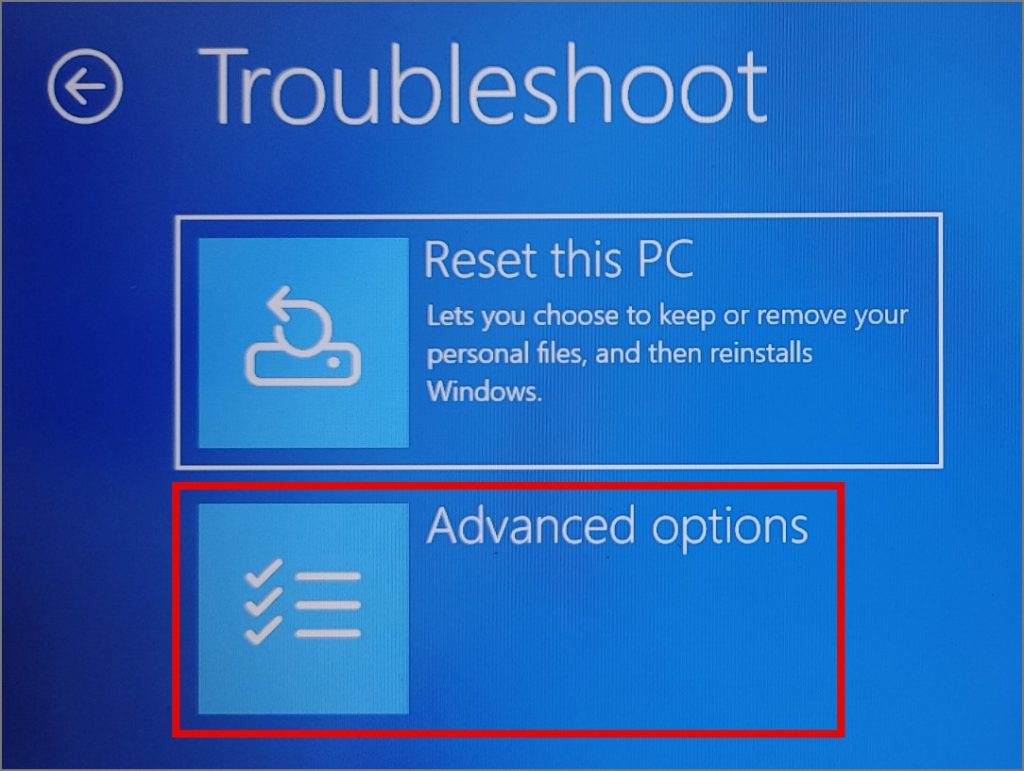
2. Next, click Troubleshoot.
3. Select Startup Settings.
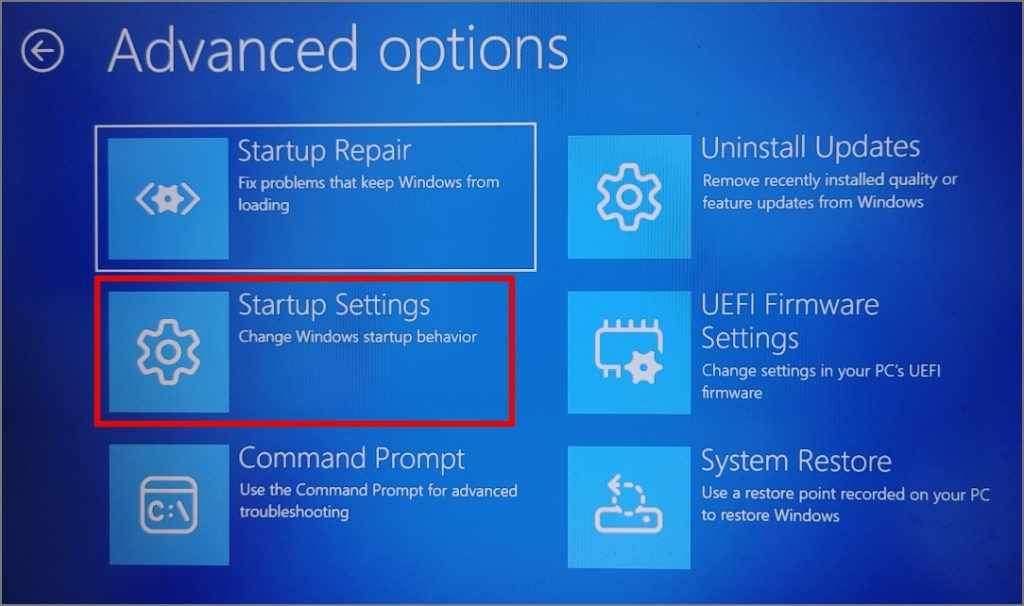
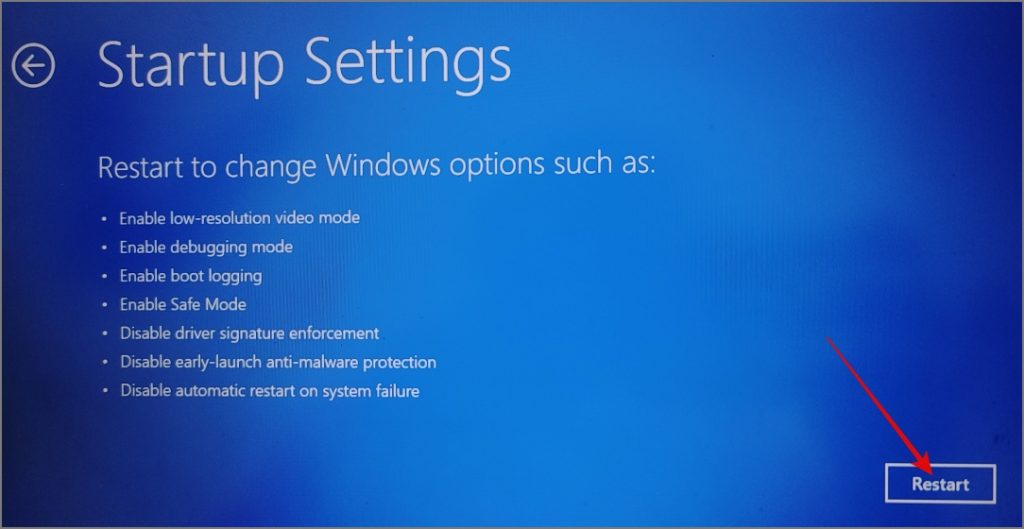
4. Then, click Advanced options.
5. Now hit the Restart button.
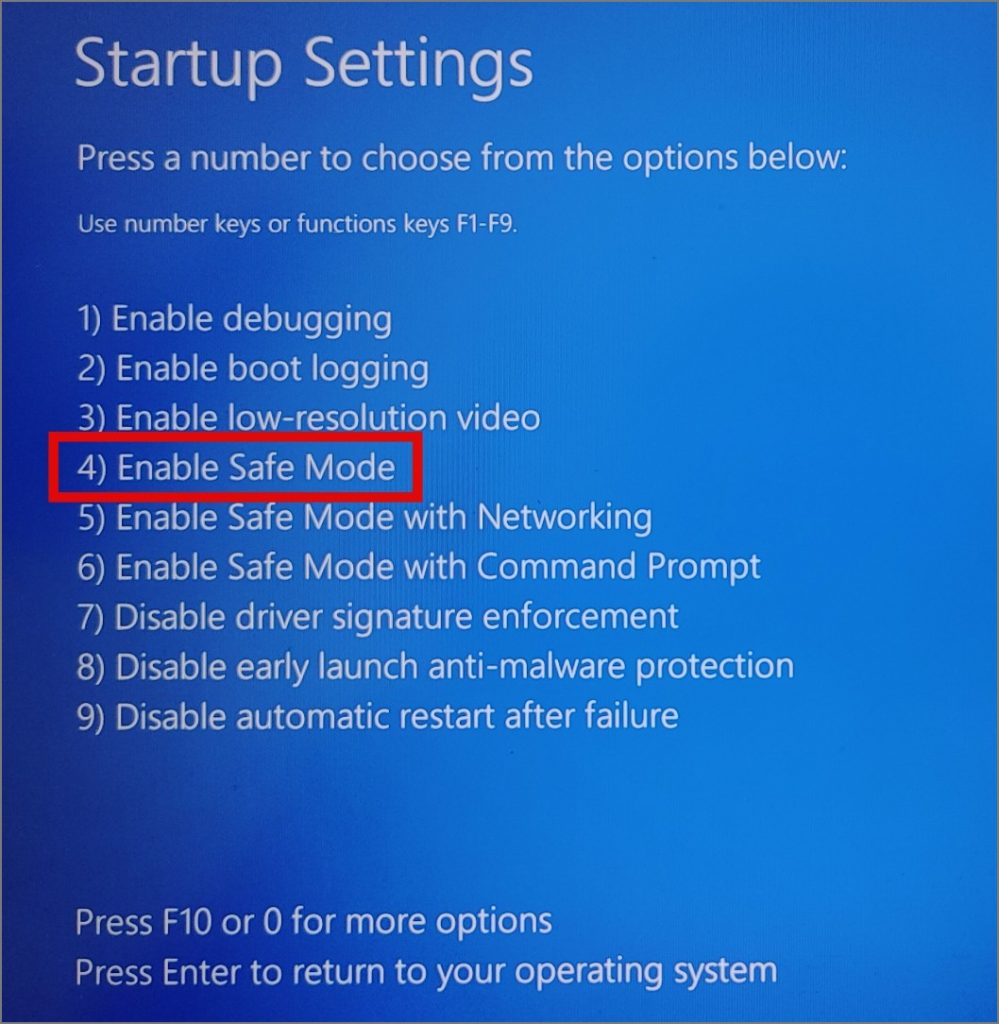
6. Now press the number key or function key to choose the options. On our screen, the 4th number is the Enable Safe Mode option so we will press either F4 or number 4.
After selecting the option, your laptop will restart again and boot into Safe Mode. To confirm that you’re in Safe Mode, check for the “Safe Mode” watermark in every corner of the desktop screen.
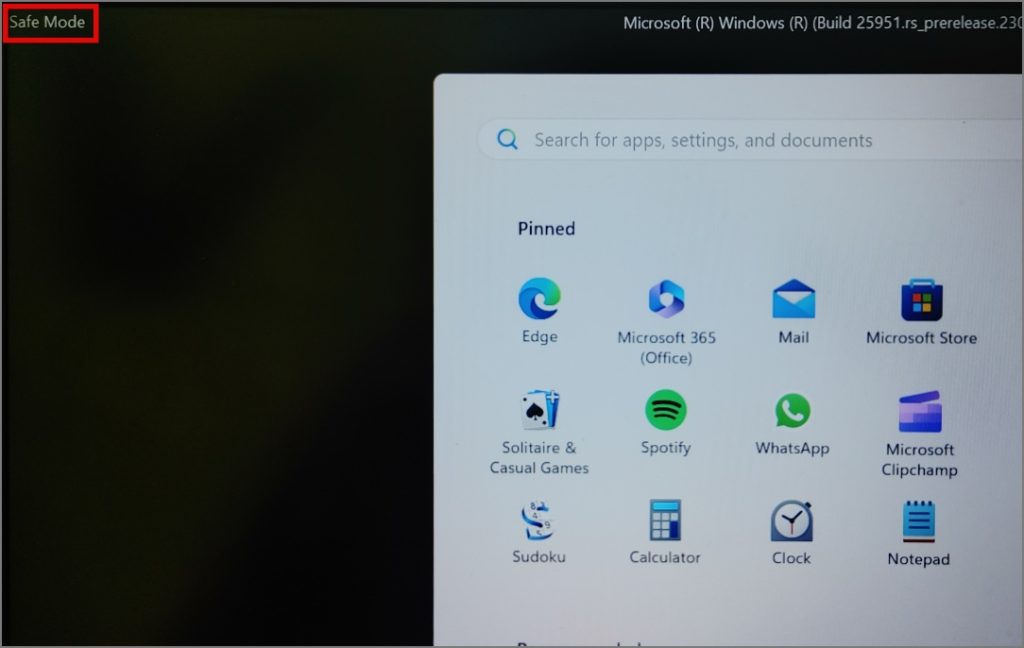
Now verify whether your laptop’s touchpad has started functioning or not. If it has, restart your laptop to exit Safe Mode and then begin the process of uninstalling all the recently installed applications to identify the potential culprits.
8. Update or Roll Back Windows Updates
Each new Windows update brings new features and fixes for previously known issues, but it may also introduce new bugs and glitches. Perhaps you should consider updating your Windows; this may resolve the touchpad issue.
Here’s how to check for updates on Windows:
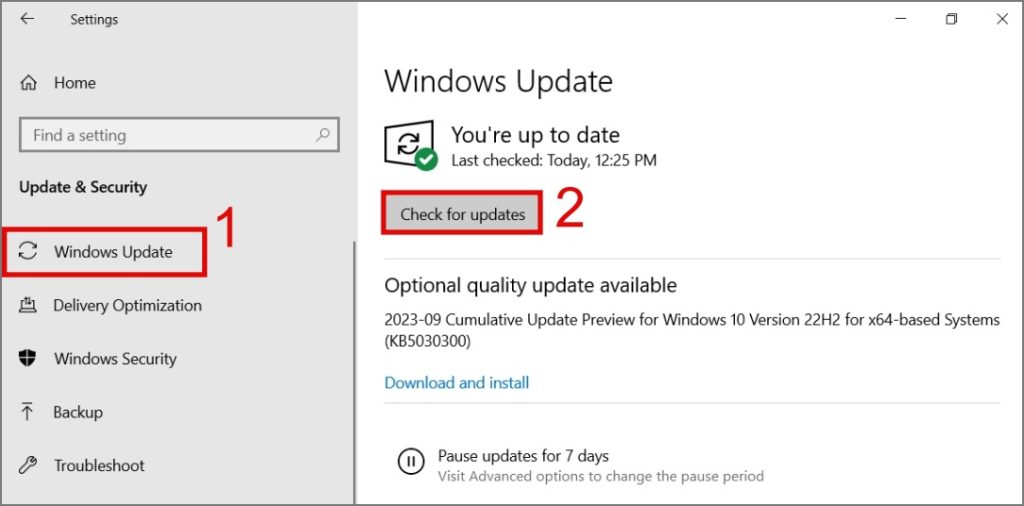
Windows 10:
Navigate to Settings (Windows Key + I) > Update & Security > Windows Update and then hit the Check for updates button.
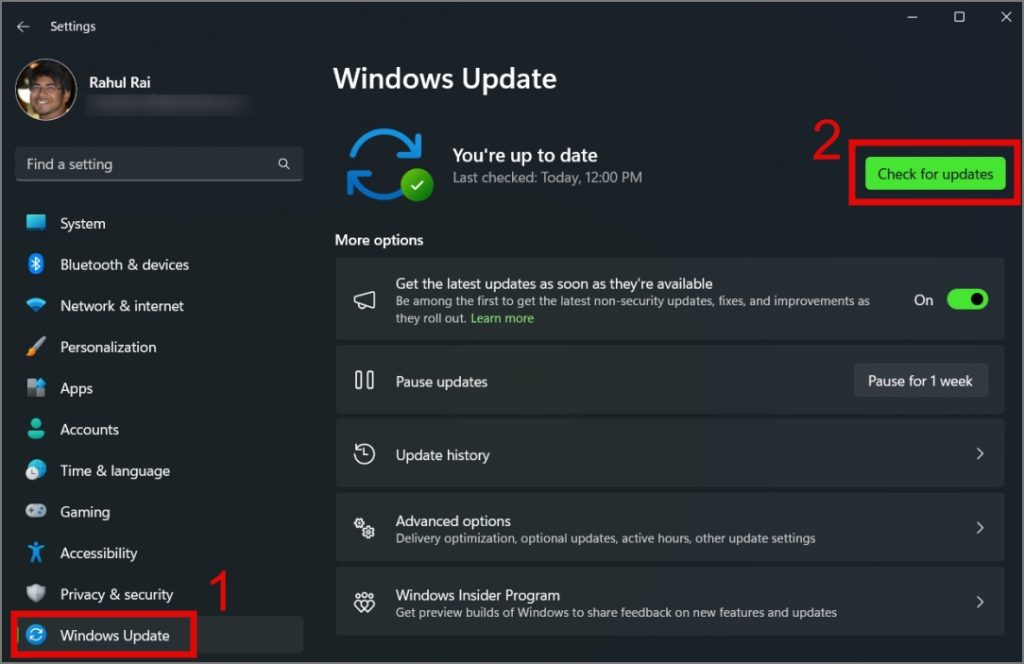
Windows 11:
Go to Settings > Windows Update and then click the Check for updates button.
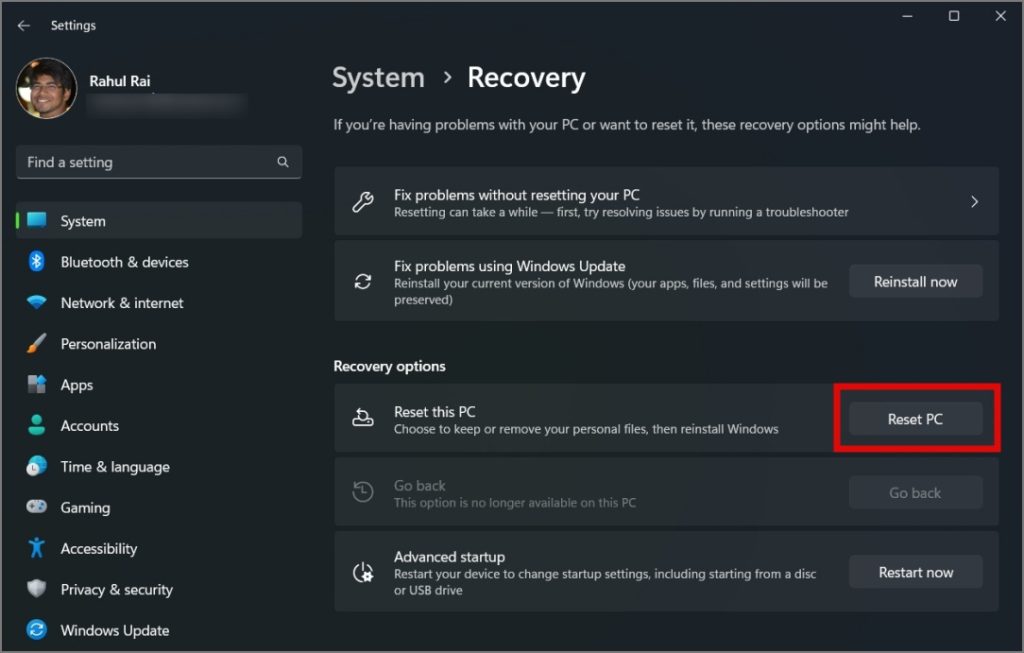
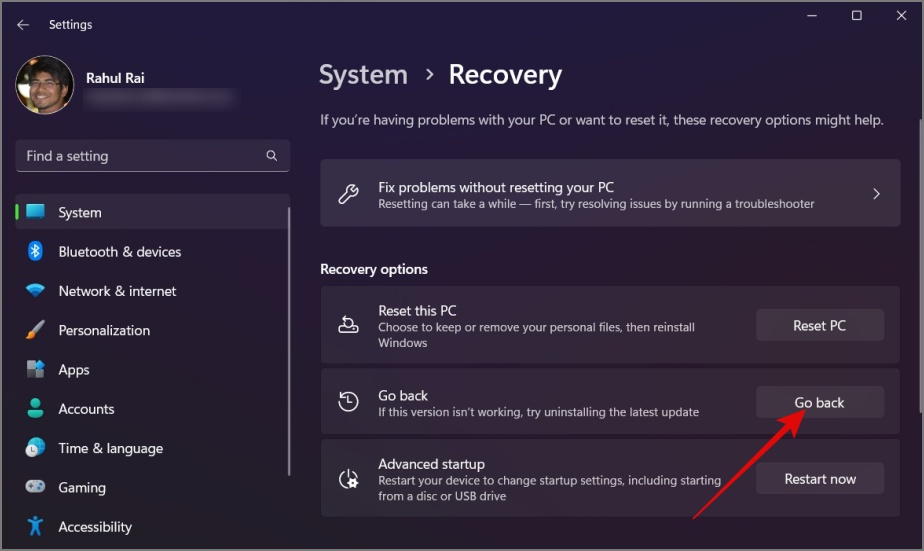
Meanwhile, if your trackpad has stopped working after updating to a newer Windows build, you can roll back to the previous build. To do that, just go to Settings (Windows Key + I) > System > Recovery and then click the Go back button. After that, you can follow the on-screen instructions.
9. Reinstall Windows
If none of the above solutions have helped you so far, then you have no other option but to reinstall Windows on your laptop. You can refer to this guide on how to reinstall Windows.
Furthermore, if you’re part of the Windows Insider Program, you should consider switching to the stable version, as Windows Insiders are typically on the cutting edge of new features and updates, which can sometimes introduce instability, such as an unresponsive touchpad.
End Your Touchpad’s Coffee Break
While most of the above solutions should help you fix the touchpad not working issue, if it still isn’t functioning, the only option left is to install a newer touchpad on your Windows laptop. In the meantime, you can manage your workload by using an external mouse.