If the Live Photos feature is enabled, your iPhone will automatically save every picture you take as a Live Photo instead of a regular photo. But not everyone is a fan of Live Photos. Some may not want to use Live Photos. Sure, you can turn off the Live Photo feature, but what about the pictures that are already saved as Live Photos? Thankfully, you can easily convert Live Photos to still photos on iPhone in different ways.
Table of Contents
1. By Duplicating Picture
One of the easiest ways to convert Live Photos to still is by using the Duplicate feature. You can convert one or multiple live photos to normal pictures using this method.
Convert One Live Photo to Still
1. Launch the Apple Photos app on your iPhone.
2. Open the live photo that you want to convert to normal.
3. Press the three-dot icon at the top and select Duplicate from the menu. On older phones, you might need to tap on the Share icon instead of the three-dot.
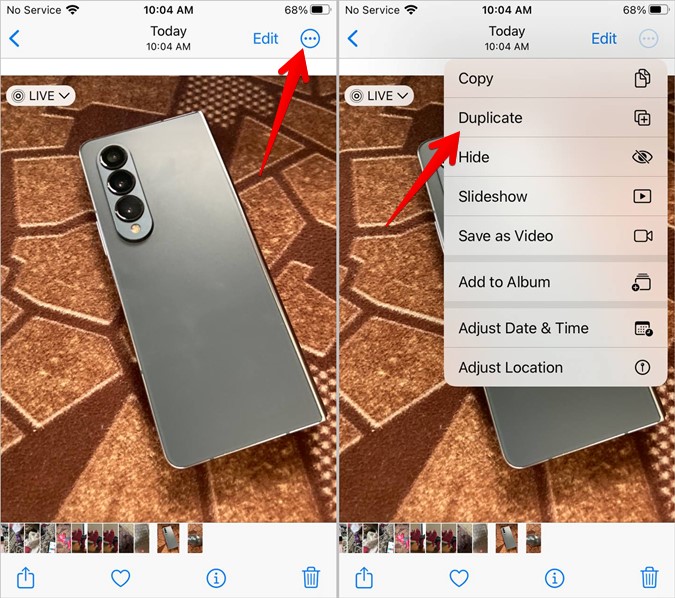
4. Tap on Duplicate as Still Photo. That’s it. The selected live photo will be converted to a normal still photo.

Things to Keep in Mind:
- If you don’t see the Duplicate as Still Photo option, make sure you haven’t edited the live photo with any effect like Bounce, Loop, etc. First, remove the effect. For that, open the picture and tap on the effect at the top-left corner. Select Live.
- The regular photos will show up on the date on which the live photo was taken. That is you will find the picture right next to the Live photo in the Library view of the Photos app and not as the most recent photo.
Tip: Learn how to make GIFs from any video on mobile.
Convert Multiple Live Photos to Still
Follow these steps to covert live photos to still pictures in bulk:
1. Open the Apple Photos app on your phone.
2. Tap on the Albums tab at the bottom followed by Live Photos.

3. Press the Select option. Then, tap on the live photos that you want to select. If you want to choose all pictures, tap on Select All.

4. Tap on the three-dot icon at the bottom and select Duplicate.

5. Choose Duplicate as Still Photos.

Congratulations! You have successfully changed multiple live pictures to normal images on your iPhone.
Tip: Learn how to combine multiple images into one PDF on iPhone.
2. Using the Files App
If the above method doesn’t work, especially for converting multiple live photos to normal, you can use the Files app for the same purpose. Here, first, you need to save the Live Photo as a file and then save it as an image from the Files app.
Here are the detailed instructions:
1. Open the Apple Photos app.
2. Go to Albums and tap on Live Photos. Alternatively, you can select Live Photos from the main library as well.
3. Press the Select option and select one or more Live Photos that you want to change to JPG.
4. Tap on the Share icon and select Save to Files.

5. Choose the location where you want to save the photo. Let’s say Downloads. Tap on Save. Your Live Photos are converted to images. However, they will not show in the Photos app yet. For that, follow the further instructions.

6. Now, open the Files app and go to the folder where you saved the pictures.
7. Press the three-dot icon and tap on Select.

8. Select the pictures that you had earlier saved. Then, tap on the Share icon and select Save images from the menu.

Now, the converted live photos will show in the Apple Photos app on your iPhone.
Tip: Learn what happens when you reset your iPhone.
3. By Turning Off Live Photo Feature Temporarily
1. Open the Live Photo in the Apple Photos app.
2. Tap on the Live option at the top and select Off. Now, your photo has been converted to a still photo temporarily. You can re-add the live effect by repeating the steps and selecting Live.

4. By Editing the Picture
1. In the Apple Photos app, open the Live Photo that you want to edit.
2. Tap on the Edit option.

3. Tap on the Live Photo icon (concentric circles) at the bottom. Now, here you can select the picture that will be converted to a normal still image from a Live photo. Select the frame from the slider at the bottom and tap on Make Key Photo. A small dot will appear on the selected frame.

4. Next, tap on the Live button at the top to turn off Live Photo.
5. Press the Done button to save the live photo as a still photo.

Tip: Learn how to make a photo black and white except one color on iPhone.
5. By Sharing in Non-Apple Apps
If you share the Live Photo outside of Apple apps, it will be automatically converted into a normal still picture. For instance, if you send the Live Photo in WhatsApp, Telegram, etc., it will be sent as a regular JPG.
6. Take a Screenshot
Finally, if you want to convert Live Photo to a still picture quickly, we have an obvious way of taking a screenshot of the Live Photo. The screenshot will be saved as a regular photo. But it might not be of the same quality as the original picture.
Tip: Learn how to take screenshots on iPhone without Power or Home buttons.
Frequently Asked Questions
1. How to turn off the Live Photo feature while taking photos?
Open the Camera app and tap on the Live Photo icon (Concentric circles) to turn it off. You will see a bar on this icon, which means Live Photos has been turned off temporarily.
2. How to permanently turn off Live Photos on iPhone?
First, you need to disable the Live Photos feature temporarily in the Camera app. For that, open the Camera app and press the Live Photo icon. Make sure it has a bar on it. Next, open Settings > Camera > Persevere Settings. Enable the toggle next to Live Photo. This ensures that Live Photos are turned off permanently after you have disabled it in the Camera app.
3. How to save a Live Photo as a video on iPhone?
Open the Live Photo in the Apple Photos app and tap on the three-dot icon (or Share icon) and select Save as Video. Check our detailed guide to convert Live Photo as video on iPhone.
4. Are there any third-party online tools to convert Live Photos to regular photos?
Yes, you can use image converters like cloudconvert.com, aconvert.com, etc.
5. Does converting Live Photo to still photo free up storage on iPhone?
Not as such. Even if you duplicate a Live Photo as a still image or convert it using the Files app, the converted image is of the same size as that of the original Live Photo. Check out other possible reasons why your iPhone storage could be full.
Edit Photos on iPhone
Once you have turned Live Photos into still photos, learn how to draw on a photo on iPhone. Also, know how to blur out a part of a picture on iPhone.