Thumbnails not showing on Mac can frustrate users. You must open every file or rely on Mac Preview to take a sneak peek at the content. Before the issue breaks your workflow, read along to learn to fix it on your Mac.
A number of factors can affect your file thumbnails on Mac. We will go through every trick to troubleshoot thumbnails to streamline your working hours. Without further ado, let’s get started.
Table of Contents
1. Make Sure to Download the Entire File
Did you download media or PDF files from the web? The Finder menu won’t show file thumbnails until you complete the download process. A slow internet connection might interrupt downloads too. Make sure to connect to a fast internet connection before downloading a file. Once your preferred browser downloads the file, a thumbnail for the same will appear in the Finder menu.
2. Enable Icon Preview
macOS enables icon preview by default on MacBook. If you have accidentally disabled it, follow the steps below to enable icon preview.
1. Open Finder on Mac.
2. Select View in the menu bar at the top and click Show View Options. Alternatively, you can use the Command + J keys.
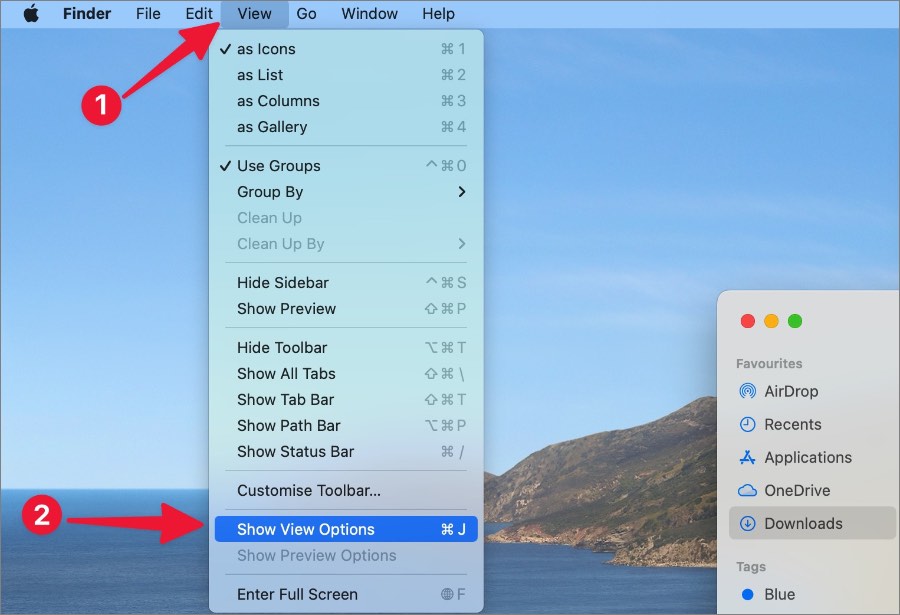
3. Enable Show icon preview, and you are good to go.

3. The Finder Doesn’t Support the File Type
The default Finder menu on Mac supports most file types. But when you move specific unknown file types to the Finder, it may not show a thumbnail. You must convert it to popular file formats. For images, PNG and JPG are popular and universally accepted image file types. As for videos, you can convert your video file to MKV, MP4, MPG, AVI, and other popular formats.
4. Check Internet Connection
Do you face thumbnails not showing on Mac issues with cloud storage files stored on Finder? Google Drive, Microsoft OneDrive, and Dropbox have native apps for Mac and seamlessly integrate with Finder. When you try to access such files without an internet connection, the Finder menu might not show thumbnails (since they are not saved on the device storage).
Popular cloud storage platforms are designed to support on-demand files. This means you can check file thumbnails on an active internet connection, but the system won’t download them until you need such files in your workflow (and save space on Mac). You must ensure an active internet connection on your Mac. You can connect to a 5GHz Wi-Fi frequency for better internet speeds and confirm via the Speedtest app or fast.com.
You can also manually download essential files offline on Mac to check thumbnails without any issues.
1. Open Finder on Mac and select your preferred cloud storage from the sidebar.
2. Right-click on a file or folder and select Free Up Space from the context menu.

5. Restart Finder
Due to a small glitch in the Finder, the app might not show thumbnails on Mac. It’s time to force-stop Finder and opens it again.
1. Press the Command + Space keys to open the Spotlight Search menu.
2. Search for Activity Monitor and hit the Return key to open it.

3. Select Finder and hit the X mark at the top.
4. Confirm your decision and close the menu.

5. Open Finder and thumbnails should start showing up again.
6. Regenerate Finder PLIST Files
You can remove corrupt Finder PLIST files from your Mac and reboot the device to regenerate thumbnails. Go through the steps below.
1. Open Finder on Mac.
2. Select Go in the menu bar and click Go to Folder.

3. Enter ~/Library/Preferences and hit the return key.

4. Find com.apple.finder.plist and right-click on it.
5. Select Move to Bin from the context menu.

6. Clear your Mac Bin and reboot it.
macOS will create the required Finder PLIST files during the reboot process.
7. Use Terminal Commands to Clear Cache
Are thumbnails missing on Finder and Mac dock? You can run the following commands in the Terminal menu and troubleshoot the problem in no time.
1. Press the Command + Space keys and search for Terminal to open it.
2. Run the following commands and hit the Return key after each.

- qlmanage -r cache
- qlmanage -r
- killall com.apple.quicklook.ThumbnailsAgent
- killall Dock
8. Update macOS
Similar to File Explorer on Windows, Finder is tied with the macOS. Apple frequently releases new updates with features and bug fixes. Here’s how you can update macOS on your Mac.
1. Select the Apple menu in the top left corner.
2. Open the System Preferences menu.

3. Select Software Update and install the pending update.

Glance Over Files on Mac
Manually opening each file in Finder or on Dock can be tiring and unproductive. You don’t need to rush to the nearest Apple service center either. Using the tricks above, you can figure out why thumbnails not showing on MacBook and fix the issue in no time. If you still face issues with thumbnails in Finder, check one of the best Finder alternatives to manage files on Mac.