Whenever there’s an issue with your Windows computer, restarting it is a go-to solution. But what if the restart feature itself becomes a nightmare? It can be frustrating when you’re working on something important on your Windows PC and it randomly restarts, especially if it’s happening every few hours. Here are some solutions to help you fix your computer that’s randomly restarting.
Table of Contents
1. Basic Solutions
Before we move forward with advanced solutions, we want you to try out the basic solutions first, such as:
- Examine Power Outlet: Your desktop computer may restart on its own due to a loose connection with your wall outlet. You should consider examining your power outlet for any loose connections or testing your computer’s power connection on another wall outlet. Also, while we’re on this topic, ensure that the extension cord you’re using to connect multiple computer devices is also functioning properly.
- Ensure Your PC Isn’t Overheating: One common reason for your PC or laptop to constantly restart is overheating. If you’re continuously playing games, editing a 4k video, or performing other resource-intensive tasks, your computer may occasionally restart due to overheating as a protective measure, especially if your laptop or PC is equipped with mediocre-level hardware.
- Clean Your Computer: Another common reason why many users experience continuous restarts is due to the accumulation of dust and debris within the computer, leading to overheating and system instability. So maybe you can try opening your laptop or PC to clean your hardware or visit the computer service center to get the job done.
2. Disable Automatic Restart on System Failure
Windows has a hidden feature that automatically restarts your computer upon system failure. You might have experienced it firsthand when your PC suddenly shows a blue screen error or turns black. There’s a possibility that due to some bugs or errors in the software, your computer keeps restarting. Temporarily disabling this feature may help you with the restarting issue. Here’s how to disable automatic restart on a Windows PC:
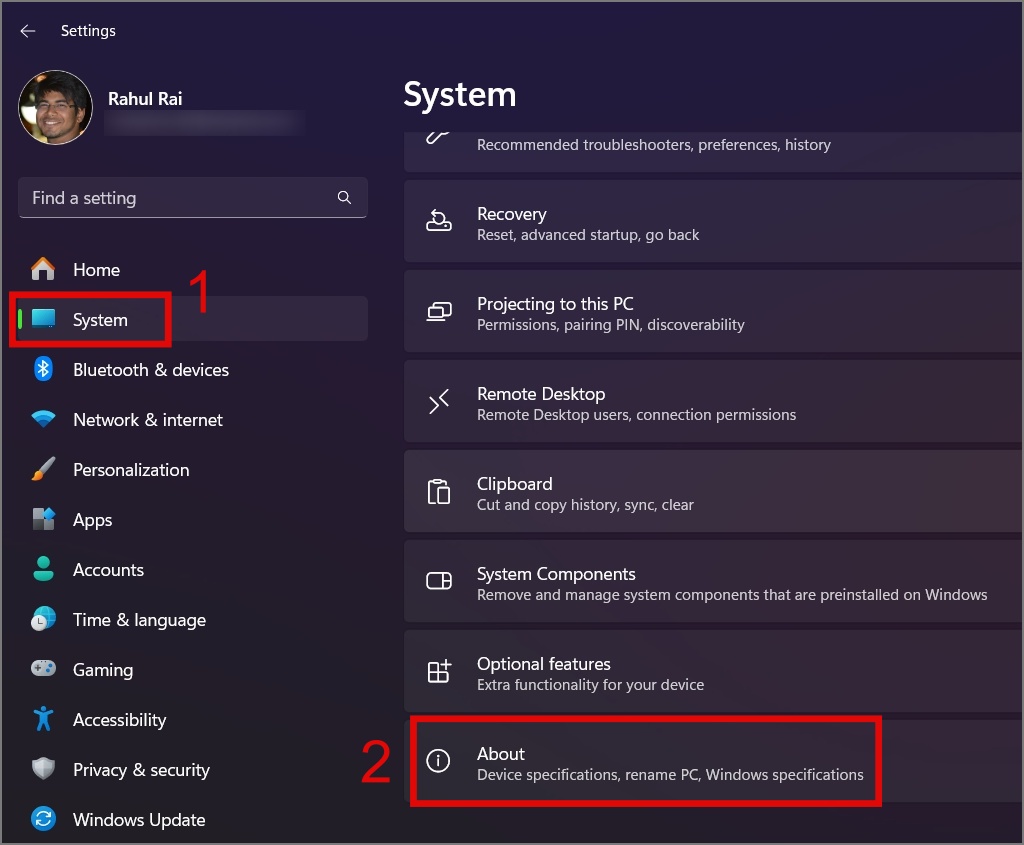
1. Open the Windows Settings (Windows Key + I) and then navigate to System > About.
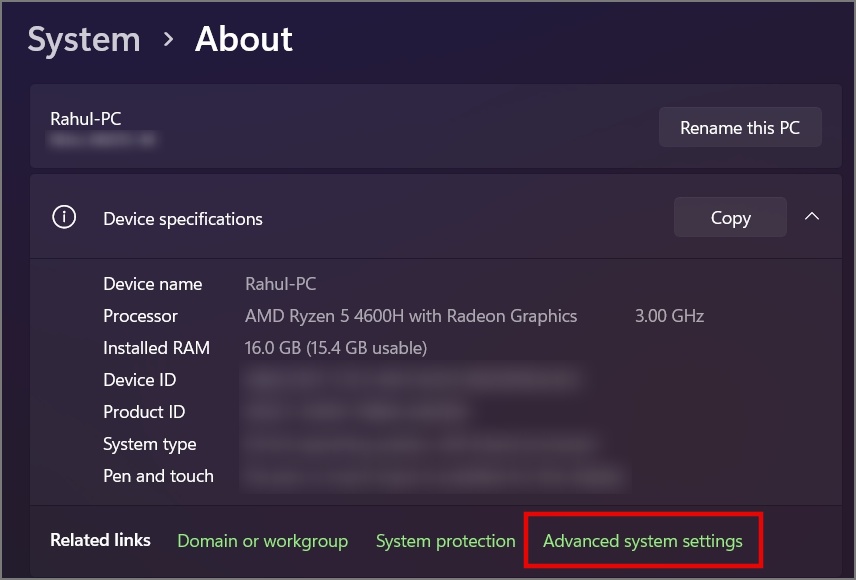
2. Next, click on the Advanced system settings link.
3. Afterward, switch to the Advanced tab and then click on the Setting button under the Startup and Recovery section.

4. In the new windows, uncheck the box next to the Automatically restart option and then hit OK.

5. Again, hit the OK button and this should most probably fix the laptop keeps rebooting problem.

TIP: Learn how restarting any device fixes most problems
3. Inspect Loose Internal Connection
If you’re able to open your PC cabinet, check for any loose connections in your hardware. Some wires or PC components may have loosened during the movement of the cabinet.
Speaking of hardware, have you recently upgraded or added hardware to your PC or laptop? Sometimes, Windows fails to configure the new hardware, or the added hardware may not be compatible with your current motherboard, which could be the reason for the constant restarting of your computer. If that’s the case, contact your PC manufacturer for the correct hardware.
It’s also likely that hardware such as RAM, SSD, or hard disk might have gotten corrupted and that’s the reason your computer randomly restarts sometimes. If that’s the case, make sure to purchase a new one that is compatible with your computer.
4. Check Your Power Supply
In the basic solutions, we discussed the issue of overheating caused by activities such as gaming, video editing, 3D rendering, cryptocurrency mining, and more. These tasks place a substantial load on your CPU and GPU. If the power required by these applications or games exceeds the capacity of your Power Supply Unit (PSU), it may fail to provide sufficient energy, leading to computer restarts. Therefore, ensure that your laptop or PC has a capable charging adapter or PSU that matches the requirements your motherboard can handle. This will ensure your computer doesn’t start restarting randomly in the future.
5. Change Power Plan
We’ve already discussed the power supply issue on the hardware level. Let’s see how power settings in Windows can also impact your computer’s functioning. The thing is when your PC operates in battery save mode or low-performance mode, then you run a highly intensive task, the operating system will throttle the CPU and other hardware components to conserve power, causing your computer to restart unexpectedly. Perhaps setting the power plan to high performance can help resolve the restarting problem. Here’s how to do it:
NOTE: Setting to high-performance mode will impact your battery life if you’re using a laptop.
If you’re a Windows 10 user, you can simply click on the Battery icon on the Taskbar and then drag the slider to the right side to set it to Best Performance mode.
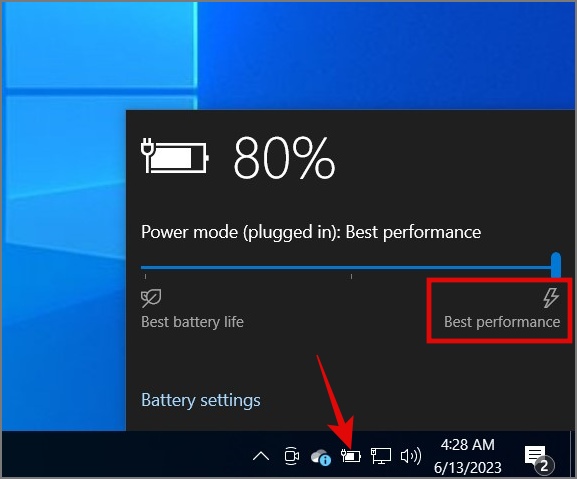
On the other hand, Windows 11 users can navigate to Settings > System > Power & battery and then select the Best performance option under Power mode.

6. Your Laptop’s Battery is Dead
If your laptop’s battery is depleted and you’re solely relying on the charger, a loose connection or even a slight disturbance might cause your laptop to restart. Therefore, we highly recommend replacing your battery to avoid this issue altogether. If the battery is not the issue, then you can move to the next solution.
7. Uninstall Recent Installed Software
There’s also a possibility that the restarting issue might have been triggered by a newly installed or updated application on your Windows PC. A bug within the app can significantly affect your computer’s behavior. Therefore, consider uninstalling the application to see if this resolves the restarting issue.
8. Run a Malware Scan
Speaking of software, have you checked whether your computer is infected with any form of malware? Malware can infiltrate your system through various channels, such as pirated software, email attachments, unsecured websites, and more. This can result in abnormal behavior in your CPU, disk, or memory, resulting in random restarts at any time.
If you have reliable anti-malware software, run a full scan. If not, there’s no need to worry. Your Windows PC also includes a built-in antivirus tool designed to help protect your device from external threats.
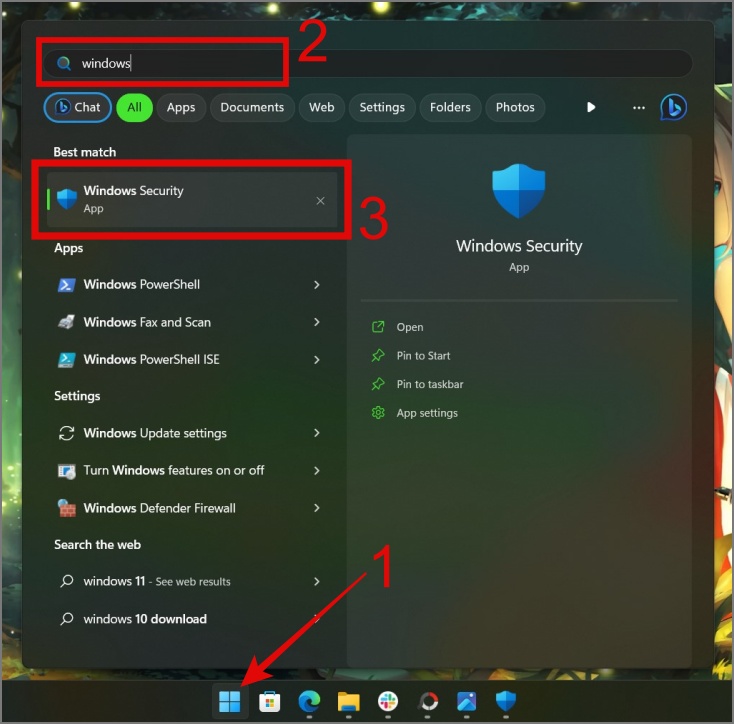
1. Launch the Windows Search (Windows Key + S) and then look for the Windows Security app.
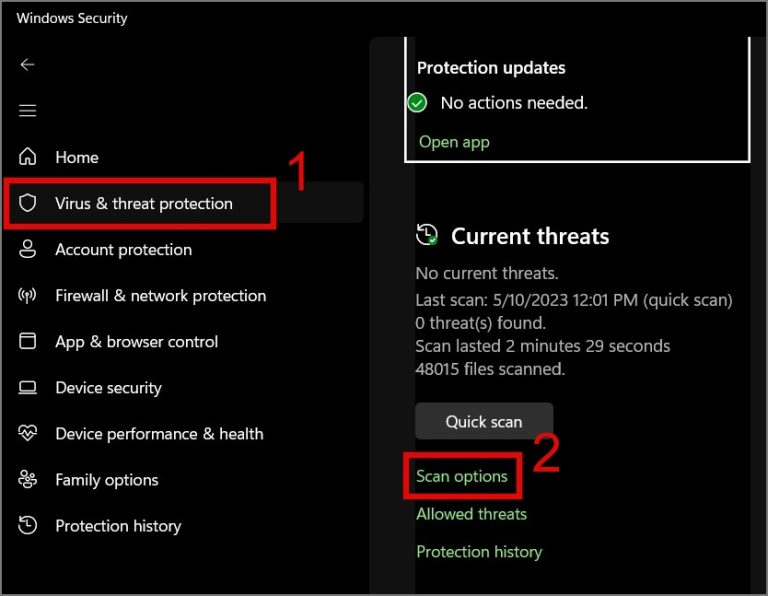
2. After opening it, navigate to Virus & threat protection > Scan options.
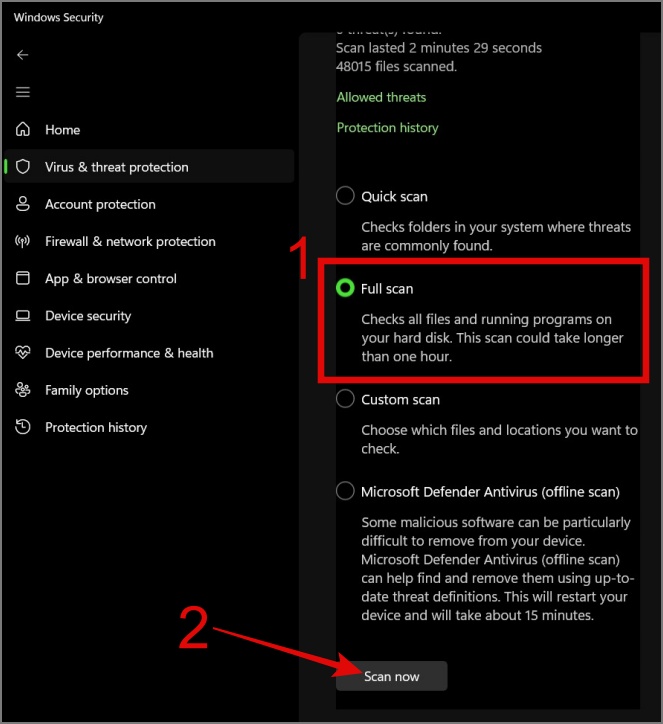
3. Lastly, select the Full scan option and hit the Scan now button.
9. Run Windows Update
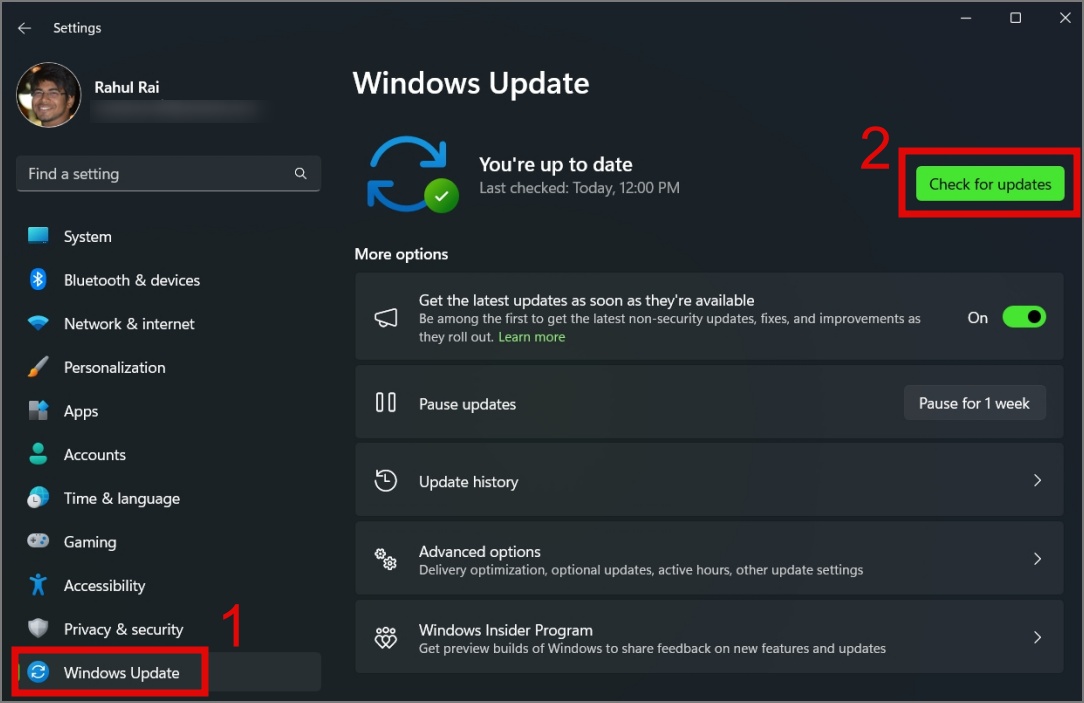
Sometimes, a bug in the operating system can make your computer restart on its own. To fix this, you can check for Windows updates. Many times, these updates have solutions for such issues. To update your Windows 11 PC, go to Settings > Windows Update and then click the Check for updates button.
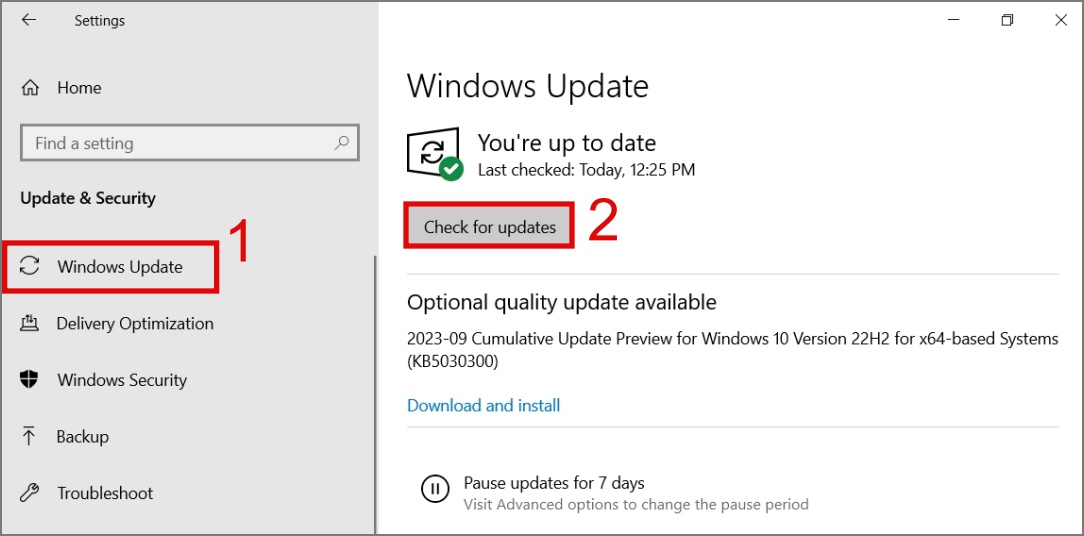
As for Windows 10 users, navigate to Settings (Windows Key + I) > Update & Security > Windows Update and then hit the Check for updates button.
10. Stop Overclocking Your CPU
Another reason for your system failure is because of CPU overclocking. When you do such things, what happens is you push the processor beyond its recommended limits, causing overheating and instability, which can result in system crashes or permanent damage to the hardware. So we highly recommend you consider restoring the CPU to its default settings.
11. Run the Memory Diagnostic Tool
A few moments ago, we discussed how a hardware failure can impact your computer’s performance and your RAM is no exception. To find any issue with your RAM, you can use the Memory Diagnostic Tool, which can help you find the root cause of your restarting problem. Here’s how to use the tool:
1. Launch the Run dialog box (Windows Key + R), then enter mdsched.exe and hit OK or Enter key.

2. After that, a diagnostic window will open, and from there select the Restart now and check for problems option.

NOTE: Make sure you save all your work before restarting.
Now your Windows PC or laptop will turn off and begin the memory diagnostic process. During the process, if you discover any error, you know who is the real culprit here.

12. Run SFC and DISM Scan
If there are no issues with your RAM, the next component to inspect for errors would be your hard disk or SSD. Given that Windows itself is stored and operates from the disk, any problem with it could lead to PC frequently restarting. Fortunately, tools like SFC (System File Checker) and DISM (Deployment Image Servicing and Management) can help you easily rectify many system and disk file issues.
To perform an SFC scan, just open the Command Prompt (Admin).
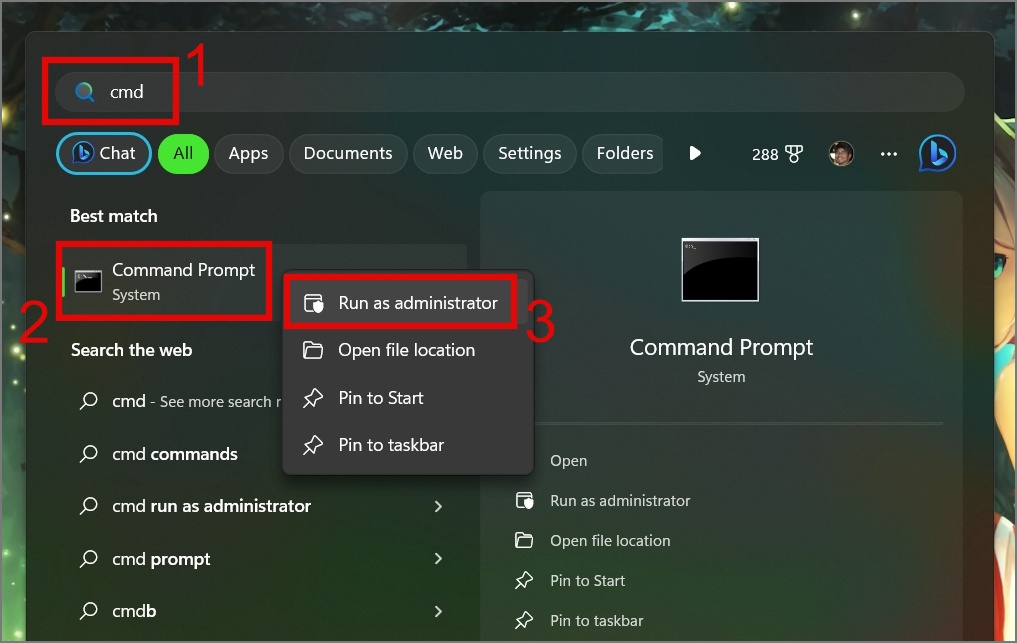
Then enter the command sfc /scannow and hit the Enter key.
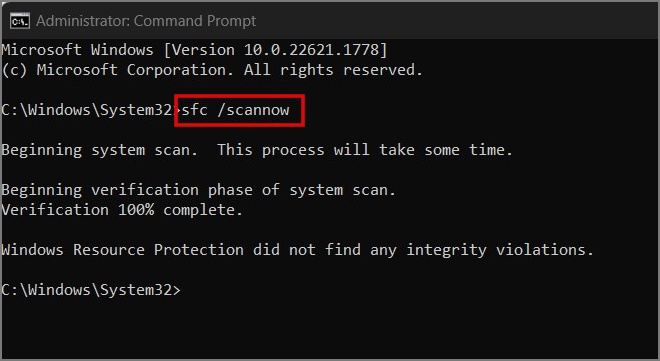
That’s all. It will initiate a scan of your computer to identify and resolve any errors detected.
Whereas, to perform a DISM scan, open the Command Prompt as Admin and type Dism /Online /Cleanup-Image /CheckHealth and then hit the Enter key.

Note: CheckHealth will only scan for corrupted files without making any changes to your system files. If you want to make any changes, you can use ScanHealth or RestoreHealth instead.
13. Update Driver
If the hardware-level scan also proves to be unsuccessful in resolving the restarting issue, updating the drivers might work like magic. Here’s how to update the drivers:
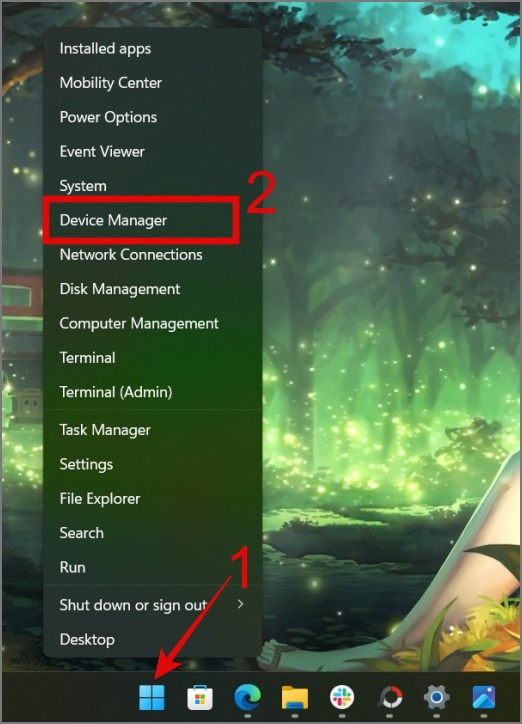
1. Right-click on the Start menu or use the Windows Key + X keyboard shortcut to bring up the WinX menu. From there, select the Device Manager.
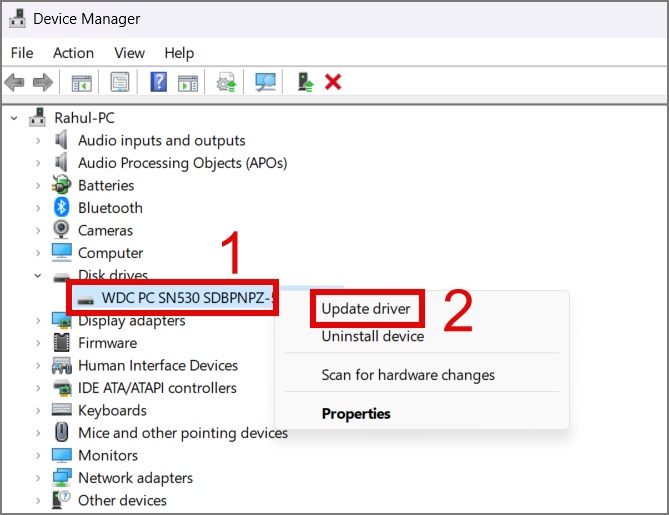
2. Next, select the specific driver you wish to update. In this guide, we’ll focus on locating a driver for the SSD. To accomplish this, expand the Disk drives, right-click on the designated drive, and choose the Update driver option.
3. On the next window, you can either go with the automatic option or if you have the right driver go with the manual option.
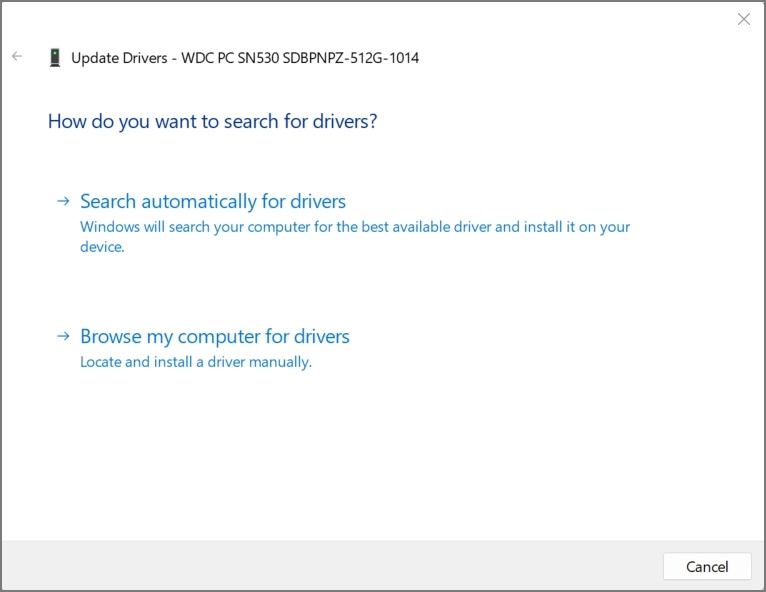
4. Now, repeat the same steps for each driver.
PRO TIP: If you want to update all your drivers in one go, you can use the Driver Easy application.
14. Disable Fast Startup
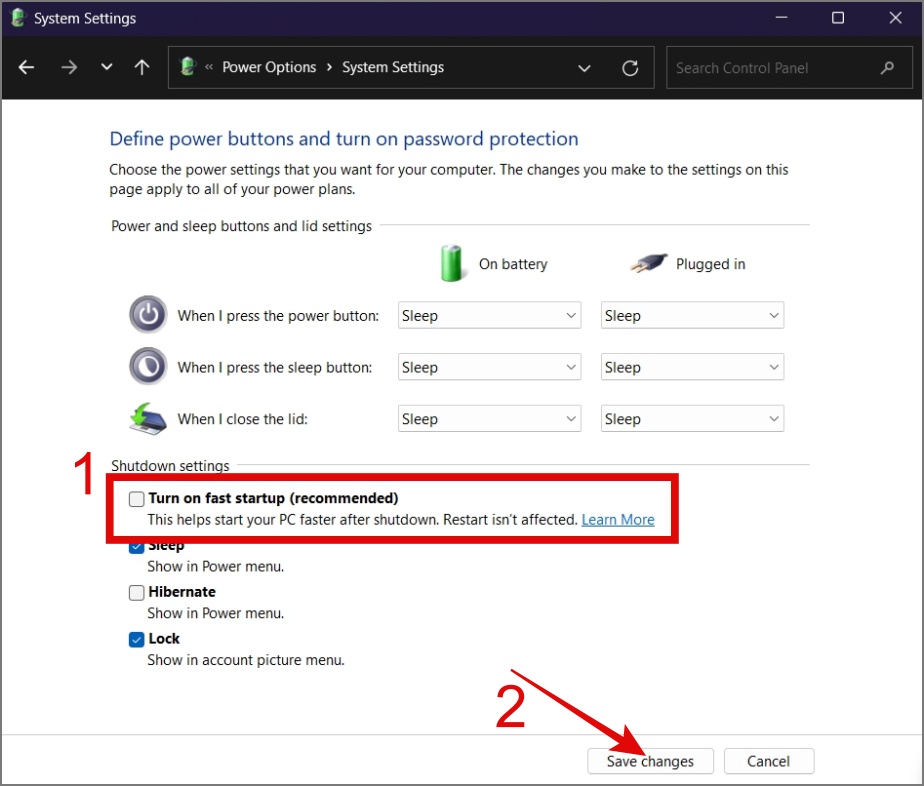
The Fast Startup feature on Windows is designed to boot the PC more quickly. However, because it doesn’t fully shut down the PC, it can sometimes lead to booting issues which further results in the PC restarting randomly and automatically. You might consider disabling this feature to see if it resolves the restarting issue on your PC or laptop.
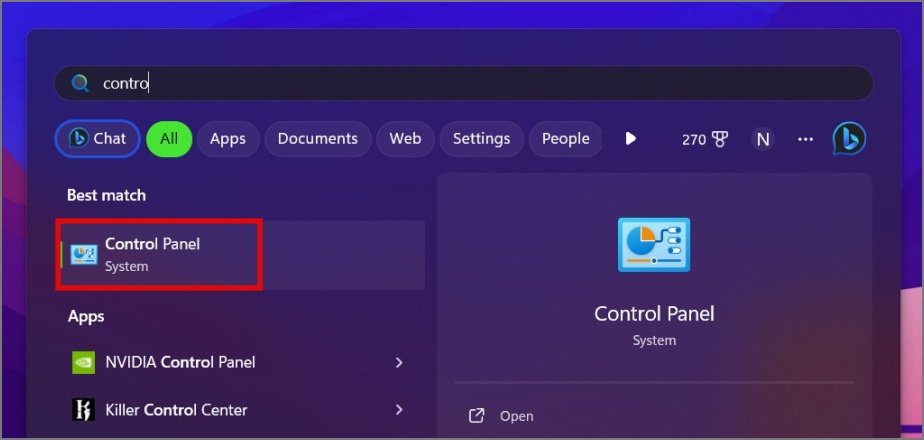
1. Find and Open the Control Panel on your computer using Windows Search (Windows Key + S).
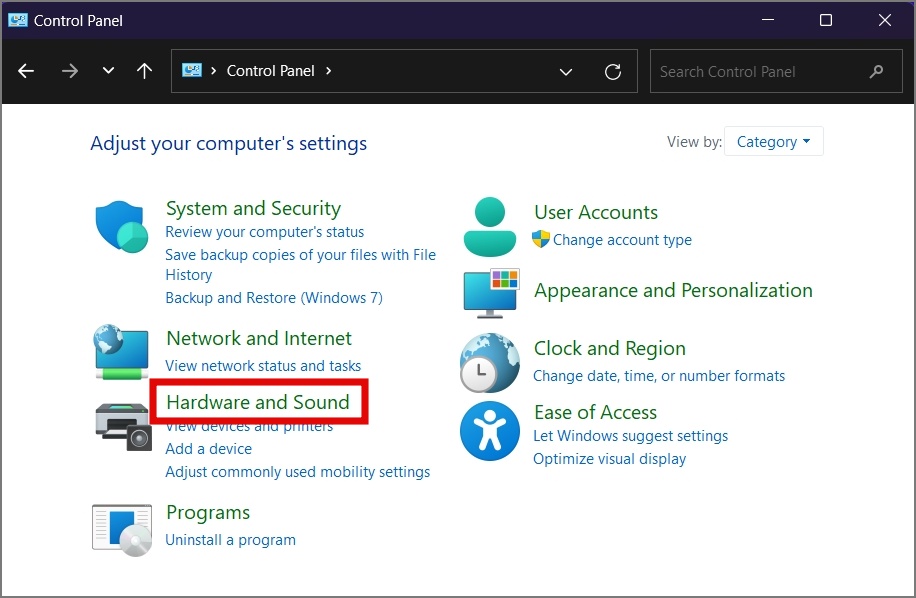
2. Click on Hardware and Sound settings.
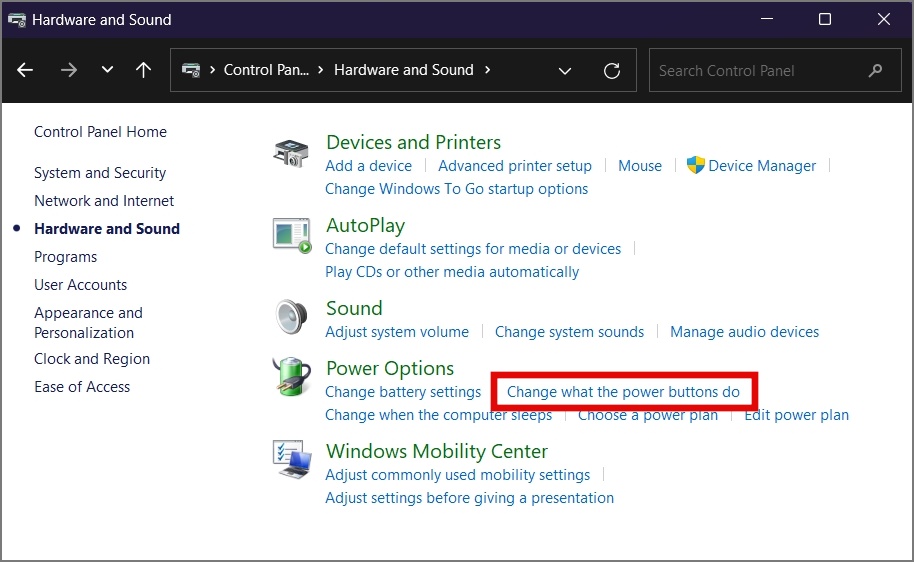
3. Under Power Options, select the Change what the power buttons do option.
4. Next, click on Change settings that are currently unavailable.
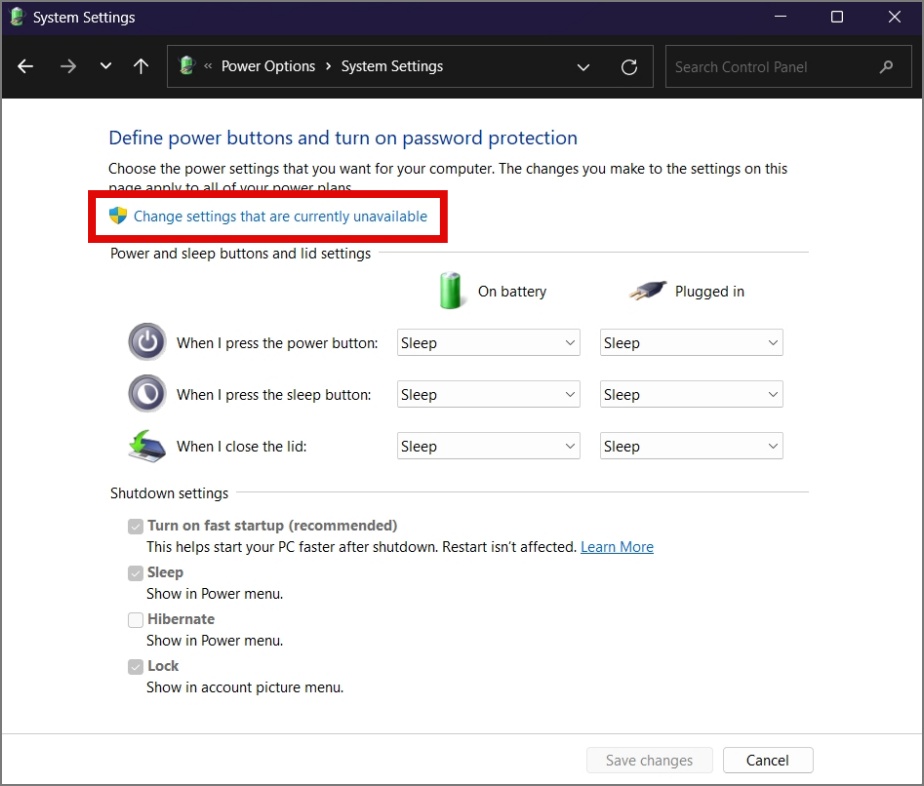
5. Finally, uncheck the box next to Turn on fast startup option and then hit Save changes.
15. Update Your BIOS
Periodically, your PC or laptop manufacturer releases BIOS updates for your device. Since BIOS is responsible for initializing hardware components and providing the basic instructions for the computer to start up. So we believe updating the BIOS may resolve the restarting issue.
However, it’s important to note that this method comes with risks. If the update is not done correctly or gets interrupted, it can make your computer unusable. Thus, it’s crucial to take the necessary precautions before proceeding with this method.
16. Reinstall Windows
If none of the solutions work in your favor, your last resort is to reinstall Windows on your computer. This can resolve potential operating system bugs or software conflicts. We’ve prepared a comprehensive guide on reinstalling Windows; you can check it out for detailed instructions.
Stop the Endless Restart Boogie!
Having to experience random restarts on your Windows computer can be annoying. This not only hampers productivity but also increases the risk of losing saved work or interrupting gaming sessions. We hope the above guide has assisted you in resolving the issue of your Windows PC restarting randomly.
By the way, do not confuse the random restart issue with the restarts that occur during Windows updates. These are different; Windows occasionally restarts multiple times during a major update event.
Before you leave, did you know that your Windows 11 PC comes with many indirect ads? Here’s how to disable all of them.