“Does Chromebook have a photo editor?” If that’s the question that brought you here, I’m glad to say that Chromebooks not only have one but two different image editors. You can edit pictures including screenshots on Chromebook using the Chromebook image editor or with Google Photos. Let’s check both methods to edit pictures on Chromebook.
1. Edit Photos Using Chromebook Image Editor
Chromebooks come with a native image editor that lets you crop, rotate, resize, and draw on pictures. There are two ways to open the Chromebook image editor. You can either open it from the Files app or via the screenshot notification.
Launch the Files app on your Chromebook. Then, double-click or tap on the photo or screenshot that you want to edit.

The image will open in the Chrome OS image editor that you can edit using the tools described below.

Alternatively, capture a screenshot on your Chromebook. The screenshot notification will appear at the bottom-right corner of the screen. Tap or click on the Edit button on the notification preview. The screenshot will open in the Chromebook image editor. Use the tools mentioned in the below section to edit your screenshots.

Tip: Learn how to screenshot on a Chromebook without a Windows key.
Crop an Image
1. Click on the Crop icon in the top bar of the image editor.

2. Select the size to which you want to crop your picture. You can choose a Free size to manually crop the image.

3. When done, click on the Done button at the top.
Rotate a Picture
To change the orientation of your image in Chrome OS, click on the Crop icon at the top in the image editor. Click on the Clockwise or Anticlockwise icons to rotate the image as per your need.

Resize Image
You can easily resize images in the Chromebook image editor using the Rescale tool.
1. Click on the Rescale tool in the image editor.

2. Enter the desired width or height for your image. Please note that when the Lock icon appears unlocked, then changing one of the parameters will not affect the other. If you want to preserve the aspect ratio while resizing the image, click on the Lock icon. The icon should appear locked.

Change the Lighting of a Photo
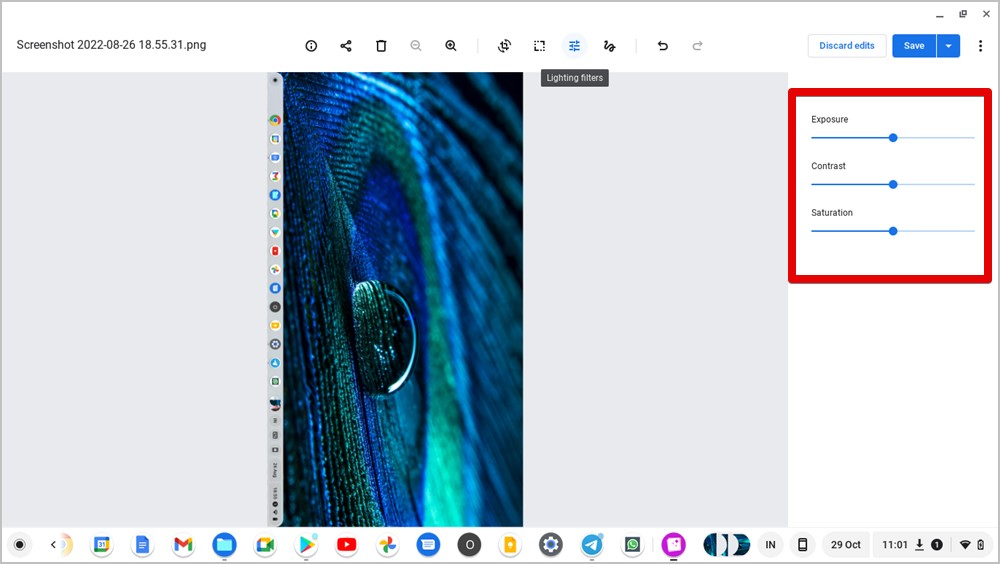
When the image opens in the Chromebook image editor, click on the Lighting filter icon to adjust the exposure, contrast, or saturation of the photo using the available sliders.
Draw on Image
Click on the Annotation tool of the Chromebook image editor to draw on your image.

Select the brush style, size, and color from the right sidebar. Click on Done.

Save the Edited Image
After you have made the necessary edits to your image, click on the Done button followed by the Save button at the top to replace the original image with the edited image.
Alternatively, click on the down arrow next to the Save button and select Save as to save the edited image as a new one. The original image will remain unaffected.

Tip: Check out the best drawing and painting apps for Chromebook.
2. Edit Photos in Google Photos on Chromebook
In addition to the gallery image editor, you can edit pictures using Google Photos on Chromebook. The Google Photos image editor offers more functionality as compared to the native image editor. For instance, you can crop an image in numerous ways, and adjust various lighting parameters of a photo such as contrast, brightness, shadows, highlights, etc. You can even add filters and text to your picture.
Follow these steps to open a picture in the Google Photos image editor:
1. Open the Google Photos app on your Chrome OS.
2. Click on the Library tab to view the photos on your Chromebook. Open the photo that you want to edit in Google Photos.

3. Click on the Edit button on the photo to open Google Photo’s image editor.

Here’s how to use different image editing tools in Google Photos on Chromebook.
Crop Picture in Google Photos
The Google Photos image editor offers a wide variety of aspect ratios to crop the image. Once you open the photo in the Google Photos editor, click on the Crop icon. Then, select the desired aspect ratio to crop your photo.

Rotate and Transform Pictures
Inside the Crop icon in Google Photos image editor, you get the Rotate and Transform tools. Use the Rotate and Transform buttons to change the orientation and perspective of the photo respectively.

Adjust Lighting Parameters
Click on the Lighting icon to see the available parameters that you can adjust. Scroll down to see more parameters. Use the slider next to the desired parameters to increase or decrease its value.

Add Filter to Photo
Click on the Filter icon in the Google Photos image editor to view the available filters. Click on the filter that you want to apply to your image. Use the slider under the filter to adjust its strength.

Add Text or Draw on the Photo
Click on the Drawing tool in the editor to open the annotation screen. You can draw on the picture using the Pen or Highlighter tools. Choose the desired color from the list.

Click on the Text button to add a text box. Type the text on your photo. Press the Done button to save changes.

Save Photo
After you have made the desired changes to the photo in the Google Photos app on your Chromebook, click on the Save copy button to save the edited photo as a new photo. The edited photo will also show up in the Google Photos or the Files app on your Chromebook.

Tip: Check out the best tips to edit photos in Google Photos.
Edit Photos Like a Pro
Now, that you know how to edit pictures on your Chromebook, you can transfer photos from your Android phone to Chromebook and edit them. Apart from the built-in image editor and Google Photos app, you can use third-party apps like Photopea, Canva, Pixlr Editor, or Sumo Paint to edit photos on Chromebook. You can even install the GIMP editor using Linux. Check out other photo-editing apps for Chrome OS.