You’ve just signed up for Gmail, and you’re already amazed by its clean user interface. However, you don’t have time to get acquainted with it or its features because you urgently need to send an email. Understanding how Gmail works and its various features can be challenging for new users. To make your journey with Gmail easier, here is an in-depth guide on how to send emails from Gmail, along with a few tips and tricks.
Table of Contents
How to Send an Email on Gmail
From Computer:
Sending an email from Gmail isn’t rocket science; you can effortlessly compose an email. Moreover, you can now ask Google to draft an email for you with just a simple prompt. Don’t worry; in this guide, we will also delve into the AI (Artificial Intelligence) aspect. But before we get into that, let’s start by learning how to create and send an email from Gmail.
1. Open the Gmail on your preferred web browser.
2. To begin writing an email, simply click on the Compose button located in the top left corner.

3. A new message pop-up will appear in the bottom right corner.
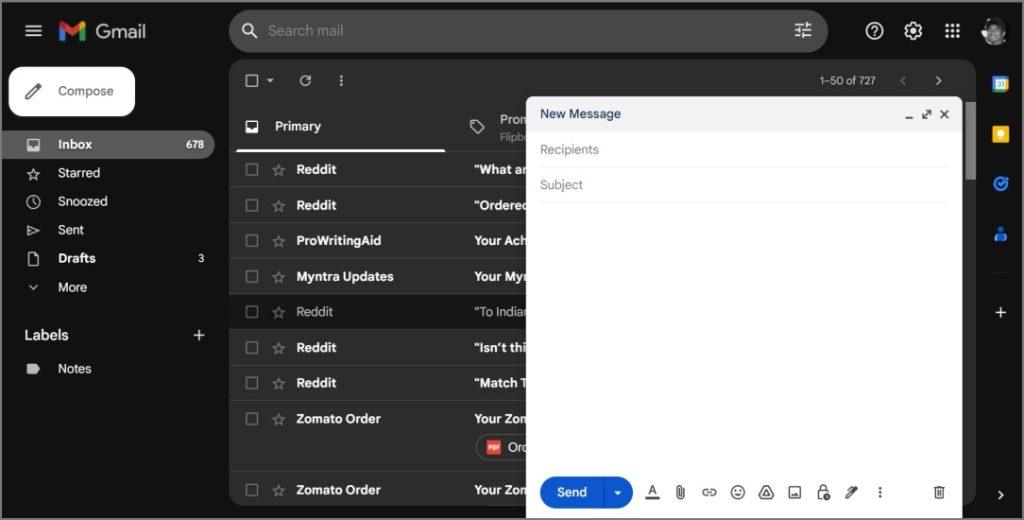
4. From there you can start writing an email. In case, you want to go to fullscreen mode, you can click on the Double Arrow Vector icon.

5. Since you’re new to Gmail, we will explain some of the basic stuff that can help you compose a proficient email.
TIP: Learn the meaning of each icon and symbol in Gmail.
To Field
This is the box where you will enter the email address of the recipient.

Cc and Bcc Field
The Cc (Carbon Copy) and Bcc (Blind Carbon Copy) fields in email allow you to send a copy of the message to other recipients.
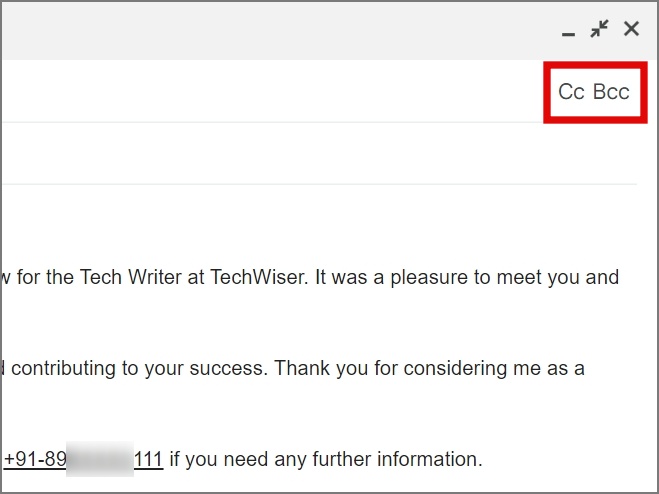
“Cc” recipients can see who else received the message.
“Bcc” recipients are hidden from the other recipients, maintaining their privacy.
Blank Space
This is the area where you compose and style your email.
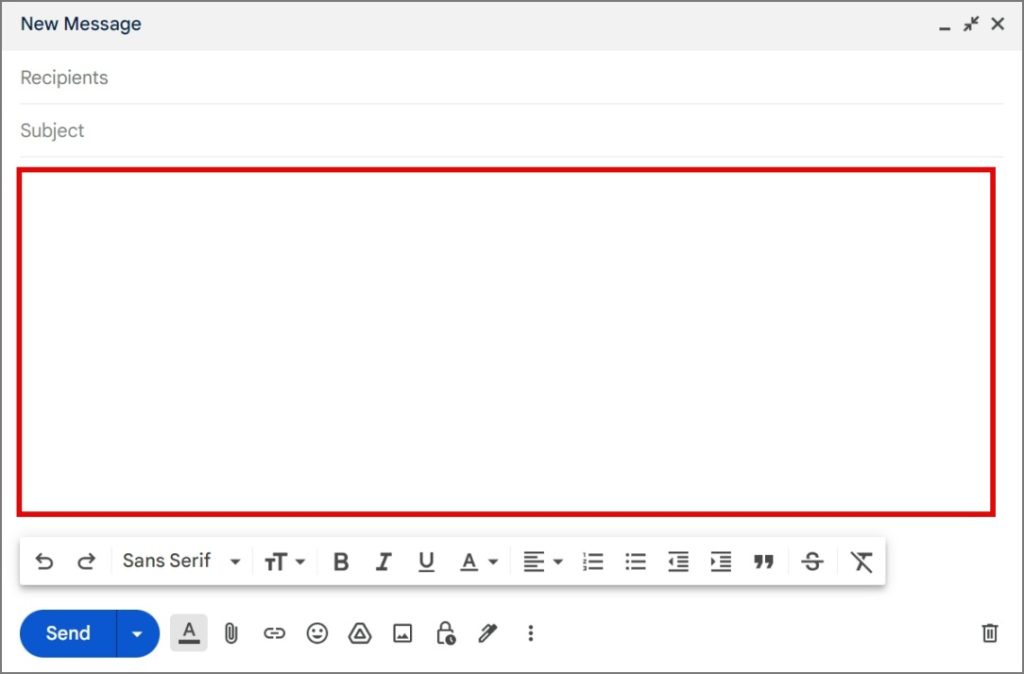
Text Format Bar
If you want to style your text inside the email, you can click the ‘A’ icon which acts as a format button. From there, you can change the font style, increase text size, change text alignment, bold text, and more. To apply any of the formats, simply select the text and click on your preferred format options.

Pencil with Start Icon
If you have access to the ‘Help Me Write’ AI tool, you’ll notice a Pencil with a Star icon next to the ‘A’ icon.

You can use this tool to generate an email using a text prompt, and it will create an email for you in a matter of seconds, although it may need some editing on your part.

We’ve already provided a comprehensive guide on how to access and utilize the ‘Help Me Write’ AI tool; be sure to check it out.

Paperclip Icon
Think of this icon as the Attachment button. You can use it to attach various file types in the email, including images, PDFs, and Docs.

Please be aware that there is a maximum upload size of 25 MB. If the file size exceeds the 25 MB mark, then it will convert the file to a Google Drive link.

NOTE 1: Google Drive attachments size limit 15 GB.
NOTE 2: There is no set upper limit on the number of attachments allowed. We tested this by adding over 65 files, including images, PDFs, and documents. The only thing to be mindful of is not exceeding the 25 MB data limit.
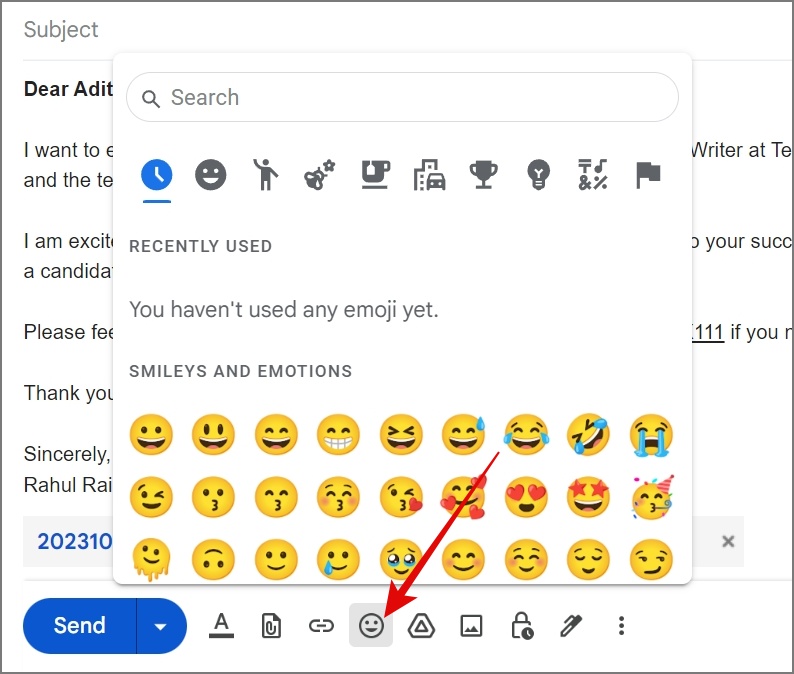
Emojis Button
The smiley icon you’re seeing is the Emoji button. Clicking on it will allow you to select emojis from a wide range of categories. Emojis are added to emails when you are writing in a casual or informal context, such as messages to friends, family, or close acquaintances.
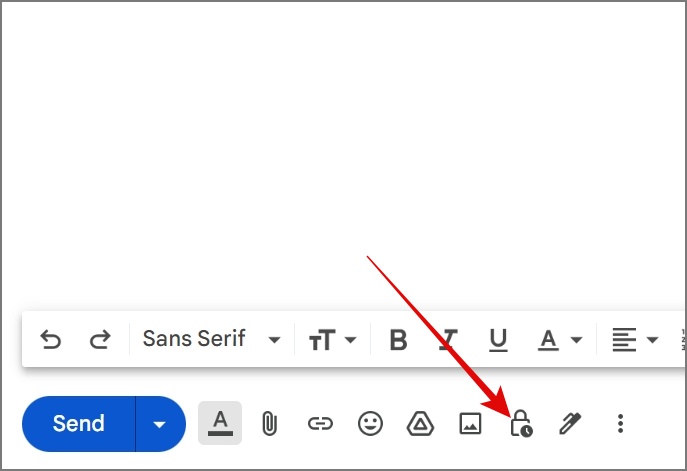
Lock with a Small Clock Icon
Consider this icon as a Confidential Mode button. Clicking it will enable you to add multiple layers of restrictions to your email, such as preventing recipients from forwarding, printing, or downloading the email. You can even set an expiry date for your email, after which the recipient won’t have access to your email once the specified time has passed. We’ll go into more detail about this feature later on.
6. Once you’re finished composing your email, click the Send button to send it.
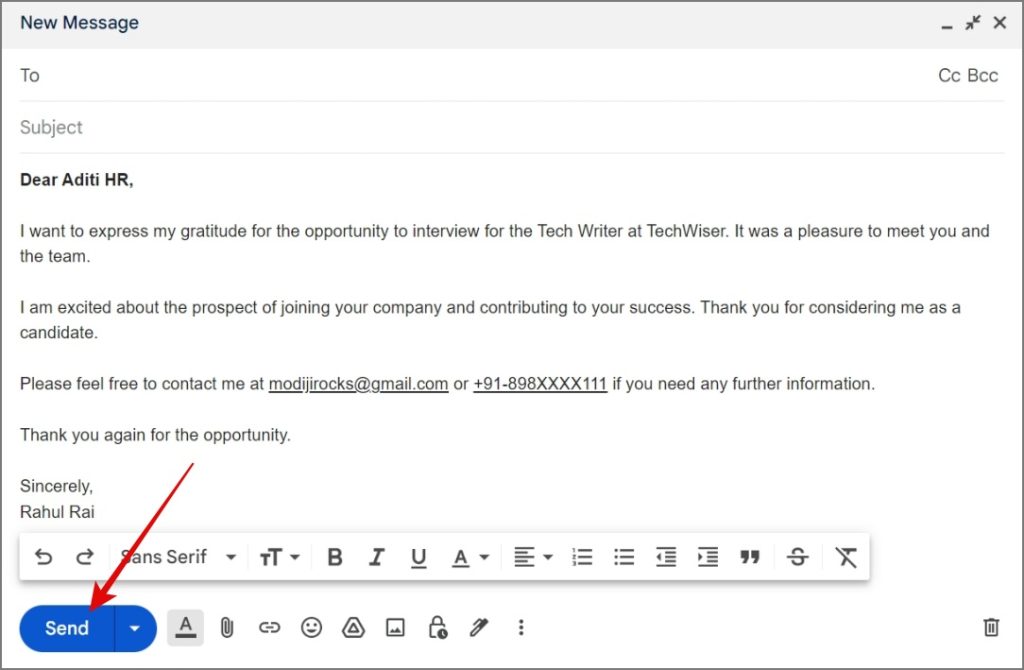
That’s it.
TIP: Learn how to add a signature in Gmail.
From Mobile:
While there isn’t much of a difference between sending emails from a desktop browser or a mobile app, we still want to make no exceptions here given you’re new to Gmail.
Like the web version of Gmail, the mobile app also requires you to tap the Compose button to start writing an email. Furthermore, you’ll have access to features like text formatting, attachments, confidential mode, and more.

When you’ve finished composing your email, simply tap the Send button, which is represented by a paper plane icon located in the top right corner.

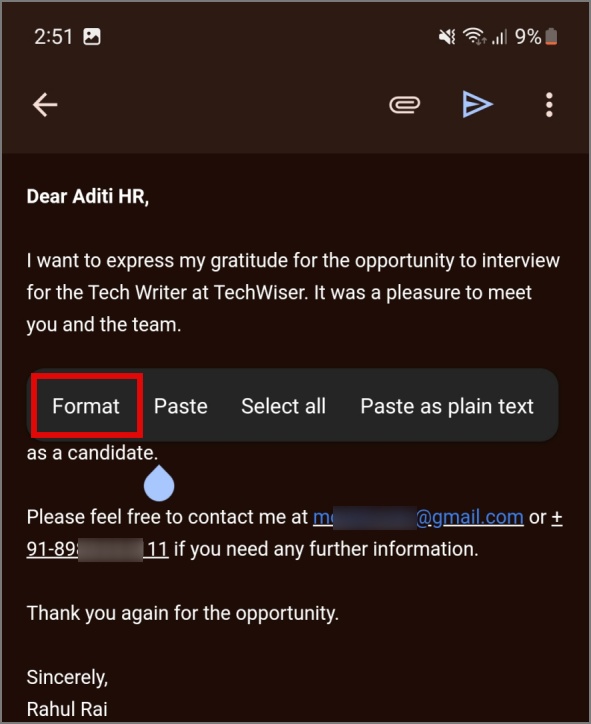
NOTE: If the Text Format toolbar is not visible in your Gmail’s Compose Window, you can press and hold the text field for a few seconds, and a ‘Format’ option will appear. Simply tap on it to enable the text format toolbar.
How to Unsend Email on Gmail
When you send an email from Gmail, you’re granted a brief window of time to undo the action, just in case you made a mistake or forgot to add something. If you click the Undo button before the timer expires, you’ll successfully unsend the email in Gmail. Now, you might be wondering how to do this and whether you can extend the Undo timer. Don’t worry, we’ll address these questions here.
When you send an email on Gmail from a PC, you’ll find the Undo option at the bottom. Click on it, and you’ll be taken back to the email draft.

Likewise, when you send an email from a mobile app, you’ll spot the Undo button at the bottom of your screen. A simple tap on it will undo the email you sent.
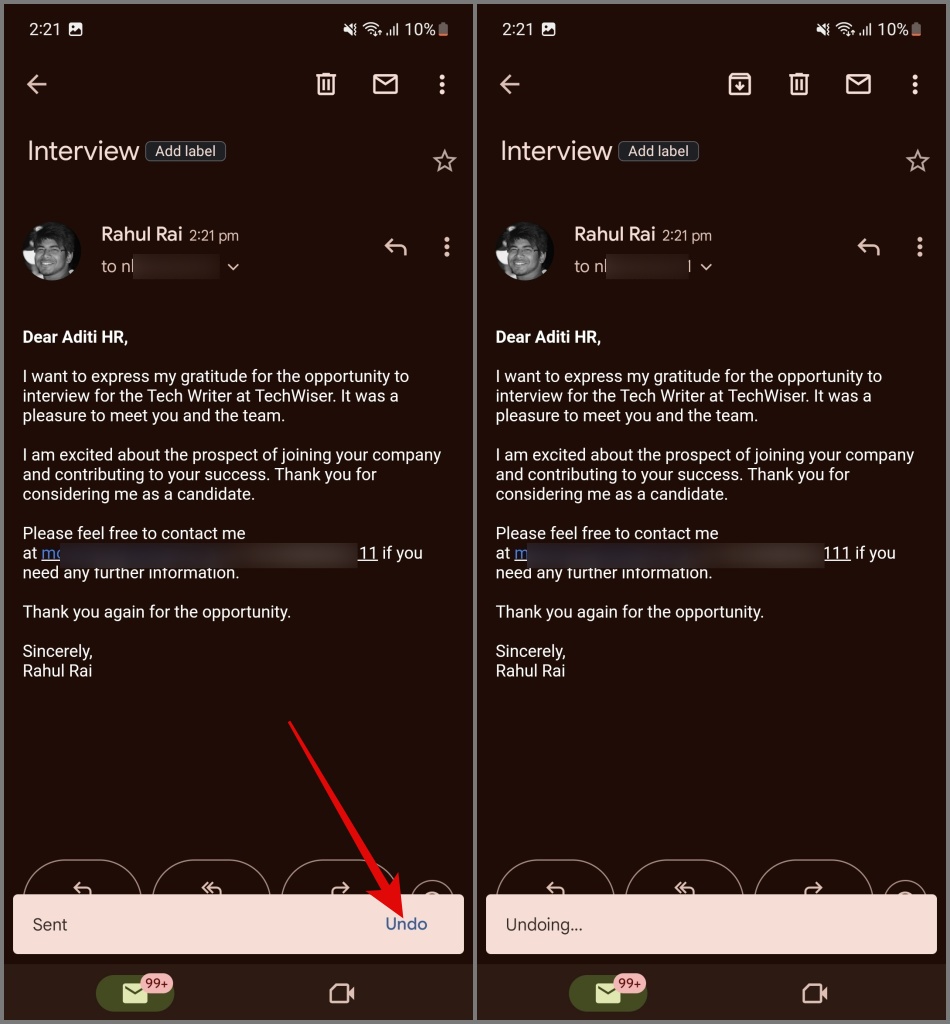
By default, the Undo timer is set to 5 seconds, but you can change it.
1. Open Gmail on your desktop browser, then click on the Settings button (Gear icon) and select See all settings option.

2. Now under the General tab, look for the Undo Send setting. Once found, click on the drop-down menu to select the preferred seconds. The maximum period you can select is 30 seconds.
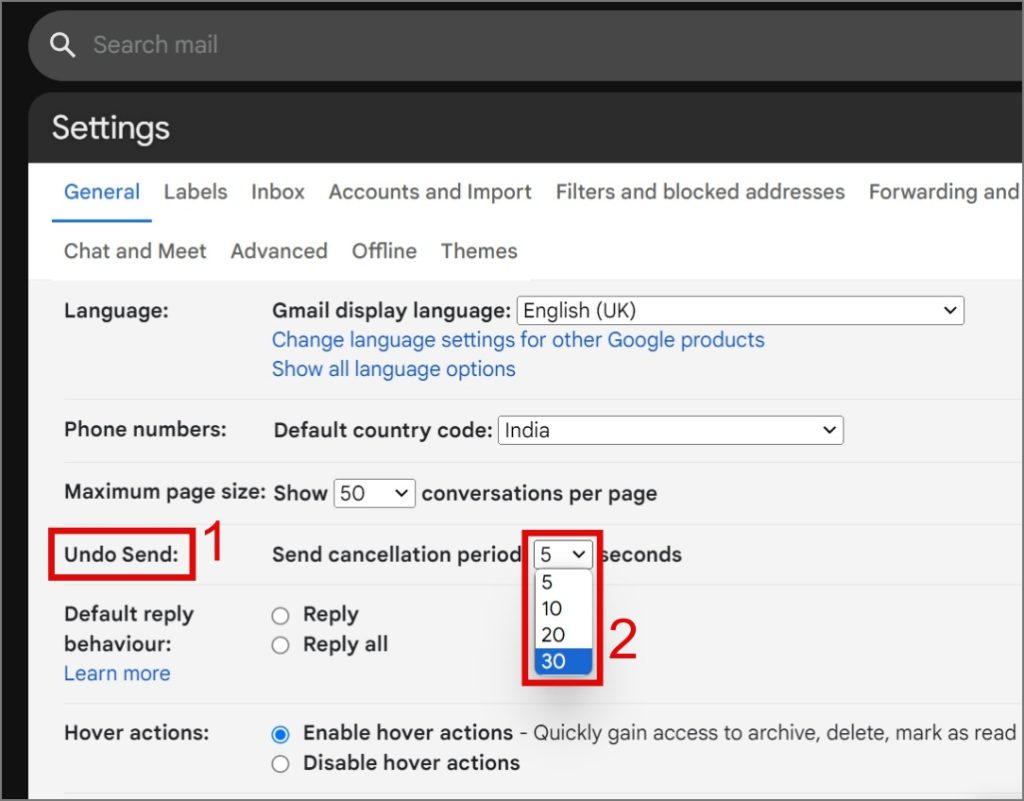
3. Once selected, scroll to the bottom and then click the Save Changes button.

Note: You cannot adjust the Undo Send timer using the Gmail mobile app.
How to Schedule an Email in Gmail
Did you know that you can also schedule your emails in Gmail? This can come in handy when you want to compose messages in advance and have them delivered at a specific date and time. Here’s how to do it:
From Computer:
1. Next to the Send text, you will notice a small triangle icon. Clicking on it will give you an option to Schedule send the email.

2. After selecting the Schedule send option, click on the Select date and time option.
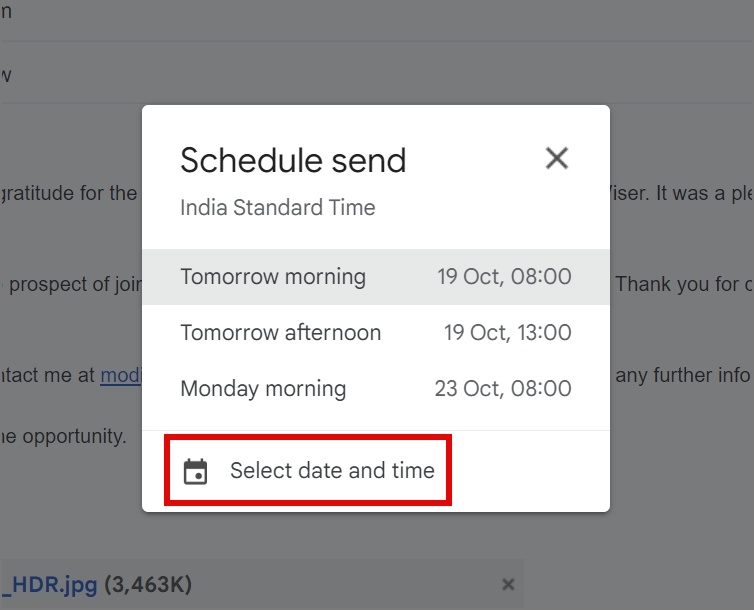
3. From here, choose your preferred date and time and then hit the Schedule send button.

That’s it. You have successfully scheduled an email.
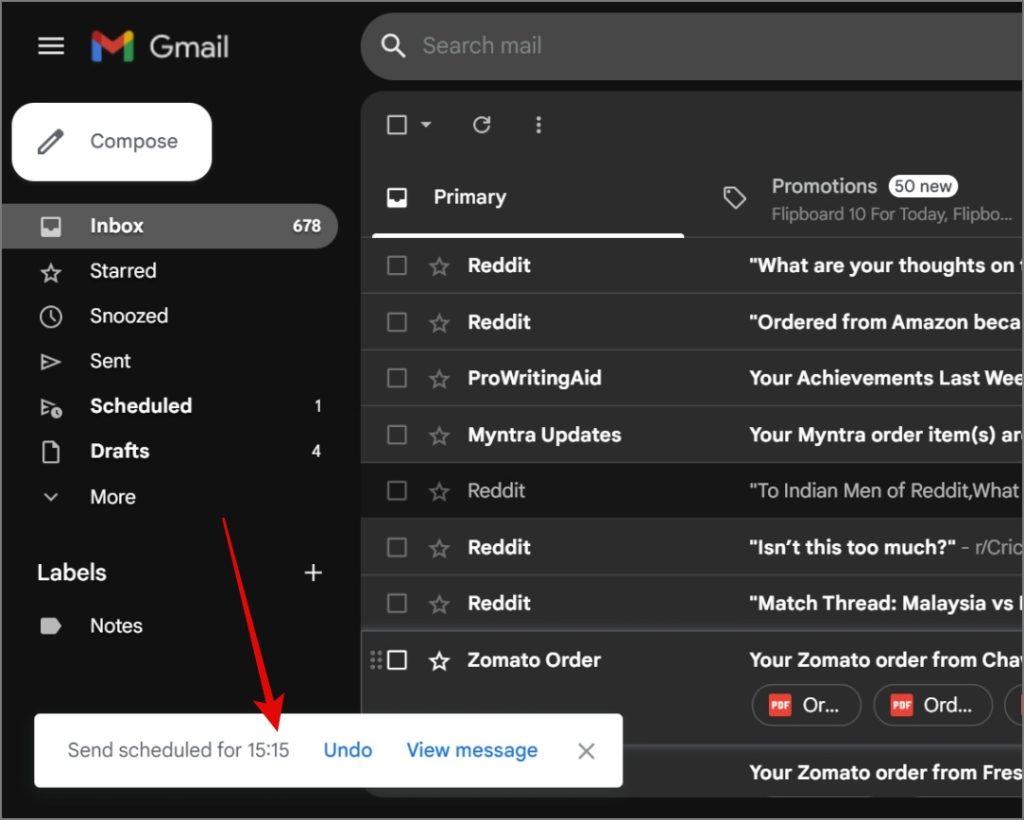
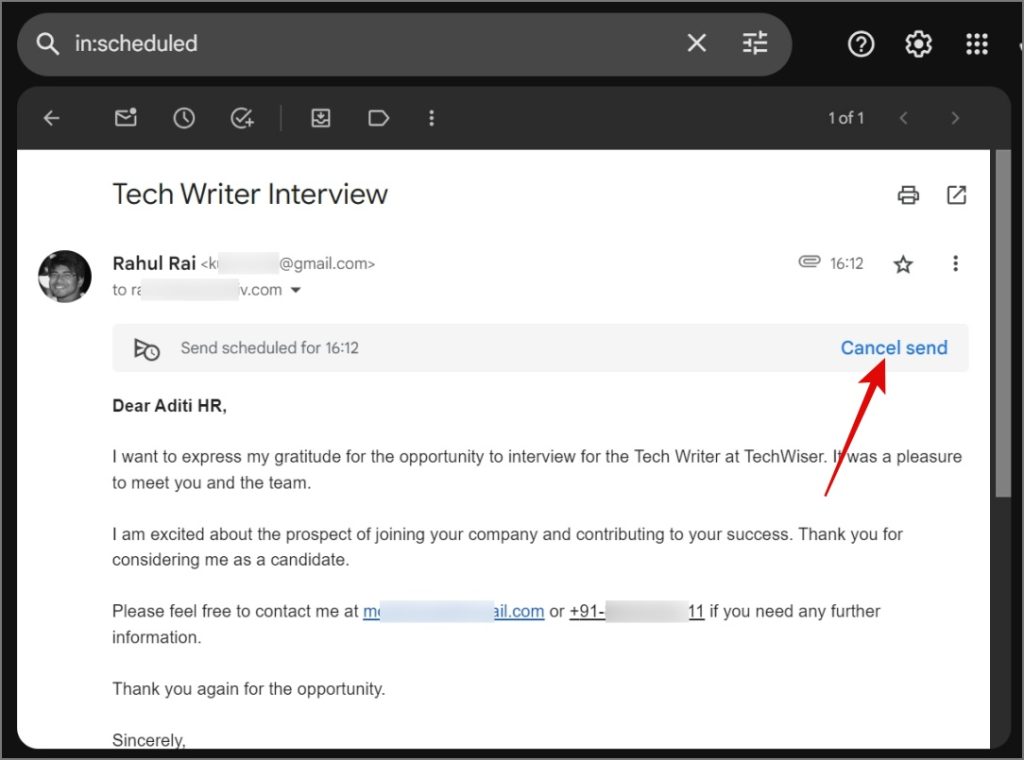
What if you wish to cancel a scheduled email or modify the date and time? To do so, navigate to the Scheduled section, and then open the scheduled email.

Beneath the recipient’s email address, you’ll find the Scheduled label. Here, an option to Cancel Send will appear; click on it, and your scheduled email will be canceled.
From Mobile:
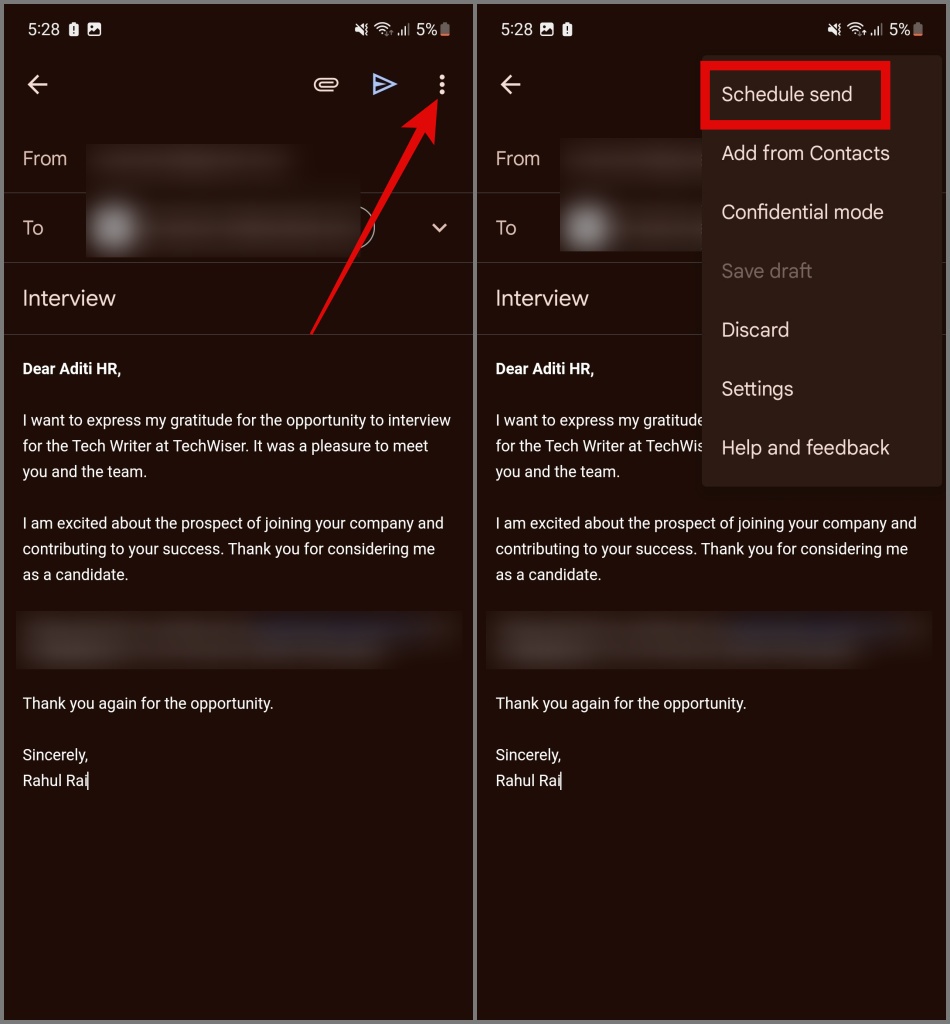
1. In the compose screen, tap on the Kebab Menu (3-dotted icon) in the top right corner and select the Schedule send option.
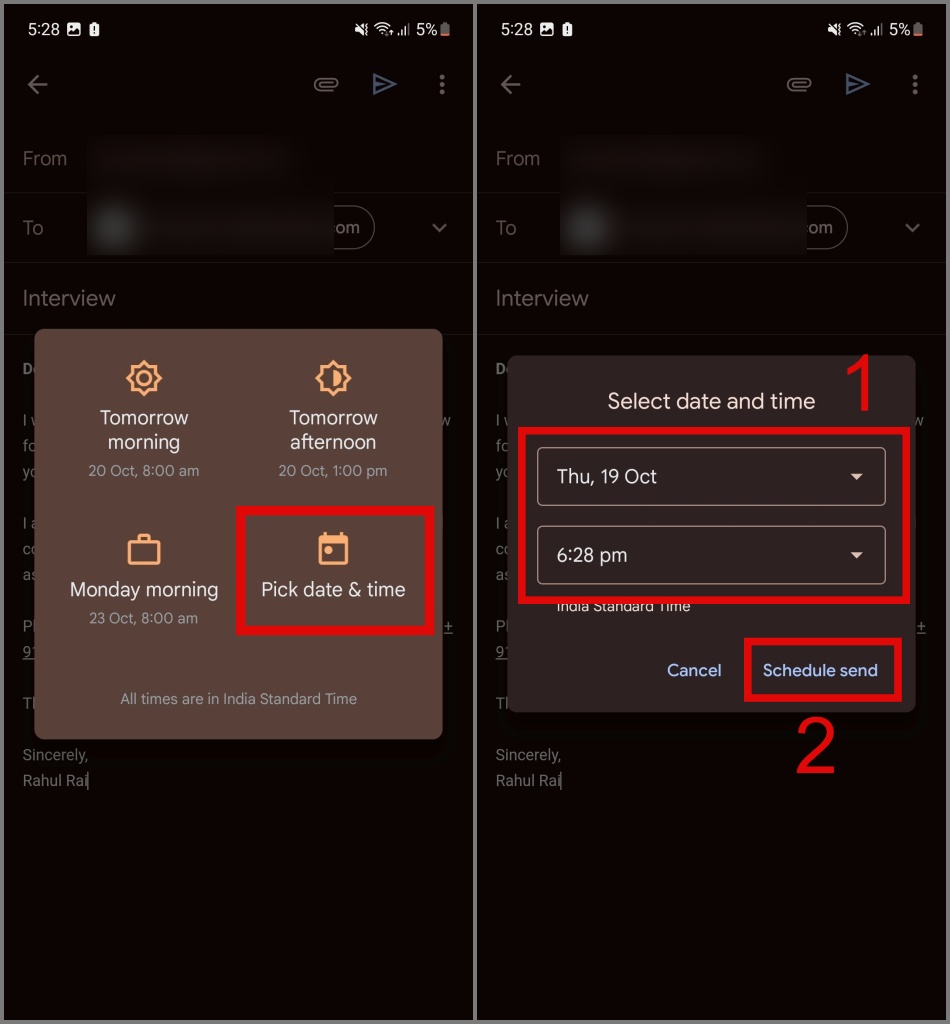
2. Next, select the Pick date & time option and then choose the date and time. Once done, hit the Schedule send button.
That’s all there is to it. Your email is scheduled.

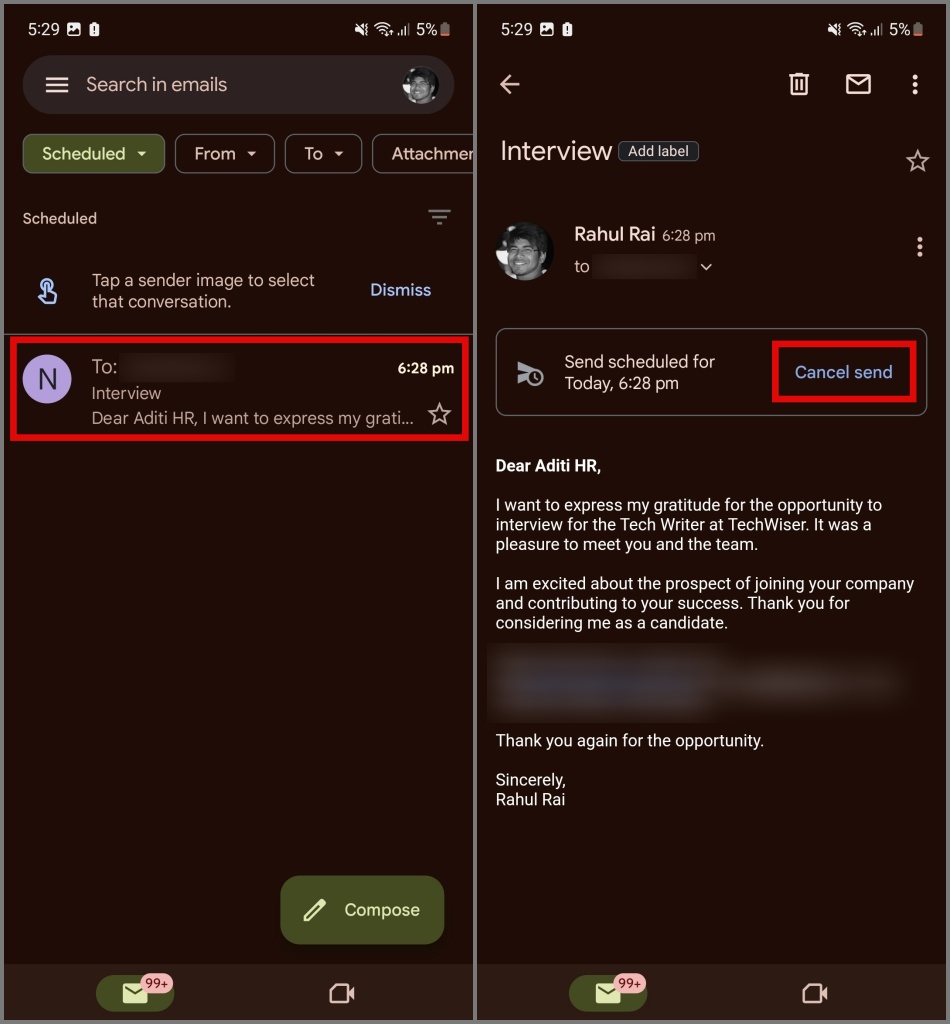
To cancel a scheduled email on your phone, tap the Hamburger Menu (3-bar) in the top left corner, then navigate to the Scheduled section.

Next, open the email and simply tap Cancel send.
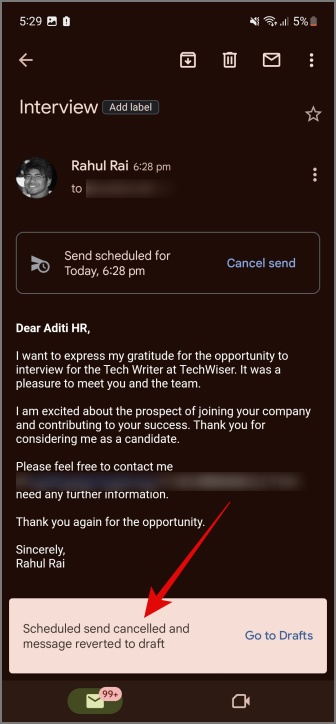
That’s it! Your email will be canceled, and your message will be reverted to a draft. You can then create a new schedule if needed.
How to Send Bulk Email From Gmail
To send email in bulk from Gmail, there are two ways to do that:
1. From Contacts:
One of the easiest ways to send mass emails is from your Gmail contacts. Here’s how:
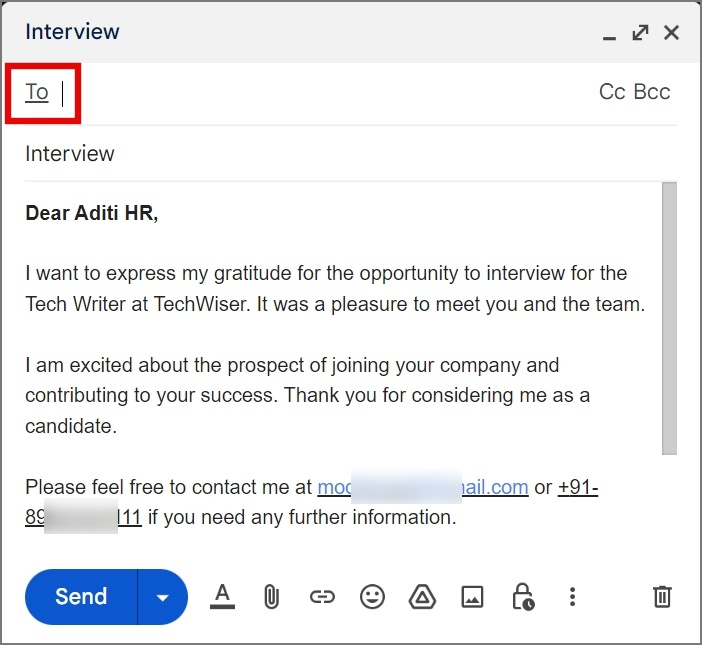
1. All you need to do is click on the To link.
2. Next, check the box next to Select All.

3. If you want to deselect any contact, simply uncheck the box next to the contact. Once done, click the Insert button.

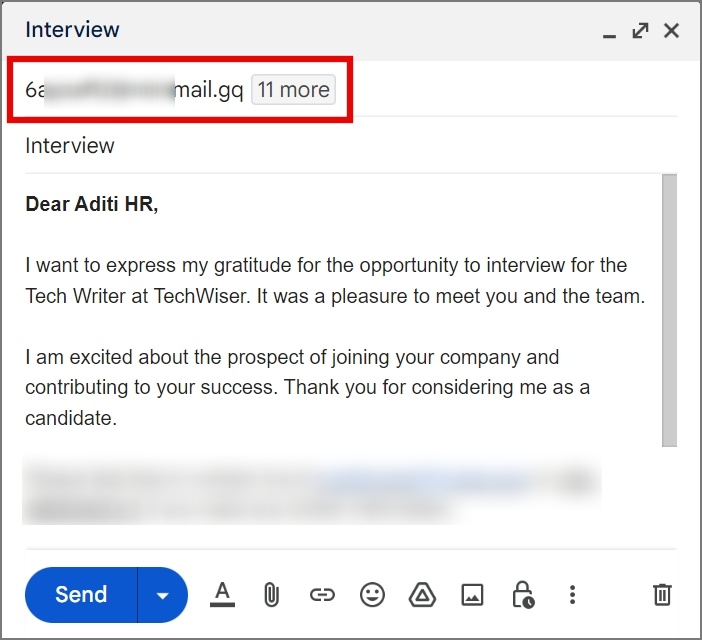
As you can see all the email address from your contacts has been added to your email.
TIP: Learn how to add email to contact list in Gmail.
2. From Worksheet
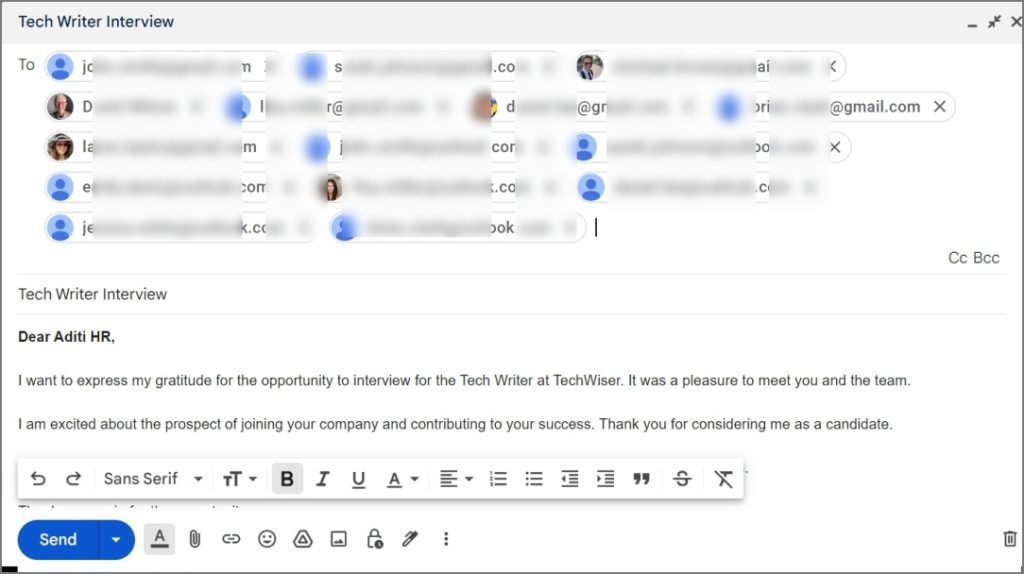
If you’re in college, an organization, or an office, you likely have an Excel or Google Sheet where you store many email addresses. To send a mass email from there, select the email addresses, copy the email IDs, and then paste them into the ‘To’ field.

As you can see it has properly added all the selected email addresses.
NOTE: The process for the mobile app mirrors that of the desktop counterpart.
If you’re wondering how many emails you can send per day or how many recipients per message you can add? In the free Gmail account, you can send 500 emails per day and the maximum number of recipients per message is 500.
On the other hand in the paid Google Workspace account, you can send 2,000 emails per day and the maximum number of recipients per email is 1,500.
TIP: Learn how to find contacts saved in Gmail on iPhone, Android, and PC
How to Send Confidential Email on Gmail
If you want to share some sensitive information with someone on the email, you can use the Confidential mode feature on Gmail. It allows you to set an expiry date, add password security, and disable forwarding or replying. If you ever have such a need in the future, you can learn how to use these features:
NOTE: Enabling confidential mode will prevent your scheduled email from functioning.
1. In the compose page, simply click on the Lock button and a Confidential Mode window will appear.

2. From there, you can set your expiry date and select passcode authentication on the email.
3. Once set, you can click on the Save button.

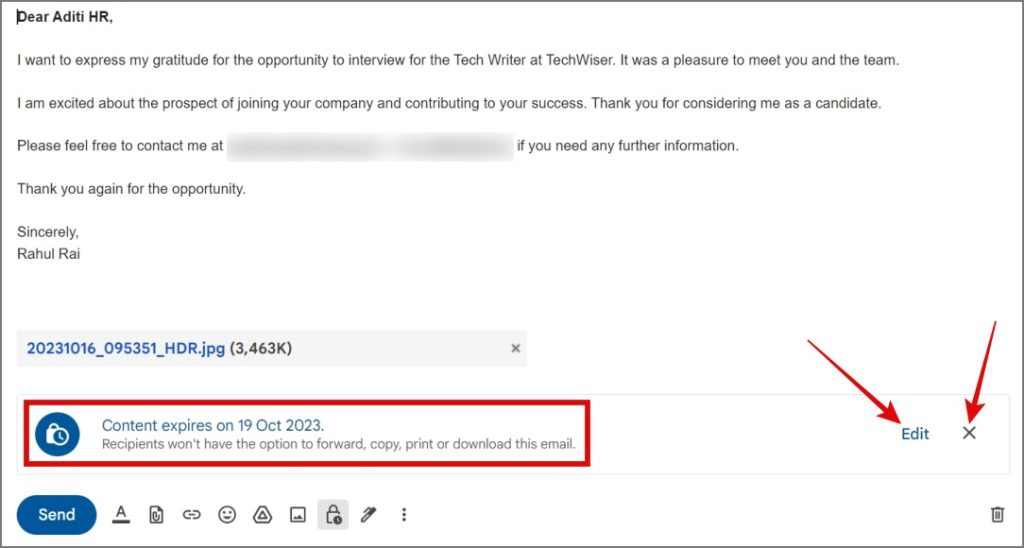
That’s all! The Content Expires message will be displayed right above the toolbar.
If you wish to modify or remove the confidential mode, you can click on the Edit or Cross (X icon) respectively.
TIP: Learn how to enable 2-factor authentication on Gmail.
On the other hand, if you want to create a secure email from your Gmail app, you can follow the below instructions:
1. Tap on the Kebab Menu (3-dotted icon) and then select the Confidential mode option.
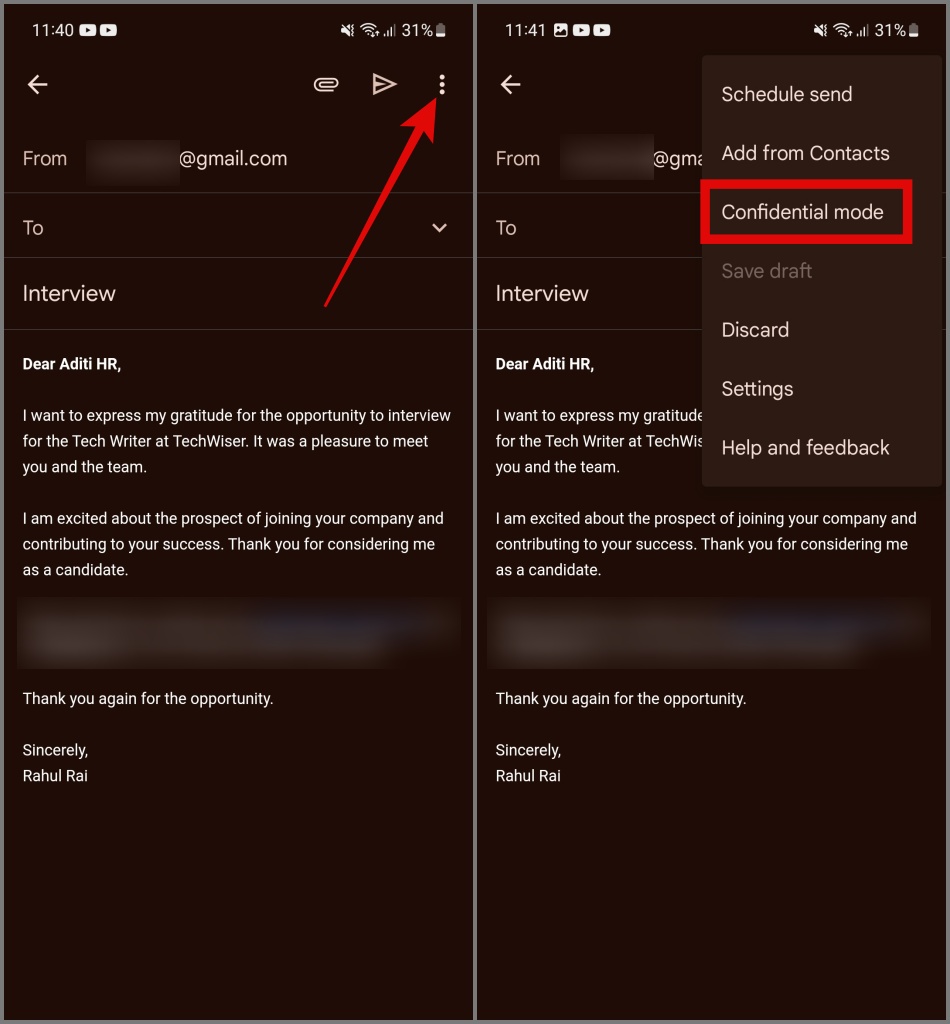
2. Now set the expiry date and passcode and then tap Save.
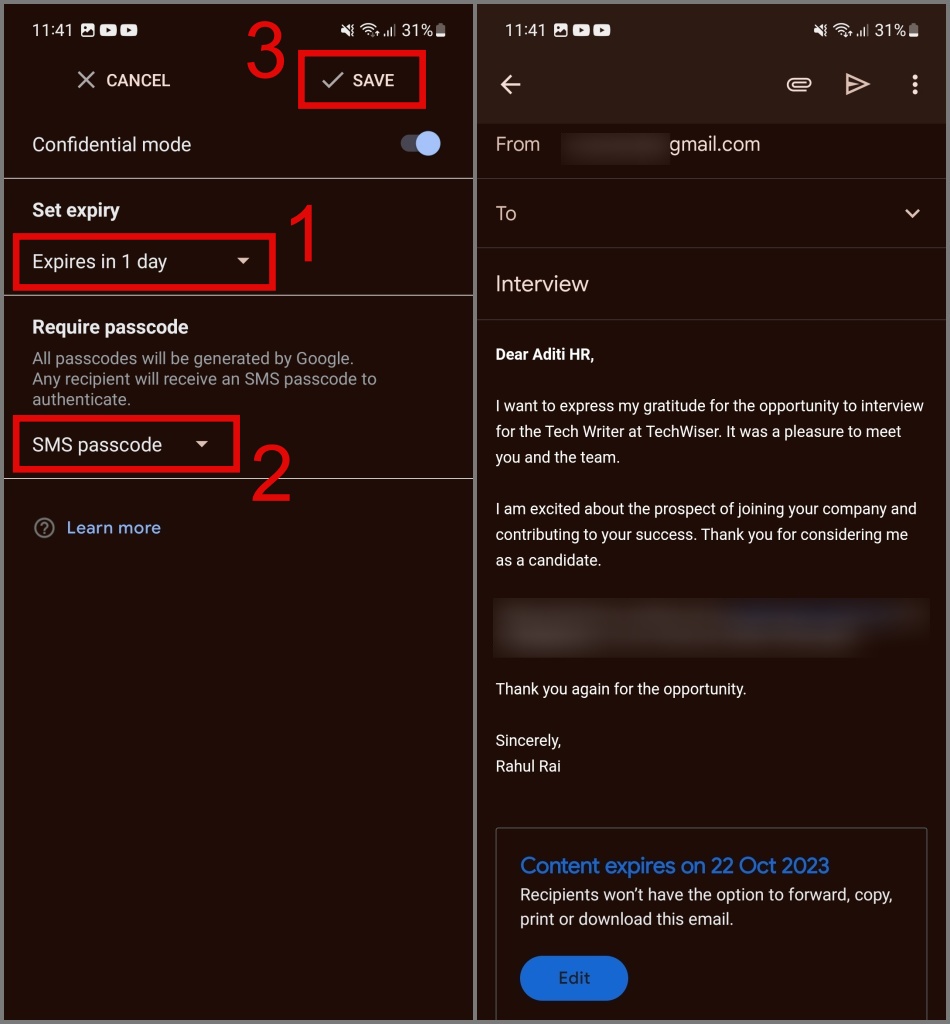
If you wish to disable confidential mode, you can repeat the 1st step and toggle off the Confidential mode setting.

How to Perform a Spell Check on an Email (PC)
Before sending an email, if you want to cross-check for any spelling mistakes, you can use Gmail’s built-in spelling checker tool. To do so, click on the Kebab Menu (3-dotted icon) and select the Check spelling option.
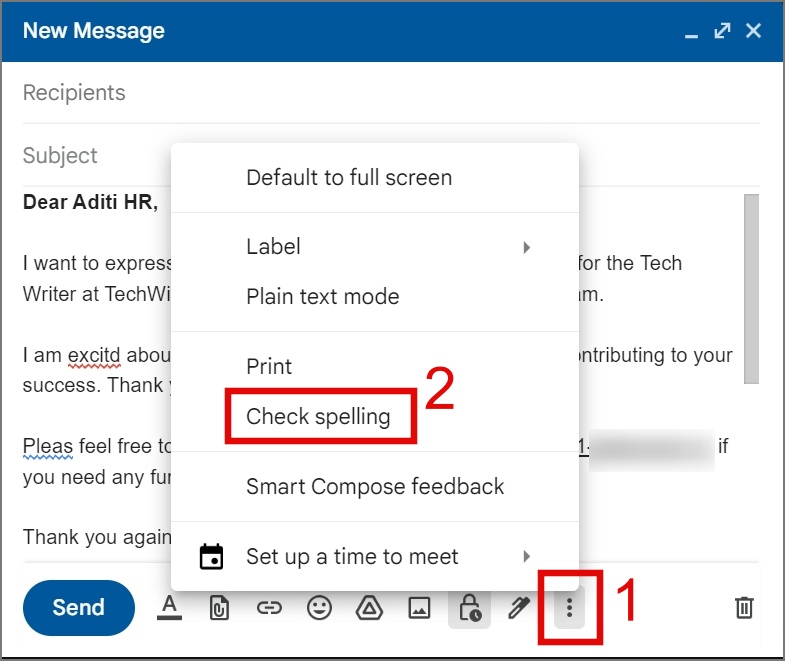
Afterward, click on the highlighted text and it will suggest the correct spelling. If you believe the word is correctly spelled, you can simply select the Ignore option.

FAQs
1. How to send an anonymous email with Gmail?
While there is no foolproof method for sending an email completely anonymously, you can significantly enhance your privacy by employing temporary or disposable email addresses, utilizing a VPN, removing personal information from your Gmail account, and using secure web browsers.
TIP: Learn how to know where your Gmail account is logged in.
2. Why couldn’t my email be delivered?
If your email fails to deliver, it could be due to various reasons: you might have entered the wrong email address, there could be an issue with the recipient’s email server, or problems might have occurred during the scheduled email process. You may attempt to resend the email after some time.
3. I accidentally closed Gmail’s compose page. Where can I retrieve my draft?
You can locate your draft in the Drafts section.
Ultimate Gmail Guide for Beginners
At first, you might find Gmail challenging to use, but trust us, it’s as easy as scrolling through Instagram Reels or TikTok videos. In this guide, we’ve tried to cover as many basic features as possible, which we believe you will likely use in your day-to-day life. We hope that by the end of this article, you will become a pro at sending emails from Gmail.
If you think that Gmail is not suitable for your needs, you can find out how to permanently delete your Gmail account.