
 Published: October 9, 2026

These are endgame weapons, but finding Firstlight weapon schematics in Slayers 2 can be a challenge. Some are hidden in underwater caves, while others require defeating powerful enemies or completing lengthy NPC quests. Here's how to find all seven Firstlight weapon schematics, craft them, and add them to your collection.
All Firstlight Weapon Schematic Locations
| Firstlight Weapon | Location | How to Get the Schematic |
|---|---|---|
| Firstlight Insect Katana | Mistfall Harbor | Explore the hidden cave beneath the tree bridge |
| Firstlight Sound Cleavers | Iceveil Valley | Defeat Duelist Hibiki |
| Firstlight Katana | Iceveil Valley | Navigate the underwater maze |
| Firstlight Spear | Iceveil Valley | Explore another section of the underwater maze |
| Firstlight War Fans | Iceveil Settlement | Complete the supply quest and dig up the schematic |
| Firstlight Tanto | Iceveil Valley | Follow Old Trapper Retsu's questline |
| Firstlight Bladed Wagasa | Windy Peak | Complete the boulder challenge and speak to Wagasa Maker Genzo |
How to Find All Firstlight Weapon Schematics
Each Firstlight weapon has its own location or unlock requirements. Follow the steps below to avoid unnecessary backtracking while exploring Slayers 2.
1. Firstlight Insect Katana
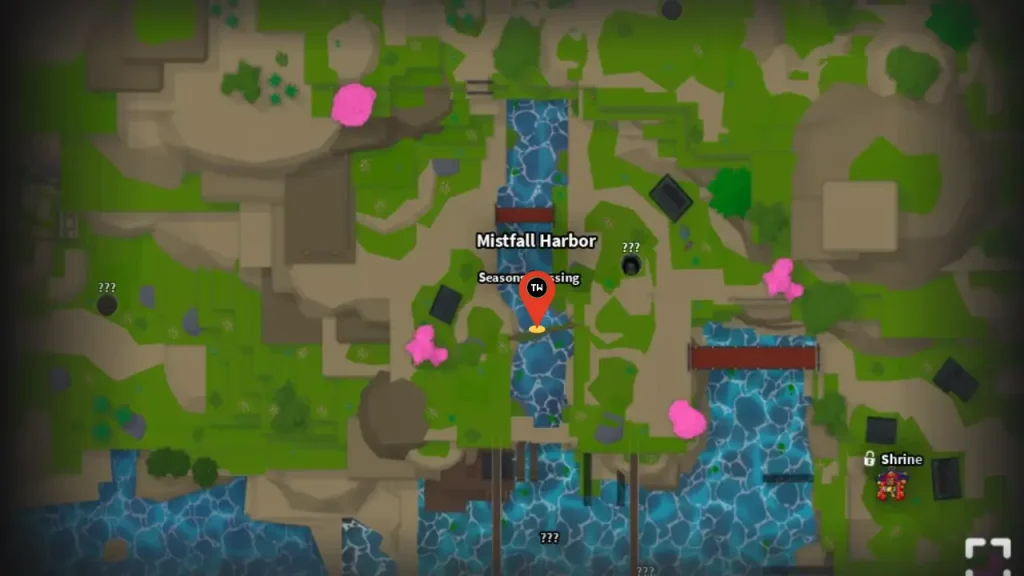
The Firstlight Insect Katana is hidden in an underwater cave near the Insect Boss spawn point at Mistfall Harbor.
- Travel to Mistfall Harbor and head toward the Insect Boss spawn location.
- Find the large tree trunk that forms a bridge over the lake.
- Jump into the water beneath the tree trunk and dive underwater.
- Look for a small hole leading into a hidden cave.
- Enter the cave and follow the passage until you find the Firstlight Insect Katana schematic encased in ice.
2. Firstlight Sound Cleavers

To get the Firstlight Sound Cleavers, you must find and defeat Duelist Hibiki inside the snowy caves of Iceveil Valley.
- Travel to Iceveil Valley and locate the cave where the Reaper Trainer Kuzan mini-boss spawns.
- From the mini-boss spawn point, head behind the area and follow the path on the left.
- Continue straight until the path splits, then take the left route.
- Take the next left, followed by a right turn and another left.
- Look for a parkour section on your right and carefully cross it. Avoid the spikes because falling will kill you.
- After completing the parkour, turn right, take the next left, and then turn right again.
- Continue straight until you find Duelist Hibiki.
- Talk to him to start the fight and defeat him to receive the Firstlight Sound Cleavers schematic.
Tip: The snowy area can damage your health over time, so bring an Emberheart Lantern to make the journey easier.
Also Read:
- Slayers 2 – All Trainer and NPC Locations
- Slayers 2 – All Bosses, Their Locations, and Drops
- Slayers 2 – All Black Marketer Spawn Locations and Timings
- Slayers 2 Weapon Refinement – How to Farm and Refine Ores
- All Muzan Spawn Locations in Slayers 2
- Slayers 2 – All Secret Slayer and Demon Weapons Locations
3. Firstlight Katana

The Firstlight Katana is hidden in the underwater maze at Iceveil Valley. You can also collect the Firstlight Spear during the same trip.
- Travel to Iceveil Valley and head toward the Wind Trainer's platform.
- Jump into the water beneath the platform and dive down until you find a statue.
- Swim behind the statue and look for an opening that leads into the underwater maze.
- From the drop point, go straight and take the first left.
- Continue forward and take the next left.
- Keep going straight and take the first right.
- When you reach a brown rock, turn left.
- Continue straight to find the Firstlight Katana schematic.
4. Firstlight Spear

The Firstlight Spear is located in the same underwater maze as the Firstlight Katana. Therefore, grab both schematics before leaving the cave.
- Enter the underwater maze in Iceveil Valley using the same entrance described in the Firstlight Katana section.
- From the drop point, go straight and take the first left.
- Continue forward until you reach a brown rock.
- Turn right at the rock.
- Keep going straight to find the Firstlight Spear schematic.
Once you collect both schematics, you won't need to return to this underwater maze just to grab the other weapon.
5. Firstlight War Fans
The Firstlight War Fans require a lengthy questline involving several NPCs. You'll also need a shovel to dig up the schematic at Iceveil Settlement.
Requirements: Level 100 or higher, nine Cooked Bear Meat, 25 Health Elixirs, and a shovel.
Step 1: Prepare the supplies
- Travel to the Bamboo Grove area and defeat Bear Cubs and Mama Bear to collect Raw Meat.
- Find Lucy at Windy Peak and bring her the meat to cook it.
- Repeat the process until you have nine Cooked Bear Meat. Speak to Tom near the Mother Bear spawn if needed to progress the cooking quest.
- Head to the docks at Mistfall Harbor and visit Alchemist Meku.
- Obtain 25 Health Elixirs. Buying them requires 50 Demon Horns and 8,750 Wen.
Step 2: Complete Iceveil Guard Shiro's quest
- Travel to Iceveil Settlement in Iceveil Valley.
- Speak to Iceveil Guard Shiro and accept his supply quest.
- Find the cart behind Shiro.
- Place all nine Cooked Bear Meat and 25 Health Elixirs into the cart.
- Complete the dialogue to unlock access to Iceveil Settlement.
Step 3: Buy a shovel
- Visit the shop in Iceveil Settlement.
- Speak to Winter Store Rep Lynx, who stands behind the counter.
- Buy the shovel from the table beside the NPC for 1,000 Wen.
Keep the shovel in your inventory because you'll need it to dig up the schematic later.
Step 4: Speak to Shiori at Butterfly Estate
- Travel to Butterfly Estate.
- Find Shiori near the largest house in the area.
- Speak to her and complete at least one of her quests if you haven't already done so.
Step 5: Complete Dockmaster Sofen's quests
- Travel to the docks at Mistfall Harbor.
- Find Dockmaster Sofen near the shop where you can obtain elixirs.
- Complete all his available quests.
- Speak to him again after finishing them to continue the story.
- Return to Iceveil Valley once his dialogue points you toward the next NPC.
Step 6: Visit Old Trapper Retsu
- Find Old Trapper Retsu sitting near the torii gate at the main entrance to Iceveil Valley.
- Speak to him and choose the dialogue option about the lantern on your belt.
- Complete the dialogue and any requested payment to unlock the next part of the questline.
Step 7: Return to Winter Store Rep Lynx
- Head back to the shop at Iceveil Settlement.
- Speak to Lynx again and go through the remaining dialogue.
- Listen to her clue about the hidden Firstlight War Fans schematic.
Step 8: Dig up the schematic
- Travel to the upper part of Iceveil Settlement, near the houses.
- Look for a prominent pile of snow.
- Equip or carry your shovel and dig through the snow pile.
- Collect the Firstlight War Fans schematic from the hidden area.
6. Firstlight Tanto
The Firstlight Tanto schematic is tied to Old Trapper Retsu and a hidden lantern trail inside the Iceveil Valley caves. You'll need a shovel and must remove your currently equipped lantern before starting the quest.
- Travel to Iceveil Valley and find Old Trapper Retsu near the torii gate at the main entrance.
- Unequip your current lantern.
- Speak to Retsu and select the dialogue option about the lantern on his belt.
- Pay him 2,500 Wen to receive the directions.
- Head to the cave where the Reaper Trainer Kuzan mini-boss spawns.
- Find the glowing blue mushrooms scattered across the cave floor.
- Step on each mushroom until the Mushroom Lit Lantern appears nearby.
- Pick up the lantern and equip it.
- Leave the cave briefly and recover your health at a nearby campfire if needed.
- Return to the cave and look for the blue footprints on the ground.
- Follow the footprints until you reach a pile of snow.
- Use your shovel to dig through the snow and open the hidden chest.
- Collect the Firstlight Tanto schematic along with the other loot.
7. Firstlight Bladed Wagasa
The Firstlight Bladed Wagasa requires you to prepare two items before you can obtain its schematic: the Firstlight Mask and a Damascus Bladed Wagasa. You'll then need to complete a boulder challenge to make Wagasa Maker Genzo appear.
Step 1: Obtain the Firstlight Mask
- Travel to Hidden Mist Village and head toward the Tai Chi Trainer Suzume mini-boss location.
- Move behind the mini-boss spawn point.
- Climb the rock formation with a tower-like structure.
- Look for an opening in the ground and jump inside.
- Collect the Firstlight Mask schematic from the hidden area.
- Visit Blacksmith Togane and craft the Firstlight Mask.
- Equip the mask before moving to the next step.
Step 2: Get the Damascus Bladed Wagasa
- Obtain the regular Bladed Wagasa, which drops from Fujiko.
- Upgrade it to the Damascus Bladed Wagasa.
- Make sure you have the upgraded weapon before approaching Genzo, as he won't give you the schematic without it.
Step 3: Complete the boulder challenge
- Travel to Windy Peak and find the Boulder Push minigame area.
- Start the challenge and push the boulder along the route indicated by the white arrows.
- Continue following the arrows until you reach the correct destination.
- With the Firstlight Mask equipped, complete the challenge to make Wagasa Maker Genzo appear near the base of a tree to your left.
- Speak to Genzo while you have the Damascus Bladed Wagasa in your inventory.
- He'll give you the Firstlight Bladed Wagasa schematic once you meet the requirements.
Also Read:
- Slayers 2 – Wind Breathing Style Location and Requirements Guide
- Slayers 2 – Flame Breathing Style Location and Requirements Guide
- Slayers 2 – Serpent Breathing Style Location and Requirements Guide
- Slayers 2 - Insect Breathing Style Location and Requirements Guide
- Slayers 2 - Stone Breathing Style Location and Requirements Guide
- Slayers 2 – Sound Breathing Style Location and Requirements Guide
How to Craft Firstlight Weapons in Slayers 2
After collecting a Firstlight weapon schematic, head to Blacksmith Togane in Hidden Mist Village to craft the corresponding weapon.
Before visiting the blacksmith, make sure you have the required materials and the appropriate base weapon for the recipe. The Firstlight Bladed Wagasa also requires the Damascus Bladed Wagasa as part of its unlock conditions, so prepare that in advance.
All Firstlight Weapons Stats in Slayers 2
All seven Firstlight weapons are Mythic rarity, but their stats vary depending on their damage output, blocking ability, and additional bonuses. Here's a complete comparison of their stats in Slayers 2.
| Firstlight Weapon | Additional DMG | DMG Factor | Max Stamina | Block Points | Block Regen | Additional Bonuses |
|---|---|---|---|---|---|---|
| Firstlight Katana | +4 | 1.15x | +5 | +6.9 | 2.66x | — |
| Firstlight Insect Katana | +4 | 1.15x | +5 | +3.95 | 2.13x | 1.12x Movement Speed; 1.1x Stamina Regen |
| Firstlight Sound Cleavers | +4 | 1.15x | +5 | +6.9 | 2.7x | — |
| Firstlight Spear | +4 | 1.148x | +5 | +8.8 | 2.93x | — |
| Firstlight Tanto | +4 | 1.148x | +5 | +9 | 2.96x | — |
| Firstlight War Fans | +4 | 1.148x | +5 | +9.15 | 2.98x | — |
| Firstlight Bladed Wagasa | +4 | 1.148x | +5 | +7.95 | 2.8x | Sun Immunity |
How to Get Firstlight Weapons:
Collect the required schematic and gather the necessary materials, then craft the weapon at Ouwland using its corresponding Mythic base weapon. The Firstlight Bladed Wagasa also grants Sun Immunity, while the Firstlight Insect Katana provides movement speed and stamina regeneration bonuses. Next, we would recommend you get all the Nightfall weapon schematics to continue leveling up in the game.
Finding all seven Firstlight weapon schematics takes plenty of exploring, a few tough fights, and more than a couple of errands for NPCs. However, once you know where to look, you can spend less time wandering around and more time building your endgame arsenal. Check out our Slayers 2 codes guide for free rewards and our Slayers 2 wiki for more guides, tips, and useful information.


